Picklist Management
Contents: This guide will provide information regarding picklists, what they are, when to use them, and how to set them up in your menu.
Picklist Overview
Picklists are used to further modify Menu items. You can find additional information regarding picklists in the sections below:
Types of Picklists
There are three types of Picklists:
- Upsell
- Used to advertise additional charges and upsells (e.g., Add extra meat for $1)
Example:
Customer orders at the register:
- Customer: I would like to order a Hamburger to go.
- Restaurant makes a suggestion to add on to the sale
- Restaurant: Would you like to add a drink or side item?
- Customer: Yes, I would like a Medium Soft Drink.
- Restaurant: I will be happy to add that to your order.
- Combo
- Used to list additional features that are included, but that the customer has a choice for (e.g., Your selection includes a side. Please choose from the below options)
Example:
Customer orders from the Drive-Thru:
- Customer: I would like a chicken sandwich and french fries.
- Restaurant makes a suggestion to make it a combo meal
- Restaurant: We have a Combo meal, which offers the chicken sandwich, fries and a medium drink for only $.50 more.
- Customer: Yes, that sounds like a good deal. I will take the Combo.
- Modifier
- Used to show variations of an item (e.g., Cheese options for a sandwich)
Example:
Customer orders at the register:
- Customer: I would like a large Pizza.
- Restaurant asks what options the customer would like
- Restaurant: Would you like hand-tossed or thin crust?
- Customer: Hand-tossed
- Restaurant: What toppings would you like?
- Customer: Peperoni, Mushrooms and Black Olives.
- Restaurant: I will be happy to add that to your order.
Note
The Ingredients Picklist type should only be used in the nutritional calculator. Anything that is assigned to this Picklist type will not show up on the front end for ordering
Create/Edit a Picklist
Create a New Picklist
Click the
 icon next to the category, sub-category or item that you wish to create a new picklist for
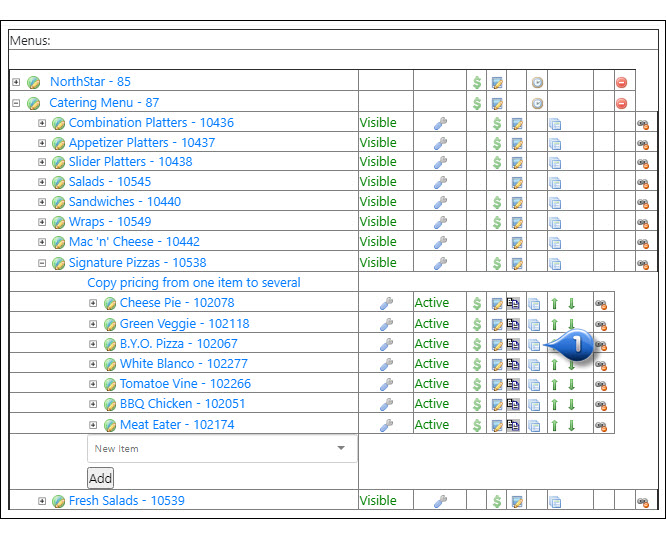
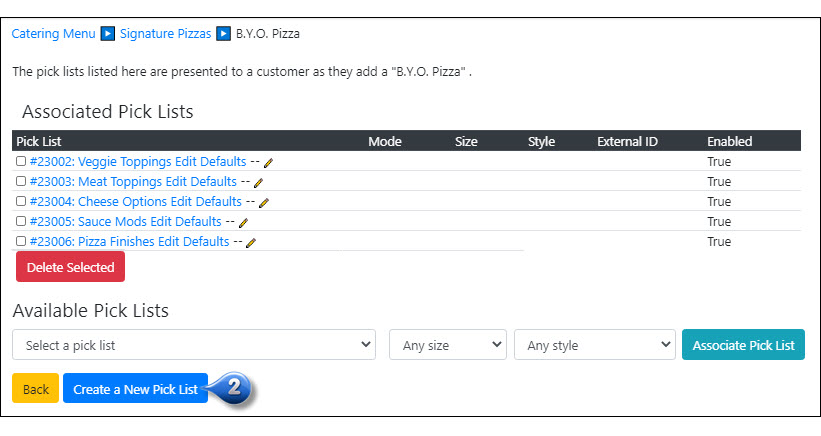
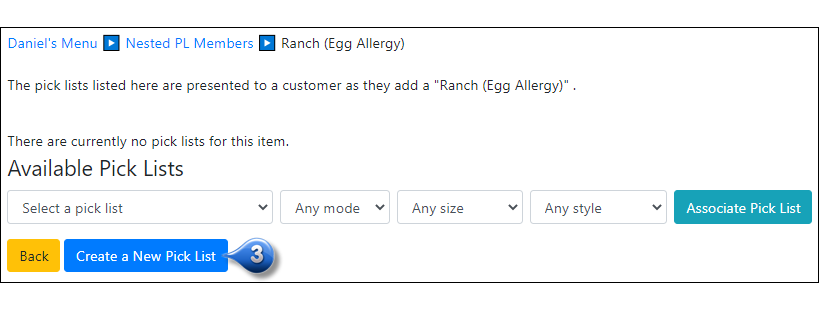
Click Create a New Picklist
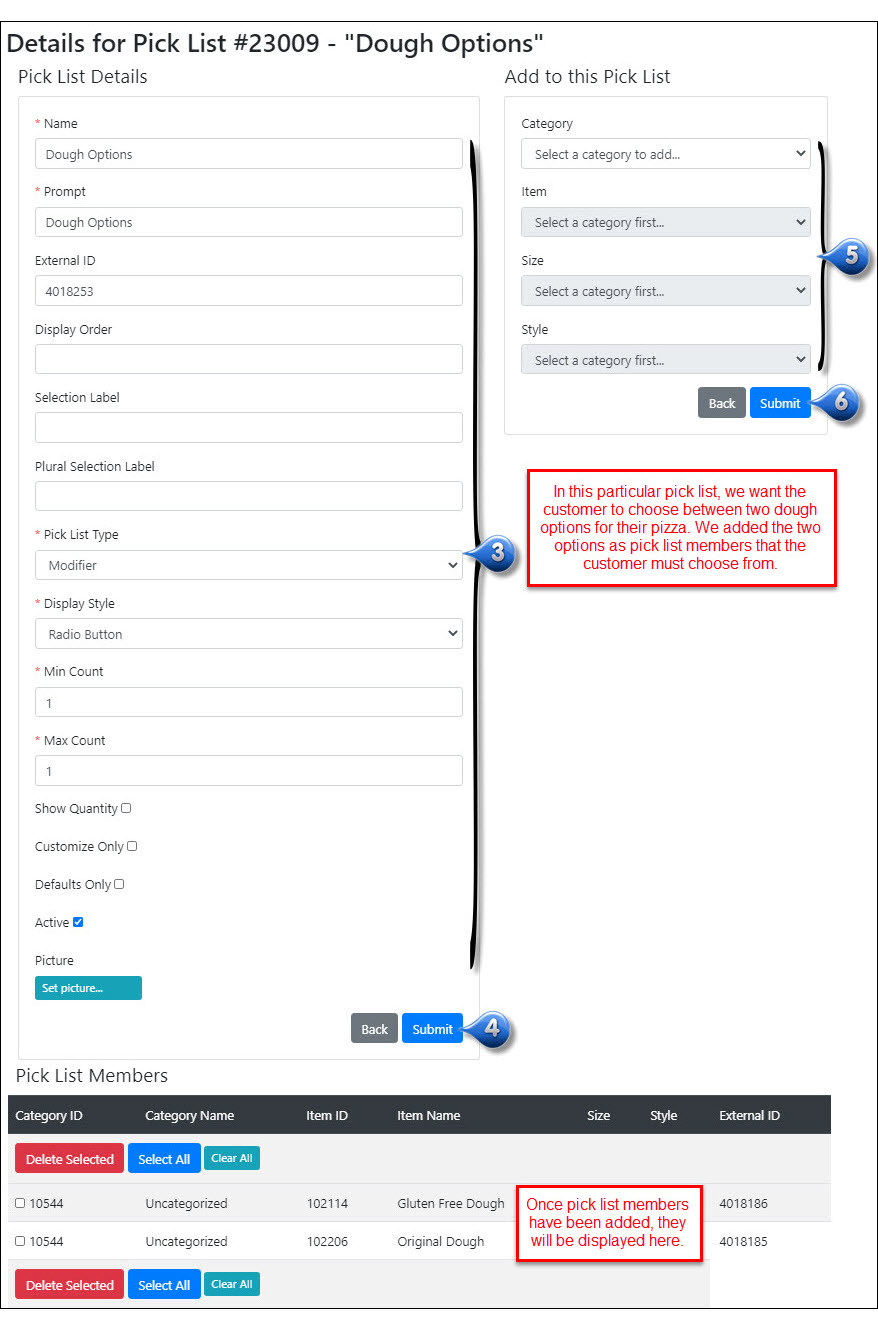
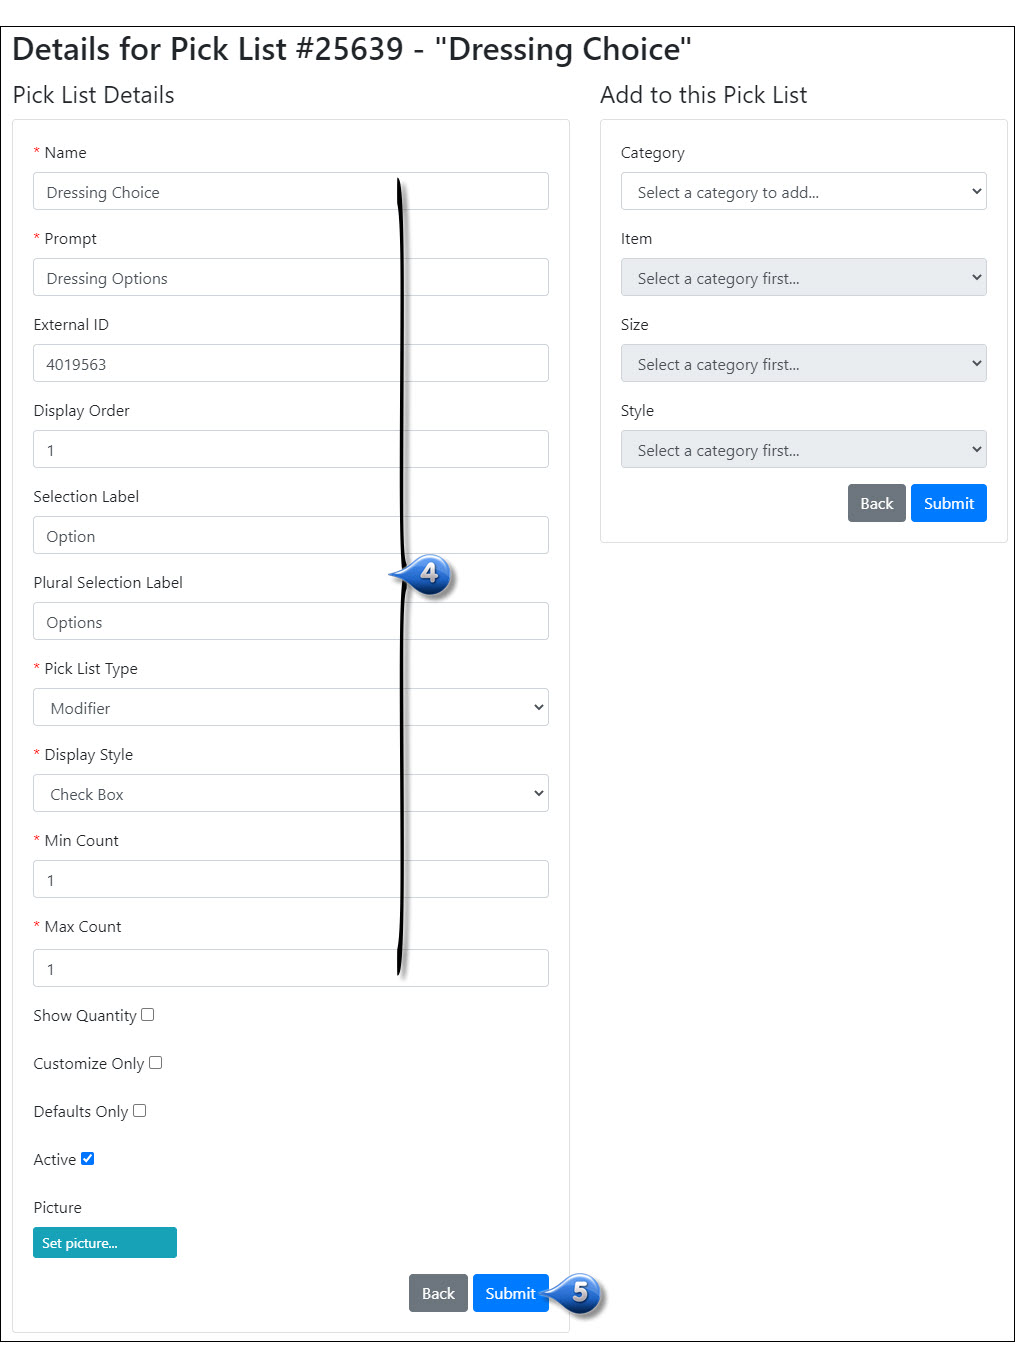
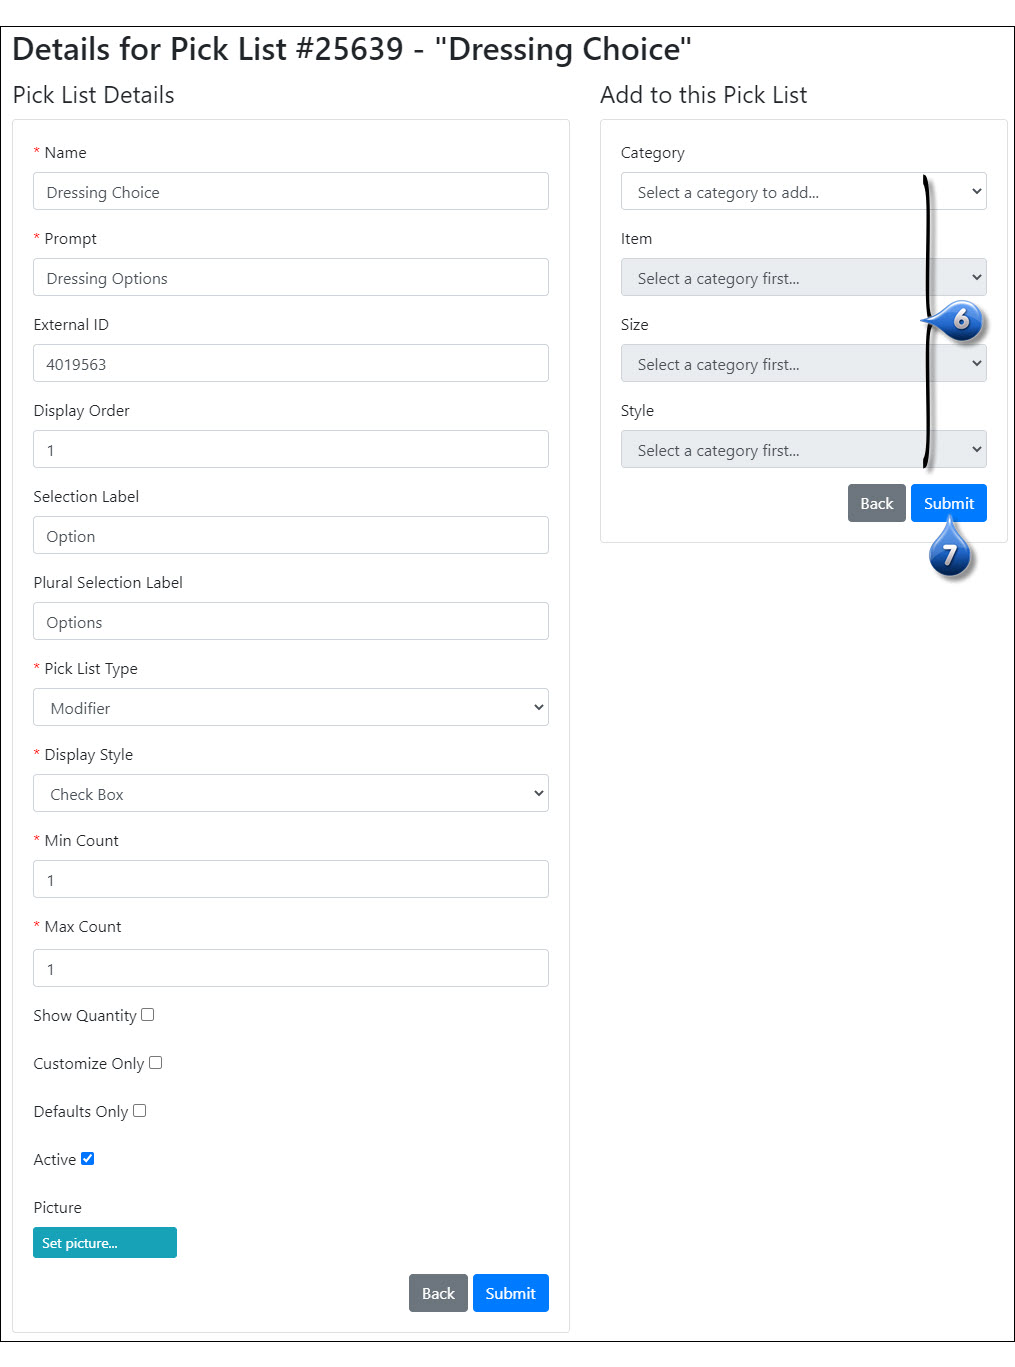
Enter the picklist information:
- Name: the name of the picklist. (e.g., Box Lunch Sides) This is for your internal use/reference and is not displayed to customers
- Prompt: this will be what the customers see as the heading (e.g., Add a side?)
- External ID: this is the ID of the picklist in the POS. It should be pulled in automatically from the POS import, if required.
- Display Order: in what order will this be displayed to the customer among other picklists under the specified items (e.g., 1 (1st picklist), 2 (2nd picklist), etc.)
- Selection Label: the label that the customer sees under the prompt when a singular choice is available (e.g., for the sub-heading, Please choose a side, you would enter side in the selection label field)
- Plural Selection Label: the label that the customer see under the prompt when there are multiple choices available (e.g., for the sub-heading, “Please choose 3 sides”, you would enter sides in the plural selection label field)
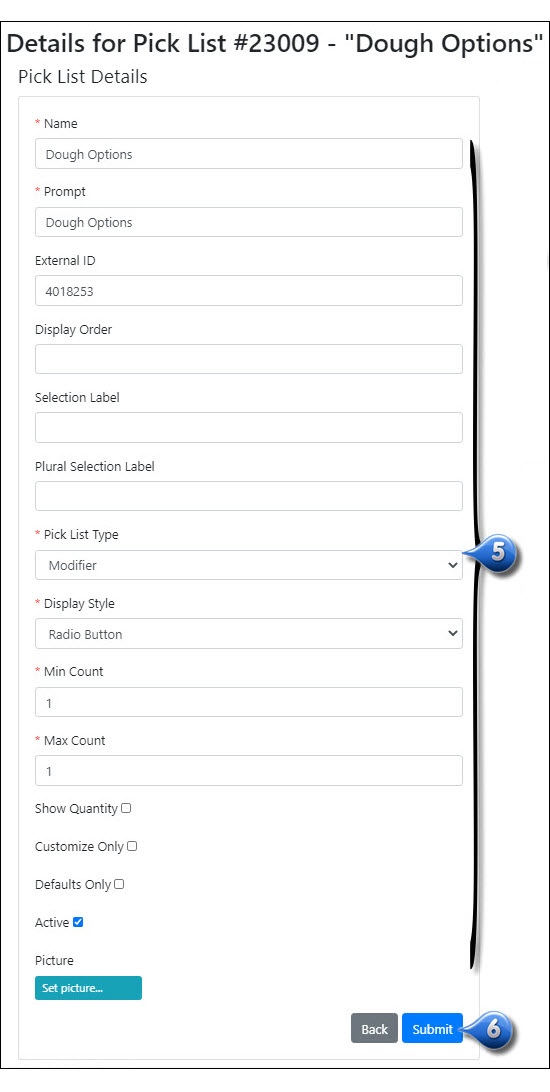
- Picklist Type: what kind of picklist it is (e.g., Upsell, Modifier, Combo)
- Display Style: how the picklist will be shown to the customer (e.g., dropdown, checkbox, radio buttons, etc.)
- Min. Count: how many items are required to be selected by the customer from this picklist (e.g., 0 (if optional and not required item), 1 (they must select one member of this picklist), etc.)
- Max. Count: the maximum number of items that a customer can select from the picklist at a time (e.g., 1 (can only select one item), 3 (can have up to 3 items), etc.)
- Show Quantity: this will show the customer a default number in the quantity box (bulk display style only) (e.g., combo comes with 3 soft tacos and 2 hard tacos by default, the numbers would display in the quantity box beside each corresponding item)
- Customize Only: this adds the picklist to the item customization screen when the customer is placing a mobile order, helping declutter the selection screen
- Active: should be checked if the picklist is active and will be used
- Picture: click Set picture to upload an image for the picklist
Click Submit
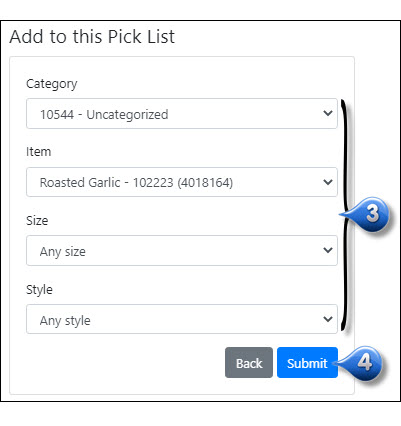
Add categories and/or items as Picklist Members under ‘Add to This Picklist’ by selecting a category, item, size, and style, if needed
Click Submit
Note
For POS Locations Only There has to be a 1 to 1 relationship between Online Ordering and the POS for all items, including customizations like fillings and toppings. Example: you would like a quantity box (bulk display) to allow customers to add ‘Extra Rice’ to their burrito. A quantity box will work perfectly IF AND ONLY IF, the way you specify double rice AT THE POS is by increasing the quantity, or hitting the Rice button twice. But, if you have a separate button at the POS called ‘Extra Rice’ or ‘Double Rice’, that means it’s a different item number and not a quantity, and a checkbox or radio button display style would be best.
Edit a Picklist
When editing a picklist, you can edit the details or the picklist members. See below for additional information on how to edit both.
Edit Picklist Details
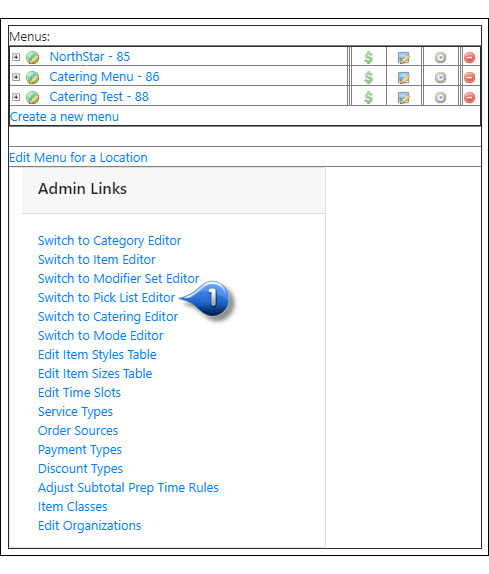
From the Menus Tab, click Switch to Picklist Editor
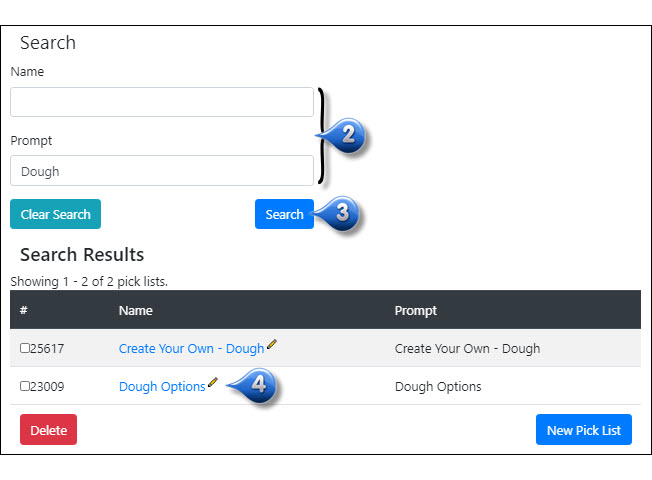
Search for the picklist by name or prompt
Click Search
Click on the |pencil| icon to the right of the picklist name that you wish to edit
Edit the picklist details, as needed
Click Submit
Edit Picklist Members
Add a New Picklist Member
Note
to add a picklist member, the picklist must first be associated to an item or category
Click the
icon next to the category, sub-category or item that has the picklist associated that you wish to add a picklist member to
Click on the name of the picklist you wish to add a member to
Add categories and/or items as picklList members under Add to This Picklist by selecting a category, item, size, and style, if needed
Click Submit
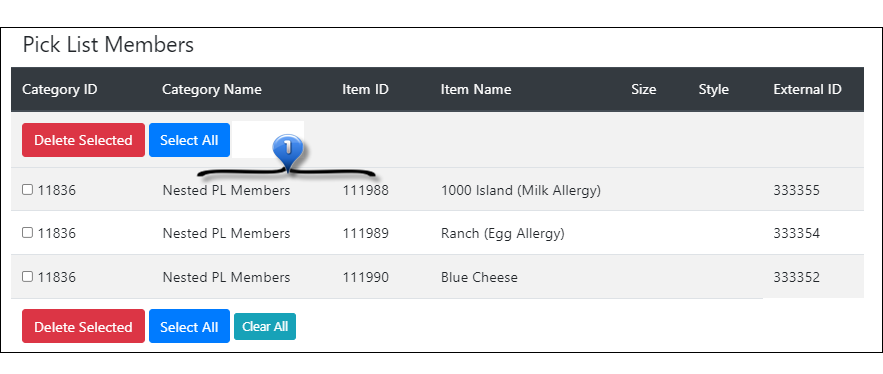
Delete a Picklist Member
Click the
icon next to the category, sub-category or item that has the picklist associated that you wish to delete a picklist member from
Click on the name of the picklist you wish to delete a member from
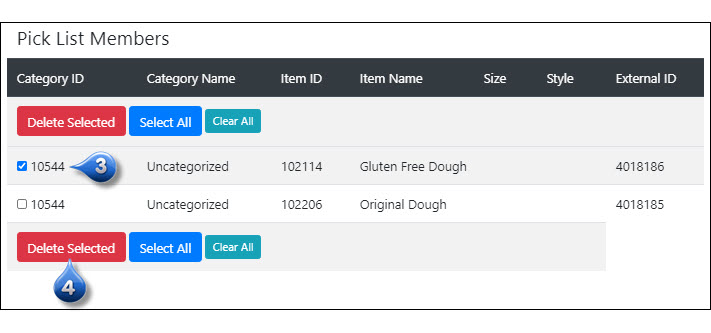
Check the checkbox(es) next to the picklist member(s) that you wish to delete
Click Delete Selected
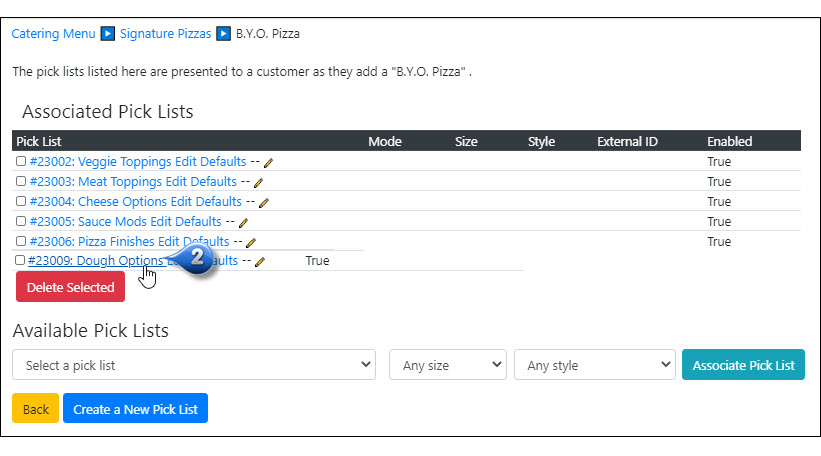
Associate a Picklist to a Category/Item
After creating a picklist, you will need to associate it with the categories or items that you want it to be presented with. To do this, follow the below steps:
Click the
icon next to the category, sub-category or item that you would like to add a picklist to
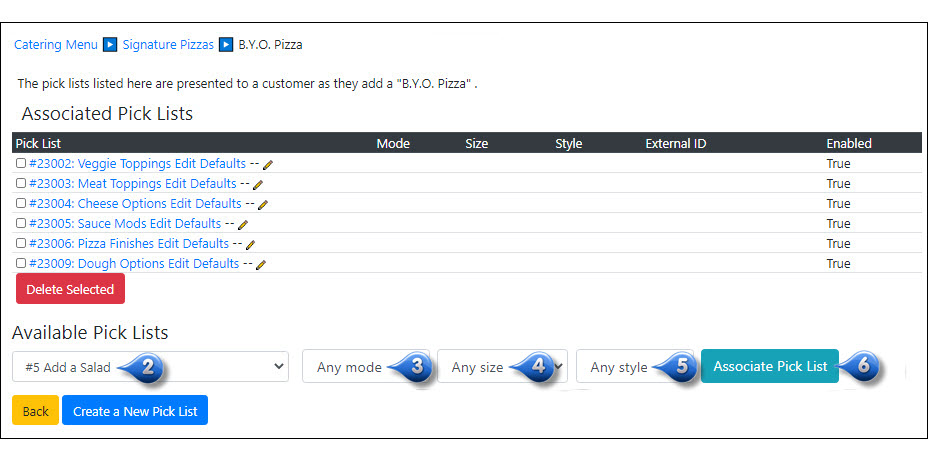
Choose a picklist from the dropdown menu
Choose a menu mode, if applicable
Choose a size, if applicable
Choose a style, if applicable
Click Associate Picklist
Repeat steps 2-5 until all desired picklists have been associated
Unassociate a Picklist
Click the
icon next to the category, sub-category or item that you would like to remove a picklist from
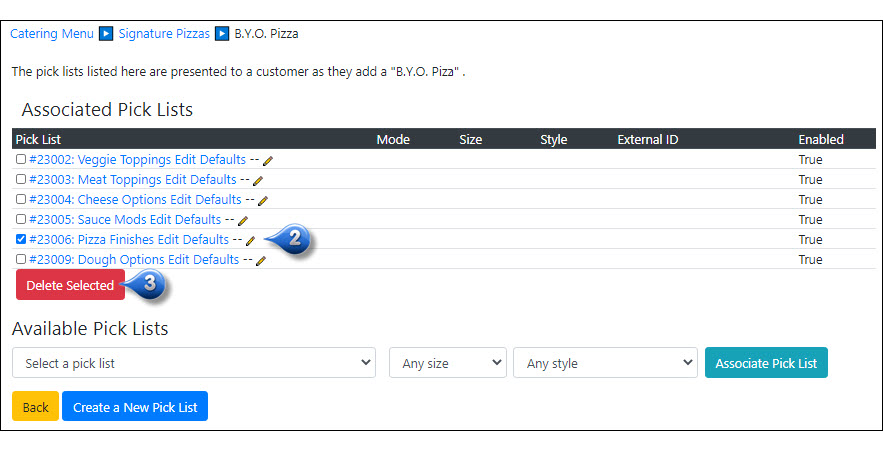
Click checkboxes next to the picklists you wish to remove
Click Delete Selected
Item Picklists and Defaults
To see what picklists, if any, are associated with a particular item:
Drilldown to item level
Click the
icon to the right of the item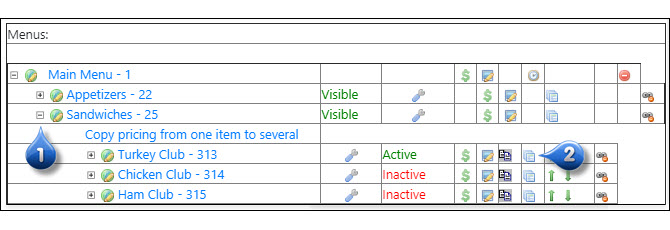
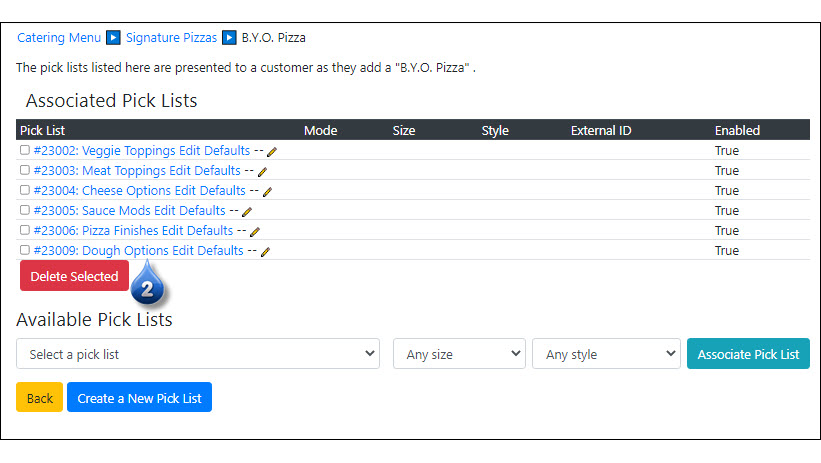
You will see what picklists have been attached to the item, if any
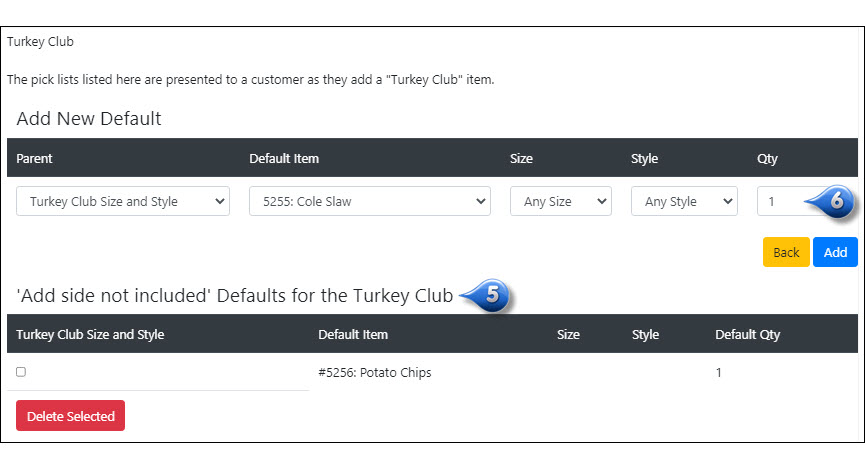
To edit the defaults, click Edit Defaults to the right of the picklist name
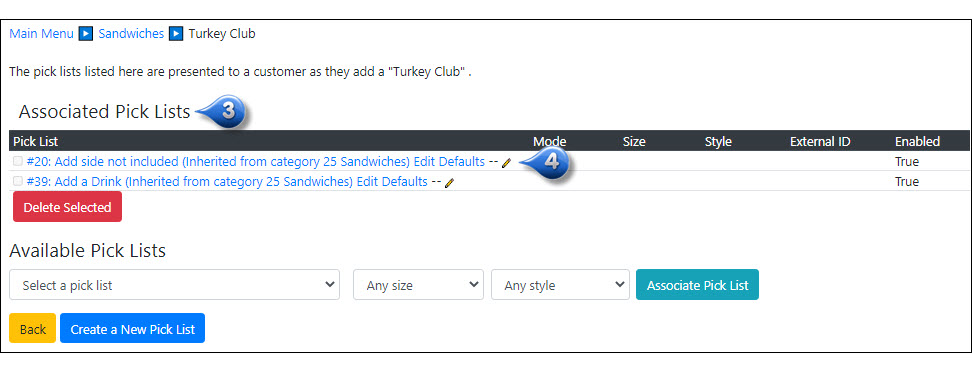
Defaults are the standards for an item, but others options are available to the customer (e.g. Caesar salad comes with Caesar Dressing by default. Customer may choose to change to Ranch Dressing)
Update default information, as needed
Example:
Customer ordering at the register:
- Customer: I would like to order the Sirloin Steak
- Restaurant’s Sirloin Steak is a dinner meal that comes with a Baked Potato and Garlic Bread, by default
- Restaurant: The Sirloin Steak comes with a Baked Potato and Garlic Bread.
- Customer: Can I get a Sweet Potato instead of the Baked Potato?
- Restaurant: You sure can. I will be happy to make substitution for you.
Picklist Mode Restriction
When associating a picklist, you may restrict it to a specific mode:
Click the
icon next to the category, sub-category or item that has a picklist that you would like to restrict
Choose a picklist from the dropdown menu
Choose a menu mode, if applicable
Choose a size, if applicable
Choose a style, if applicable
Click Associate Picklist
Repeat for each mode that is needed
Example:
Customer ordering at a restaurant in Nashville, TN:
- Customer: I would like to order the Grilled Shrimp Combo with Jasmine Rice as the side item but I do not see the rice listed on the menu. I frequent your location in Jacksonville, FL and they offer Jasmine Rice.
- Jasmine Rice is a side item that is being tested in limited markets in Florida
- Restaurant: I am sorry, Jasmine Rice is only being offered in certain markets at this time. Is there another side that you would like instead?
Picklist Size and Style Restriction
When associating a picklist, you may restrict it to specific sizes and/or styles:
Click the
icon next to the category, sub-category or item that has a picklist that you would like to restrict
Choose a picklist from the dropdown menu
Choose a menu mode, if applicable, from the dropdown
Choose any necessary sizes (or you can choose Any Size or No Size) from the dropdowns
Choose any necessary styles (or you can choose Any Style or No Style) from the dropdowns
Click Associate Picklist
Repeat for each size/style that is needed
Example - Sizes:
Customer ordering at register:
- Customer: I would like to order the Dinner Meal with two side items. What size side items come with the meal?
- Restaurant offers any two regular sized side items free of charge with this particular Dinner Meal
- Restaurant: Two regular size side items are included when ordering the Dinner Meal.
- Customer: Can I get two large sides instead?
- Restaurant: Yes, but there will be an additional charge.
Example - Styles:
Customer ordering from Drive-Thru:
- Customer: I would like to order a Chicken Sandwich
- *Restaurant offers 2 styles the customer can choose from, Grilled or Crispy.
- Restaurant: How would you like you Chicken Sandwich prepared?
- Customer: Crispy, please.
- Restaurant: I have added a Crispy Chicken Sandwich to your order.
Delete a Picklist
From the Menus Tab, click Switch to Picklist Editor
Search for the picklist that you wish to delete by name or prompt
Click Search
Enable the checkbox to the left of the picklist you wish to delete
Click Delete

Change Picklist Order
Click the
icon next to the category, sub-category or item that has a picklists that you would like to reorder
Click on the picklist name and drag and drop to the desired location
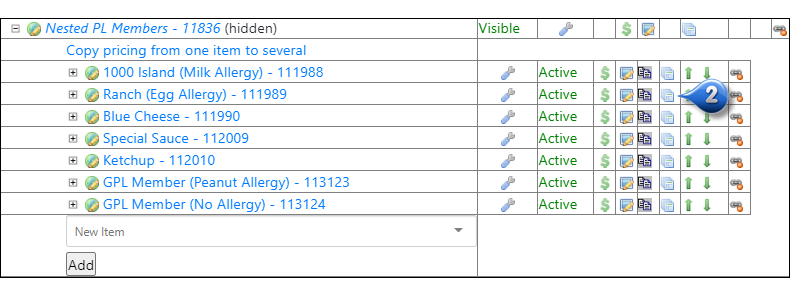
Grandchild Picklists
Picklists can be attached to picklist members to create a Grandchild Picklist. This picklist will be presented after users select the configured item from the parent item’s picklist.
Navigate to the category where the parent item’s picklist members reside. This can be found by reviewing the picklist members section of the parent item’s picklist. The category and NovaDine Item ID will be visible in this area for reference.
Click the
icon next to the category, sub-category, or item that you wish to create the grandchild picklist for.
- Click Create a New Picklist
- Enter the picklist information:
- Name: the name of the picklist. (e.g., Box Lunch Sides) This is for your internal use/reference and is not displayed to customers
- Prompt: this will be what the customers see as the heading (e.g., Add a side?)
- External ID: this is the ID of the picklist in the POS. It should be pulled in automatically from the POS import, if required.
- Display Order: in what order will this be displayed to the customer among other picklists under the specified items (e.g., 1 (1st picklist), 2 (2nd picklist), etc.)
- Selection Label: the label that the customer sees under the prompt when a singular choice is available (e.g., for the sub-heading, Please choose a side, you would enter side in the selection label field)
- Plural Selection Label: the label that the customer see under the prompt when there are multiple choices available (e.g., for the sub-heading, “Please choose 3 sides”, you would enter sides in the plural selection label field)
- Picklist Type: what kind of picklist it is (e.g., Upsell, Modifier, Combo)
- Display Style: how the picklist will be shown to the customer (e.g., dropdown, checkbox, radio buttons, etc.)
- Min. Count: how many items are required to be selected by the customer from this picklist (e.g., 0 (if optional and not required item), 1 (they must select one member of this picklist), etc.)
- Max. Count: the maximum number of items that a customer can select from the picklist at a time (e.g., 1 (can only select one item), 3 (can have up to 3 items), etc.)
- Show Quantity: this will show the customer a default number in the quantity box (bulk display style only) (e.g., combo comes with 3 soft tacos and 2 hard tacos by default, the numbers would display in the quantity box beside each corresponding item)
- Customize Only: this adds the picklist to the item customization screen when the customer is placing a mobile order, helping declutter the selection screen
- Active: should be checked if the picklist is active and will be used
- Picture: click Set picture to upload an image for the picklist
- Click Submit
- Add categories and/or items as Picklist Members under ‘Add to This Picklist’ by selecting a category, item, size, and style, if needed
- Click Submit
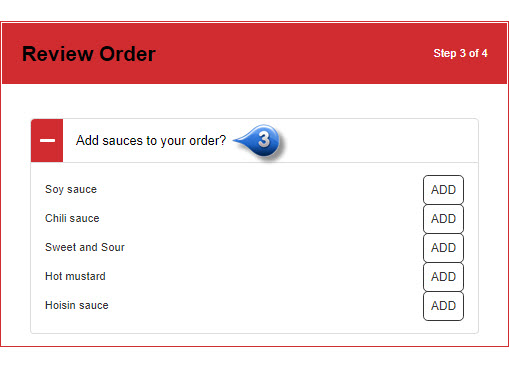
Order Level Picklists
You might want to offer your customers the option of adding special items to each order. This could range from utensils to sauces. Follow the below steps to add Order Level Picklists to your site:
Create a new Picklist that contains all of the items that you wish to offer at the order level
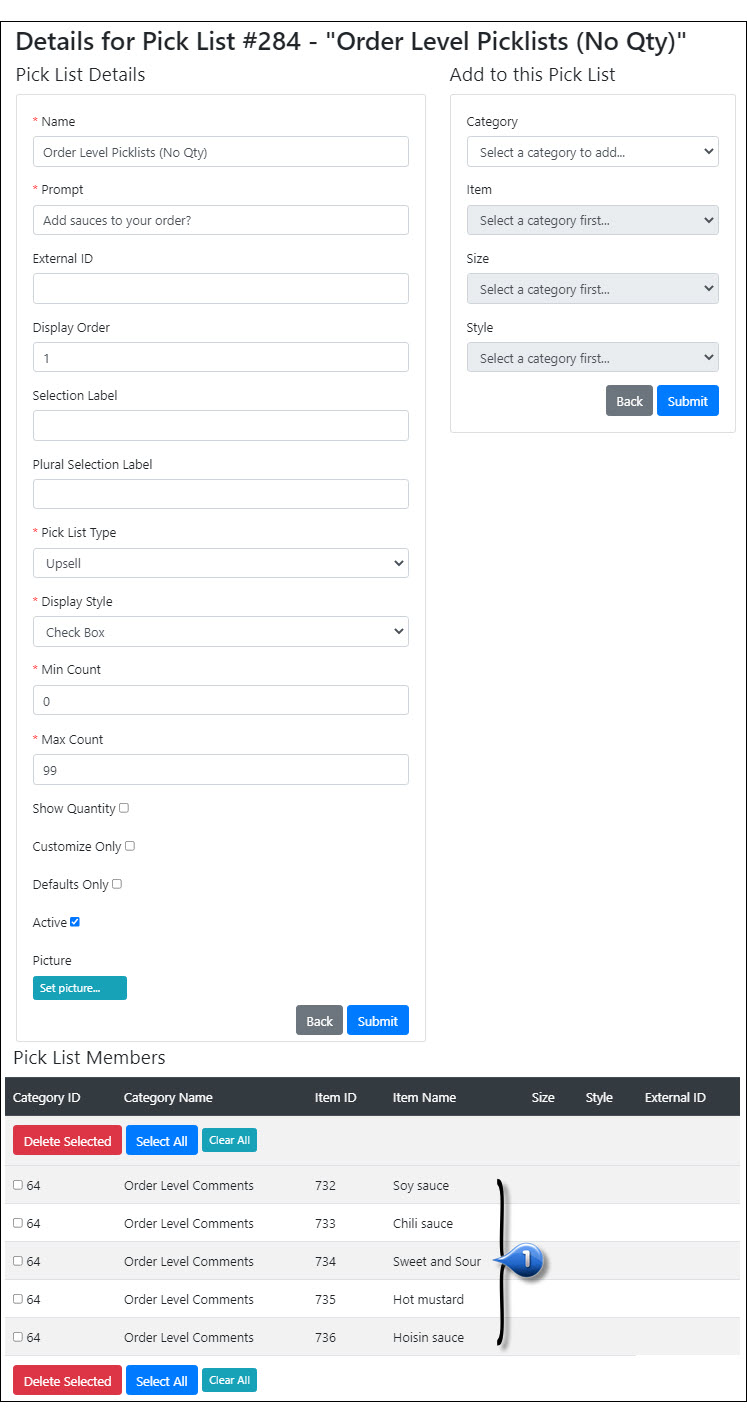
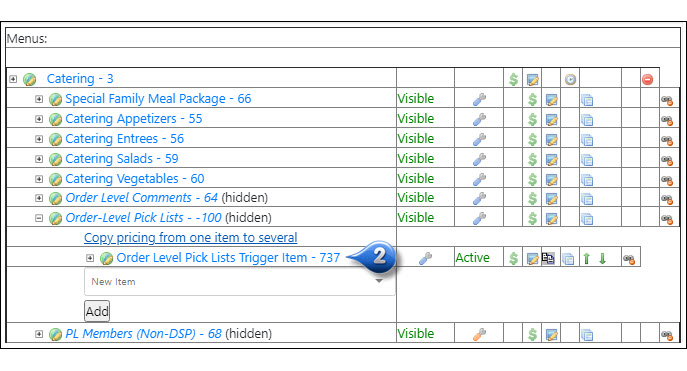
Associate the Order Level Picklist to the item in Category (Order-Level Picklists - -100)
The items will show up on the front end on the checkout screen