Brink POS
Contents: This guide will show you how to setup NovaDine and Brink to communicate for online ordering
Request NovaDine access to Locations
Before starting the POS setup, you will need to request that Brink give NovaDine access to all POS Data and receive the API tokens for your locations (this allows us to pull in your menu and settings from Brink). The request needs to come directly from the customer to the support team.
Please send an email to support.brinksoftware@partech.com and apisupport2full@partech.com using the following format:
“I [Name of authorized user], authorize NovaDine to access all POS data and receive the API Tokens for [Concept] for the following locations:” Then list all of your locations that NovaDine will need access to, including any labs.
Overview
Once you have requested the access from Brink, you will need to gather the required information and provide to NovaDine and configure settings in Brink, as outlined below, in order to allow NovaDine to communicate with your POS:
Brink Setup
Menu ID
In order for NovaDine to pull the menu from Brink, we will need to know the appropriate Menu ID(s) to pull. If you have not previously setup a Menu in Brink, you will need to create one and add all of your items to this Menu for NovaDine to import. The Menu ID value is not exposed in the Brink Admin Portal, so the information must be found in the Changeset Log Details. This can be found in any Changeset Log in which Menu updates for the appropriate menu were made.
To locate your Menu ID in Brink:
Log in to the Brink Admin Portal
Click on Configuration and then open the Settings Editor
Click on Menus in the lefthand menu
Click the pencil icon to the left of the Menu that you need to find the Menu ID for
Make any change under ‘Edit Menu’ (add a menu category or remove a menu category - you can revert your changes after you retrieve the Menu ID)
Since there is no ID field for the Menu ID, once the changeset is published, you will need to find the Menu ID in the logs. The ID will be listed under <Menus> in the Changeset Details (see screenshot)
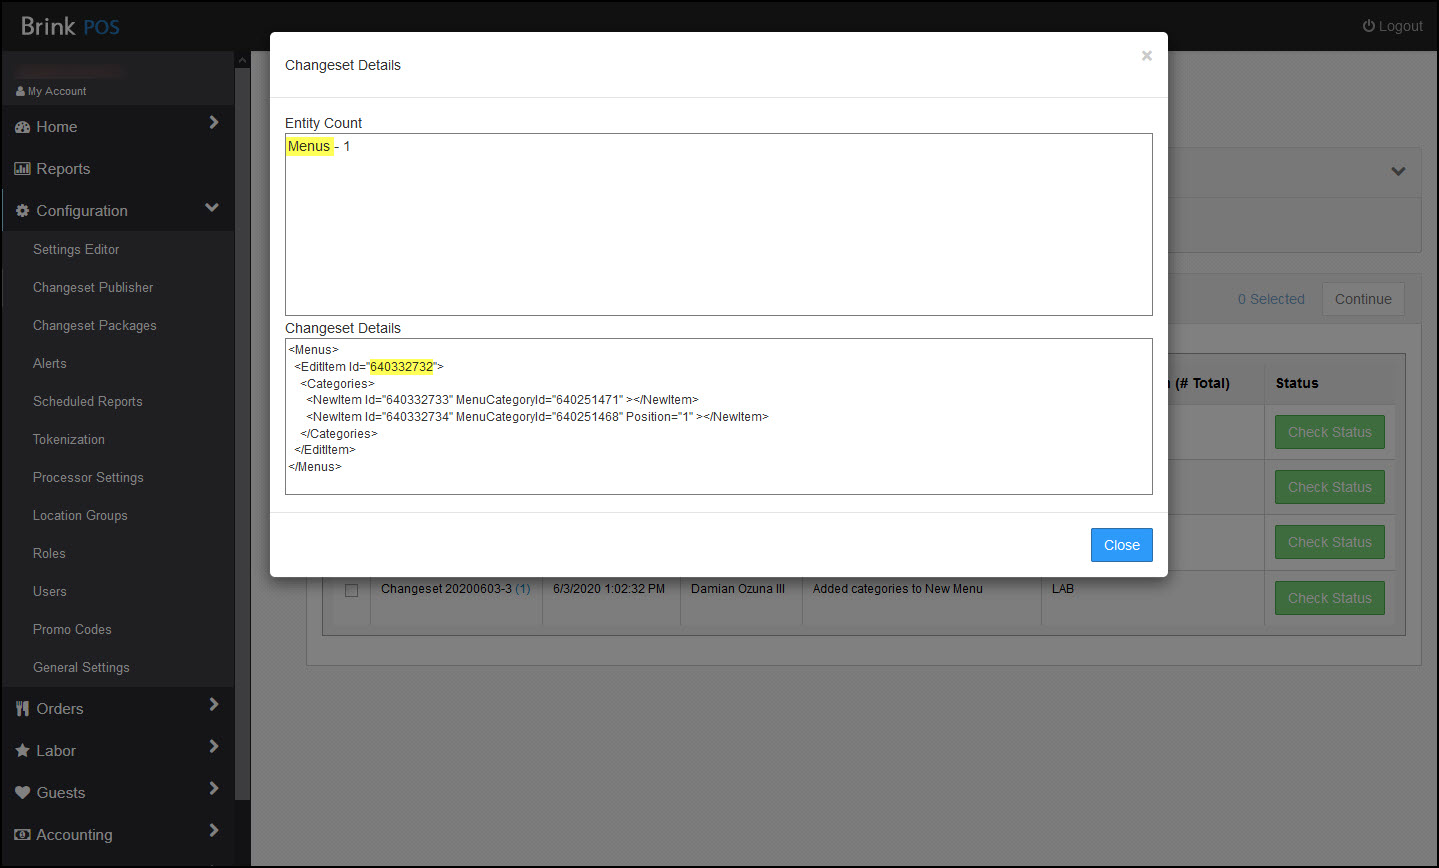
Copy the Menu ID and send it to NovaDine
Note
If you will utilize seperate menus in Brink, please create unique menu categories for each menu to avoid import issues.
Tender IDs
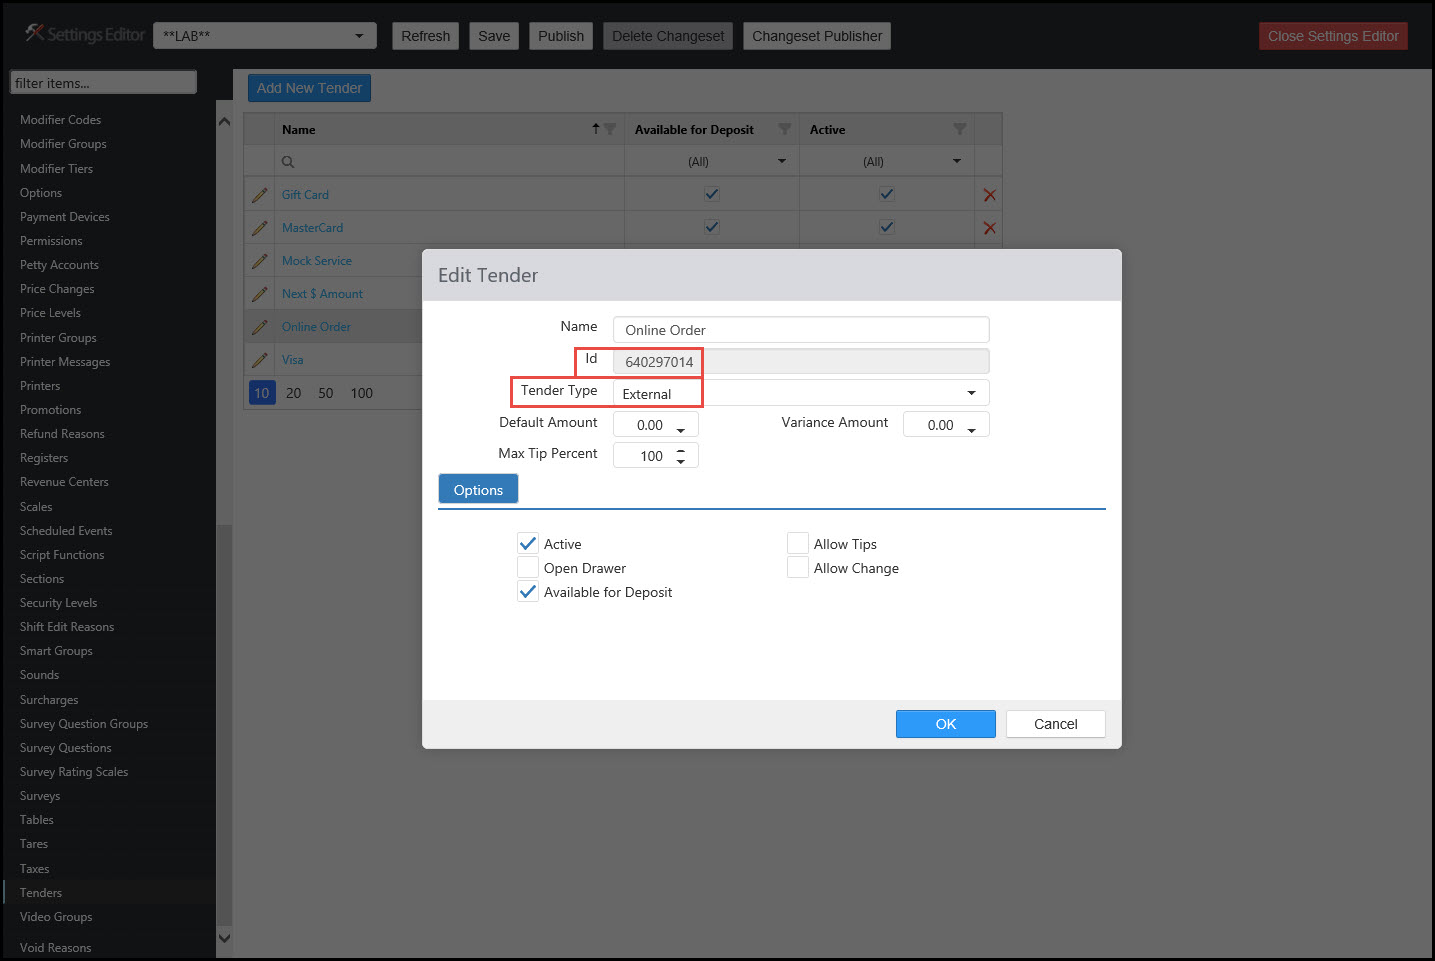
You can create a Tender Type in Brink for each Payment Type that you wish to differentiate for online ordering for reporting purposes. These could include Gift Cards, Grubhub, DoorDash, etc.
To locate your Tender IDs in Brink:
Log in to the Brink Admin Portal
Click on Configuration and then open the Settings Editor
Click on Tenders in the lefthand menu
Click the pencil icon to the left of the first Tender that you will be using with NovaDine and copy the ID number listed
Select External in the ‘Tender Type’ dropdown
Repeat the above steps for each Tender Type that will need to be available for online ordering
Send the copied IDs to NovaDine labeled with the appropriate Tender Type
Destination IDs
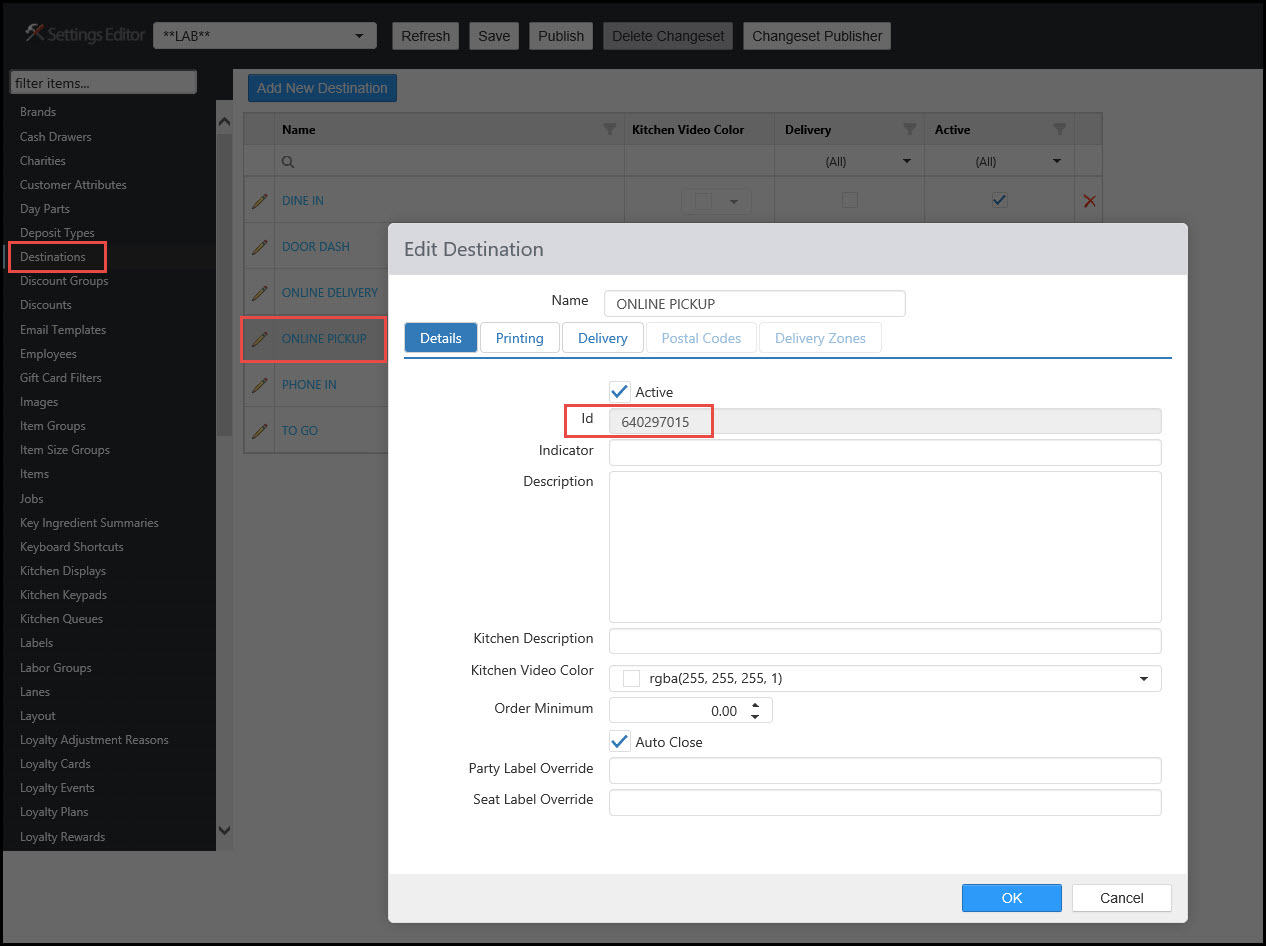
You can create a Destination in Brink for each Service Type that you plan to offer online. These could include Online Ordering Pick-up, Online Ordering Catering Pick-up, Online Ordering Delivery, Online Ordering GrubHub, etc. You will need a Destination for Pickup and Delivery at a minimum, assuming you are using both
Log in to the Brink Admin Portal
Click on Configuration and then open the Settings Editor
Click on Destinations in the lefthand menu
Click the pencil icon to the left of the first Destination that you will be using with NovaDine and copy the ID number listed
Repeat the above steps for each Destination that will be available for online ordering
Send the copied IDs to NovaDine labeled with the appropriate Destination
Note
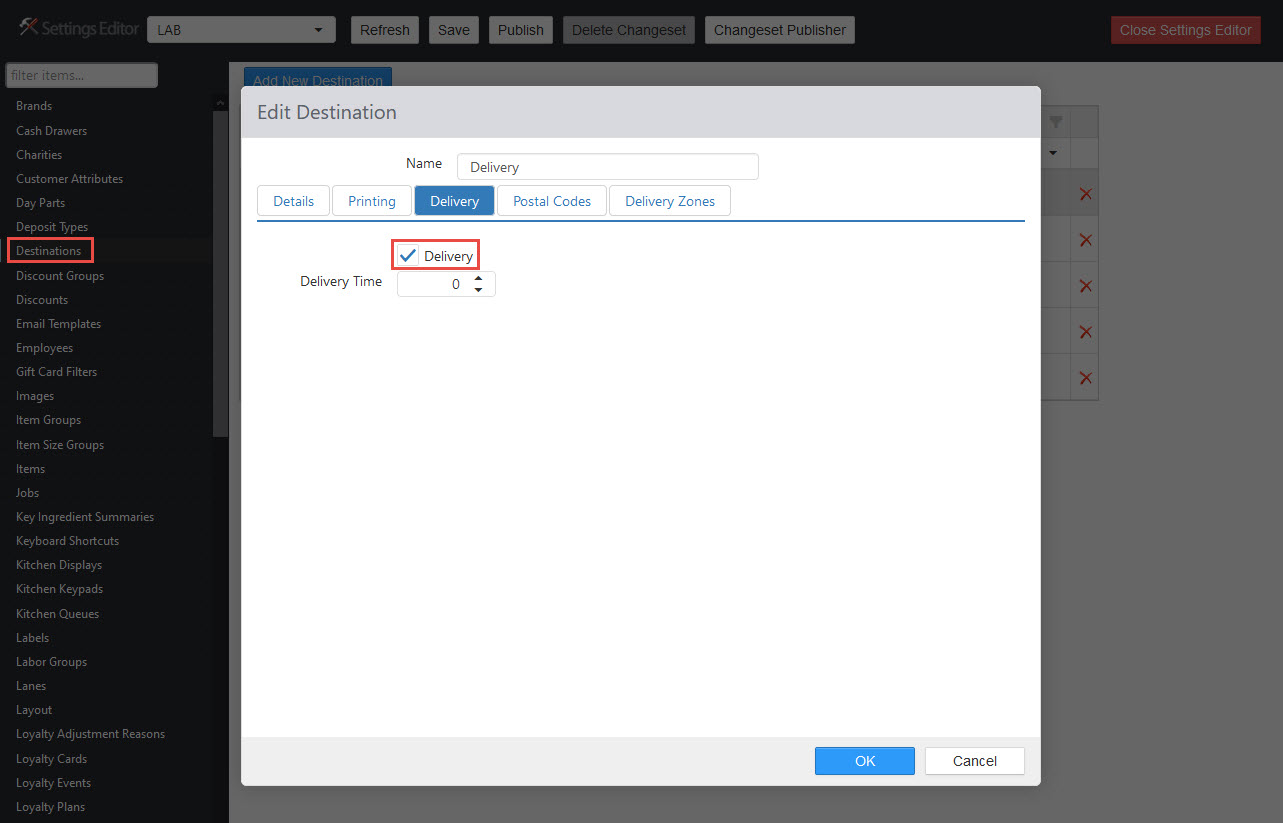
If the Destination will be used for DaaS or self-delivery, you will need to check the ‘Delivery’ box under the Delivery Tab to allow the POS to receive the customer’s delivery address. If this is not done, orders will be rejected with an error of ‘Delivery details required’
Comment Item ID
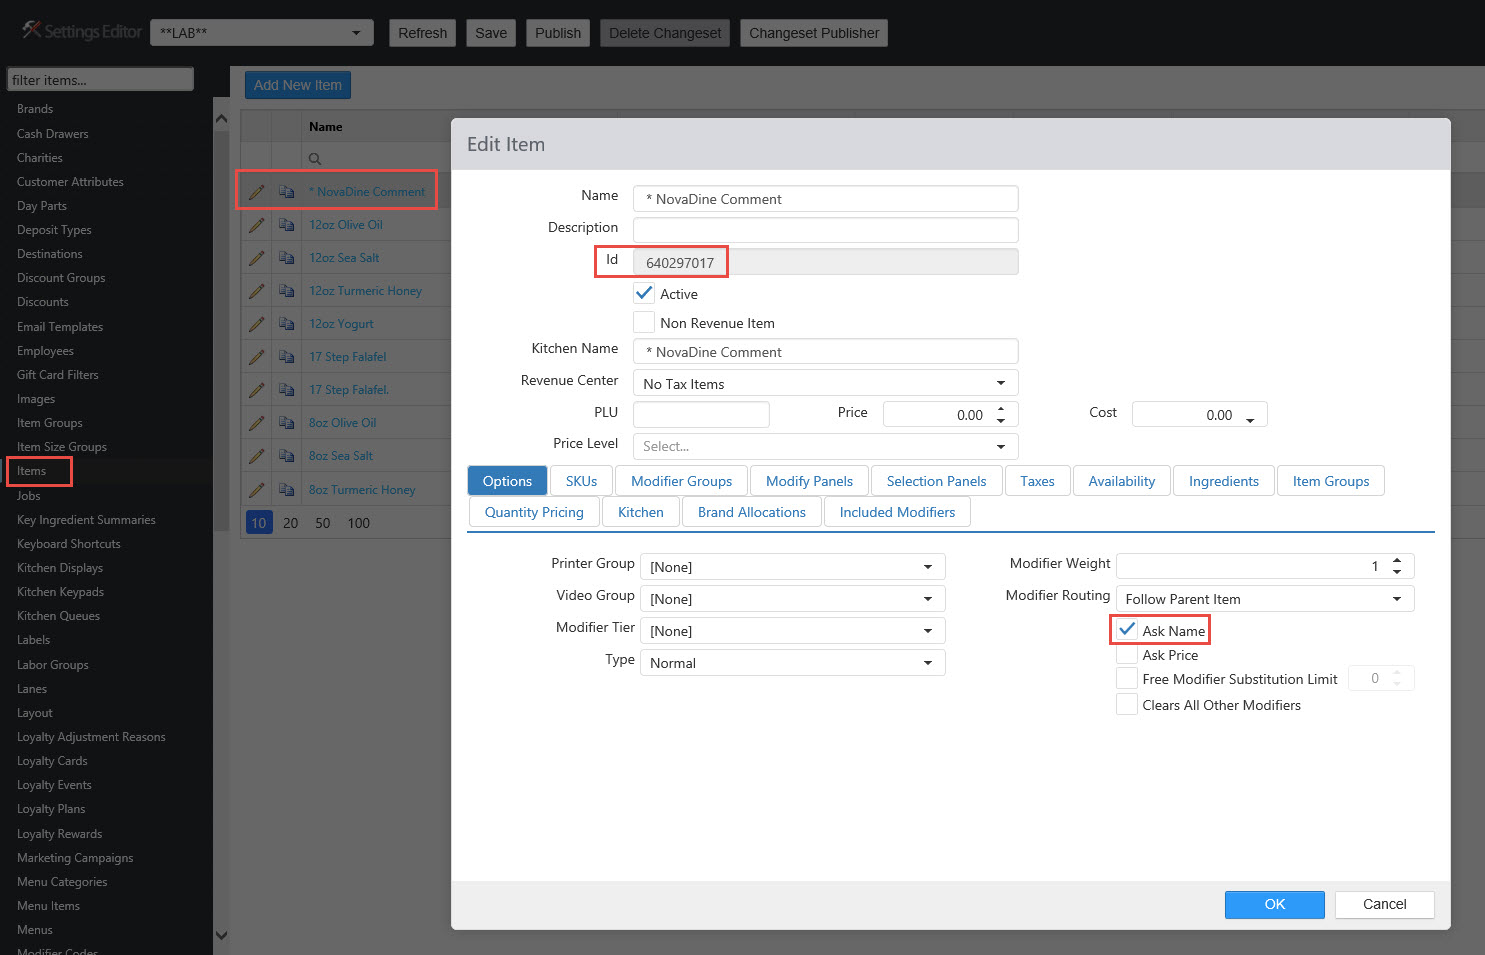
You will need an item called ‘Comment’ in order to receive order-level comments in the POS. If a comment item does not exist in the remote system, it must be created with Ask Name enabled.
To locate the ‘Comment’ Item ID:
Log in to the Brink Admin Portal
Click on Configuration and then open the Settings Editor
Click on Items in the lefthand menu
Click the pencil icon to the left of the Comment Item, ensure that Ask Name is enabled, and copy the ID number listed
Send the copied ID to NovaDine labeled ‘Comment Item ID’
Note
For Curbside Check-in, a notification of customer arrival will be sent to the POS as an order comment item and print in the kitchen. In order for the notification to print, print routing must be configured for the order comment item.
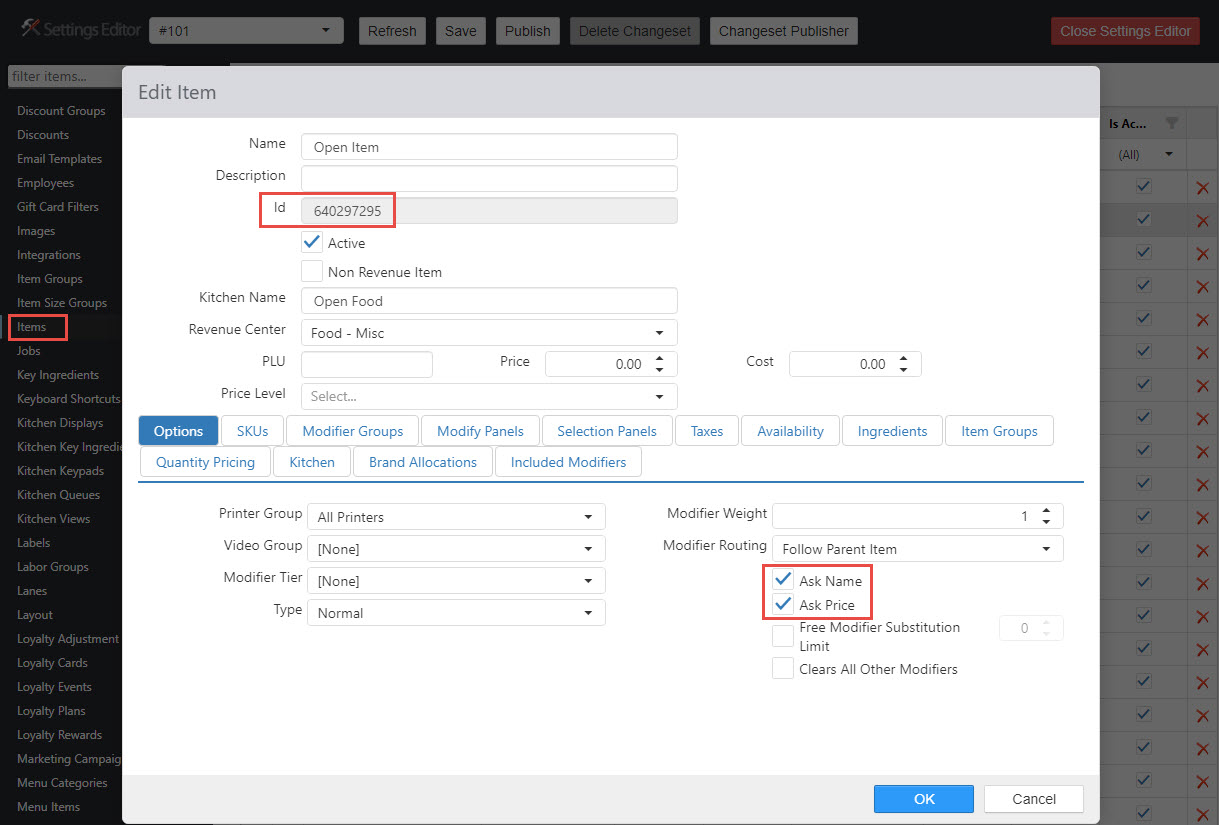
Open Item ID
An ‘Open Item’ with Ask Name and Ask Price must be created/enabled in Brink to allow orders to push to the POS, even when an item error occurs (Ex: item is marked as unavailable in the POS while customer is placing an order online. Open item allows order to send through to the POS successfully). To create an ‘Open Item’:
To locate the ‘Open Item’ ID:
Log in to the Brink Admin Portal
Click on Configuration and then open the Settings Editor
Click on Items in the lefthand menu
Click the pencil icon to the left of the Open Item, ensure that Ask Name and Ask Price is enabled, and copy the ID number listed
Send the copied ID to NovaDine labeled ‘Open Item ID’
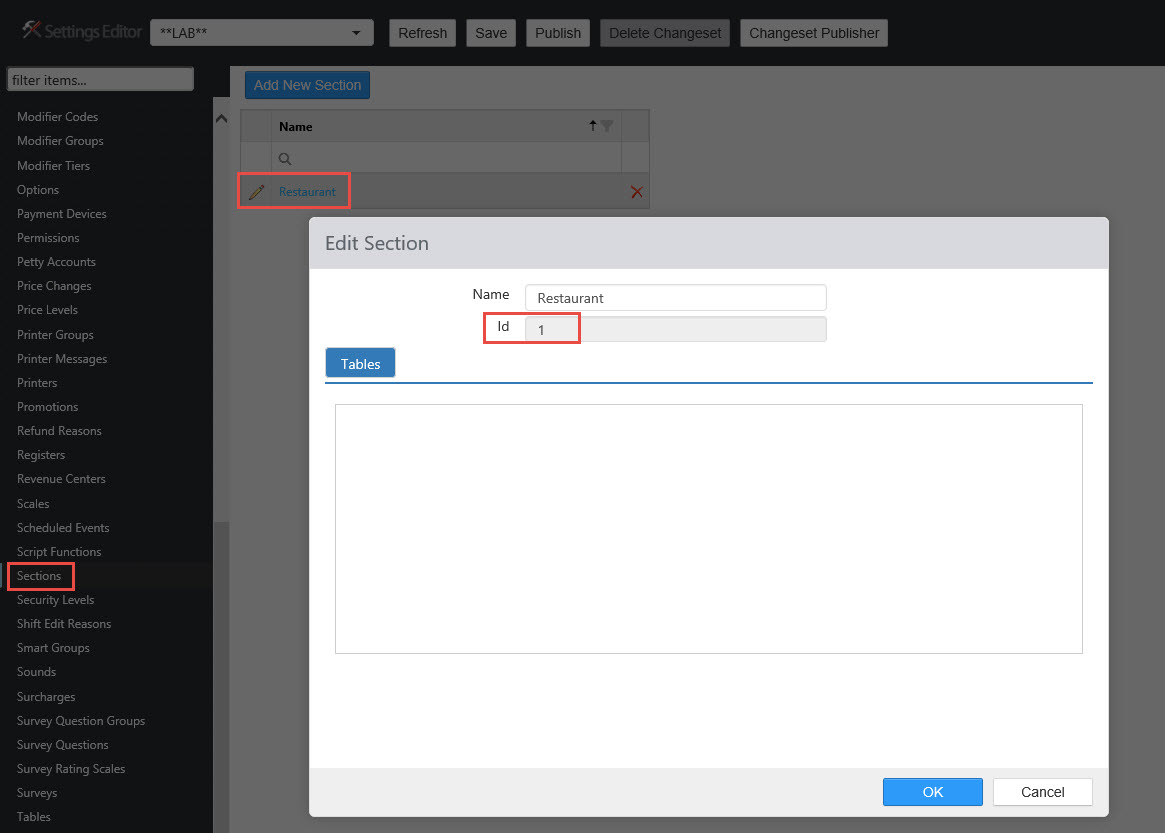
Section ID
NovaDine will need a Section ID configured for us to send online orders to the Brink system.
To locate the Section ID:
Log in to the Brink Admin Portal
Click on Configuration and then open the Settings Editor
Click on Sections in the lefthand menu
Click the pencil icon to the left of the appropriate Section and copy the ID number listed
Send the copied ID to NovaDine labeled Section ID
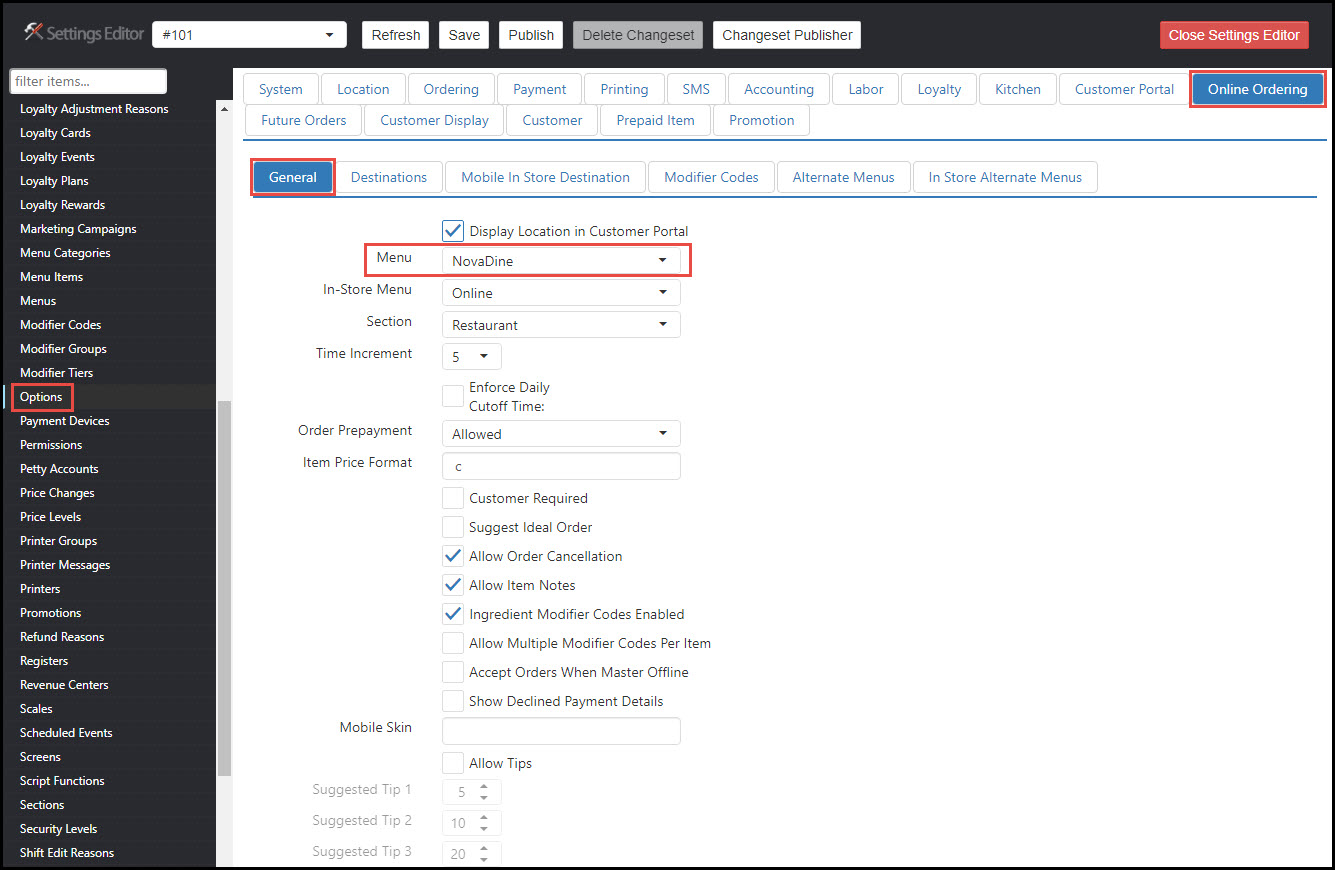
Configure Brink to accept Online Orders from NovaDine
Associate the Online Ordering Menu:
In the Brink Admin Portal, click on Configuration and then open the Settings Editor
Click on Options in the lefthand menu
Select the Online Ordering Tab, then the General sub-tab
Select the menu that will be used for online ordering in the Menu drop-down
Publish Changes
Before NovaDine can pull the changes, you will need to publish the updates that you just made in Brink:
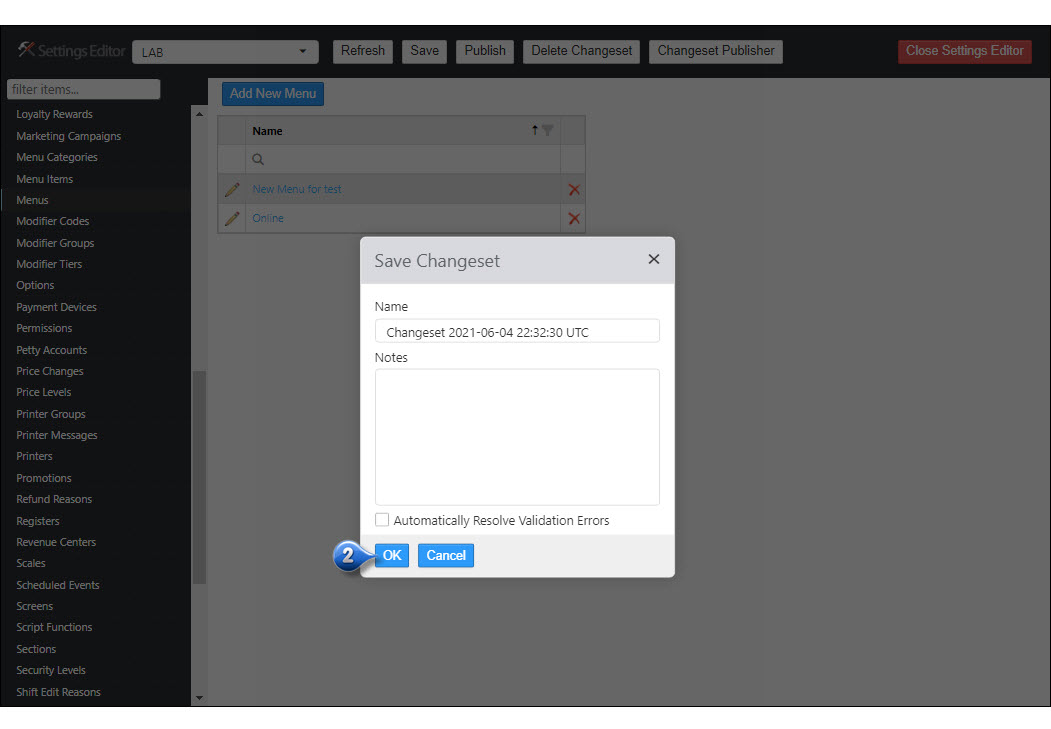
After making any changes in the Settings Editor, select Save
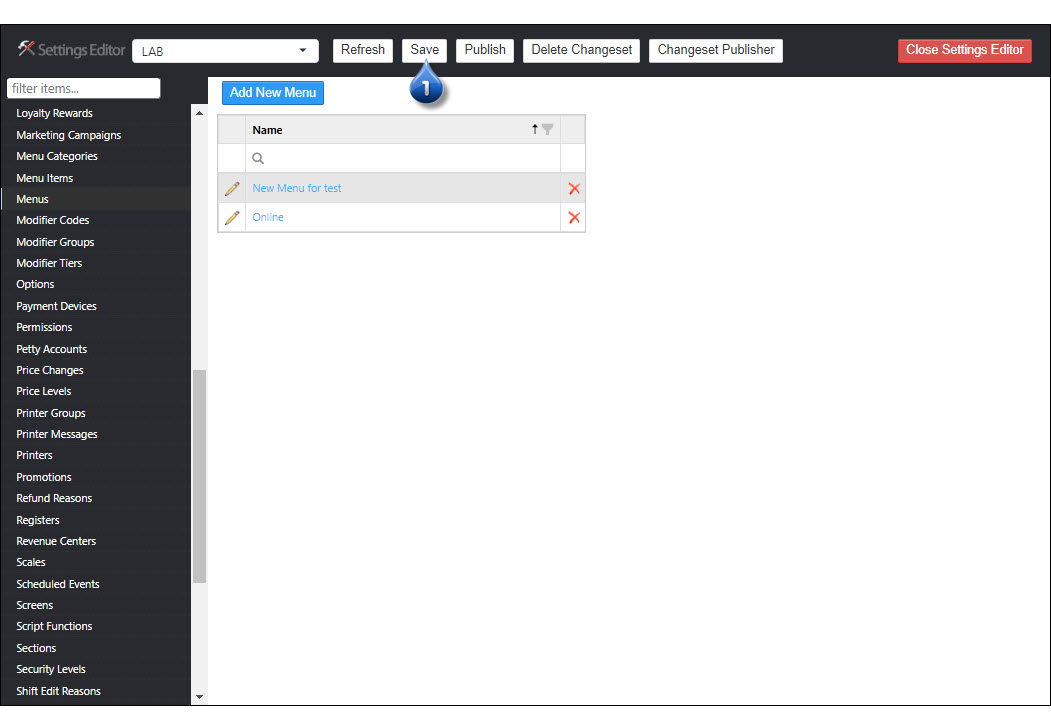
Select Ok on the Save Changeset pop-up window
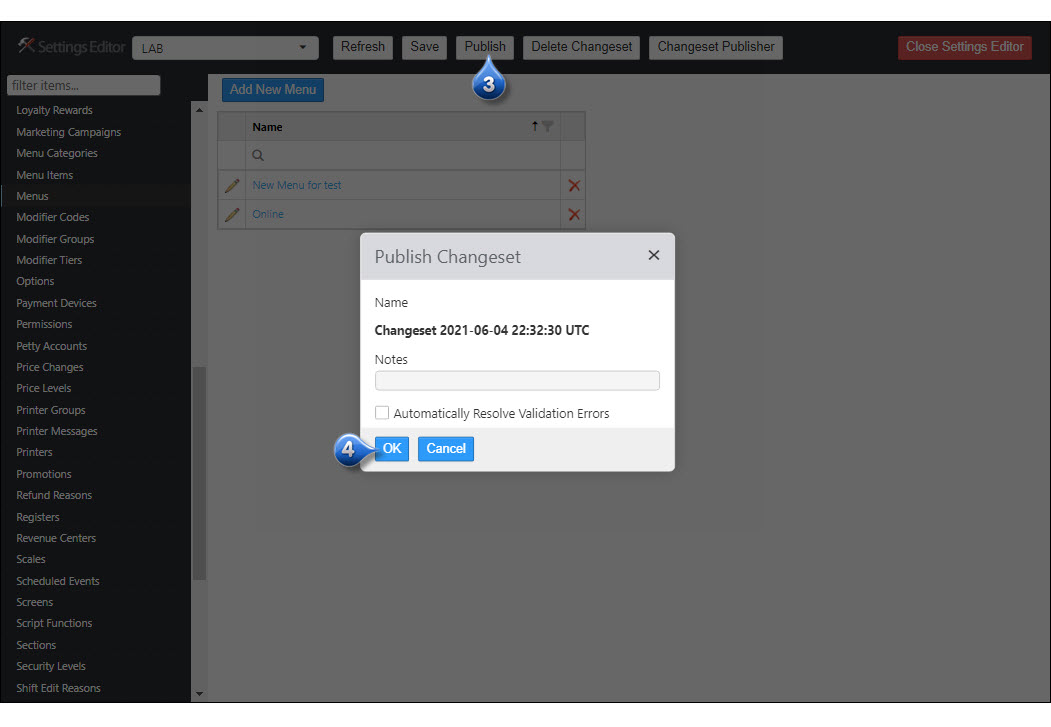
Select Publish from the top menu
Make any necessary notes and click OK
Optional Features
Enable Tips
If you will be allowing tips on online orders, they will need to be enabled in Brink. To enable, follow the below steps:
In the Brink Admin Portal, click on Configuration and then open the Settings Editor
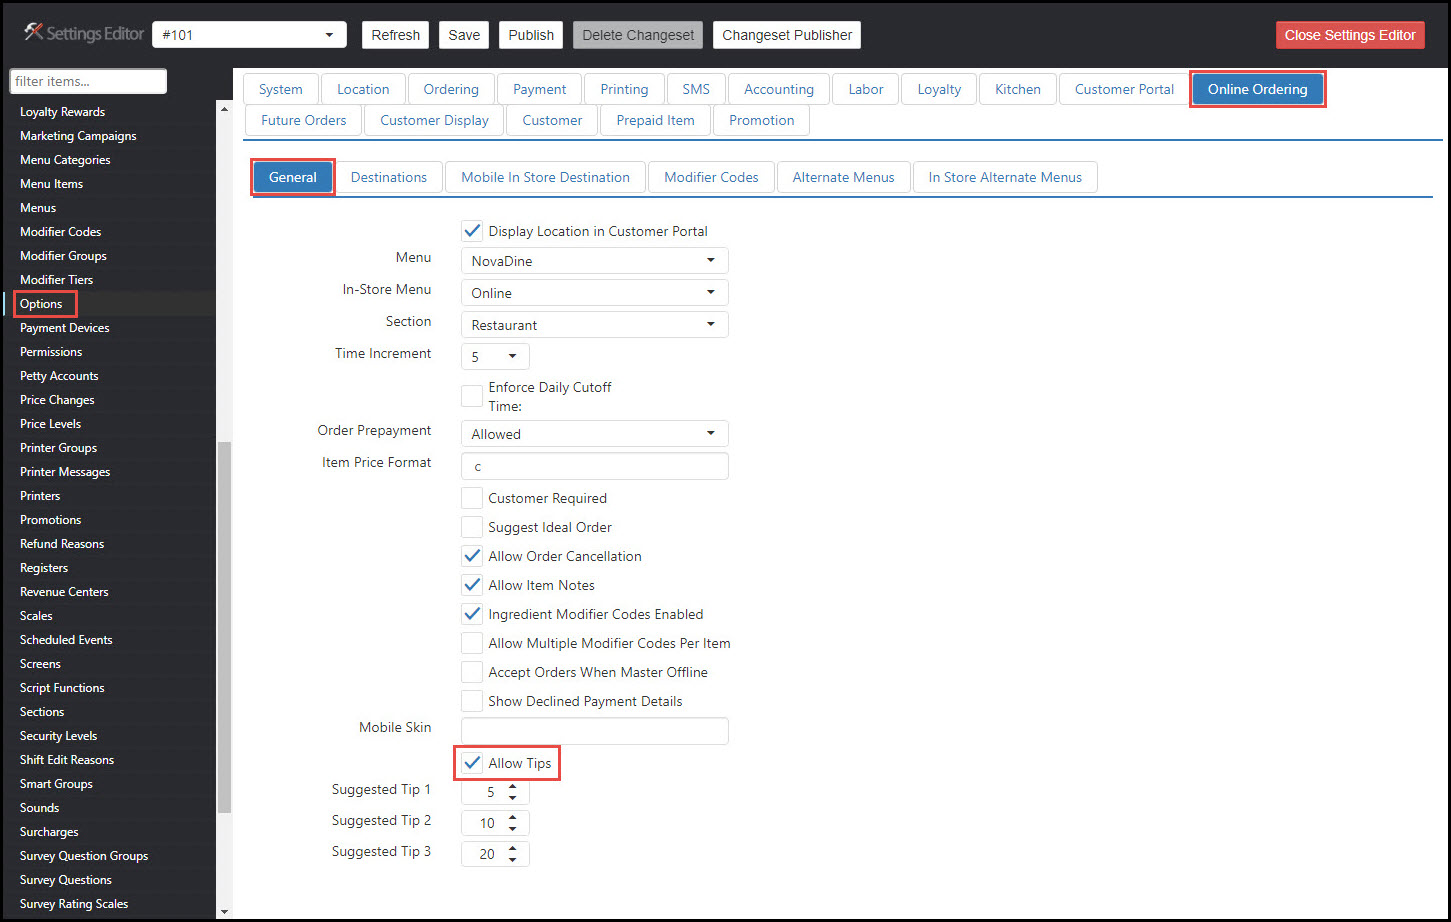
Click on Options in the lefthand menu
Select the Online Ordering Tab, then the General sub-tab
Enable the checkbox next to Allow Tips
Enter suggested tips, if applicable
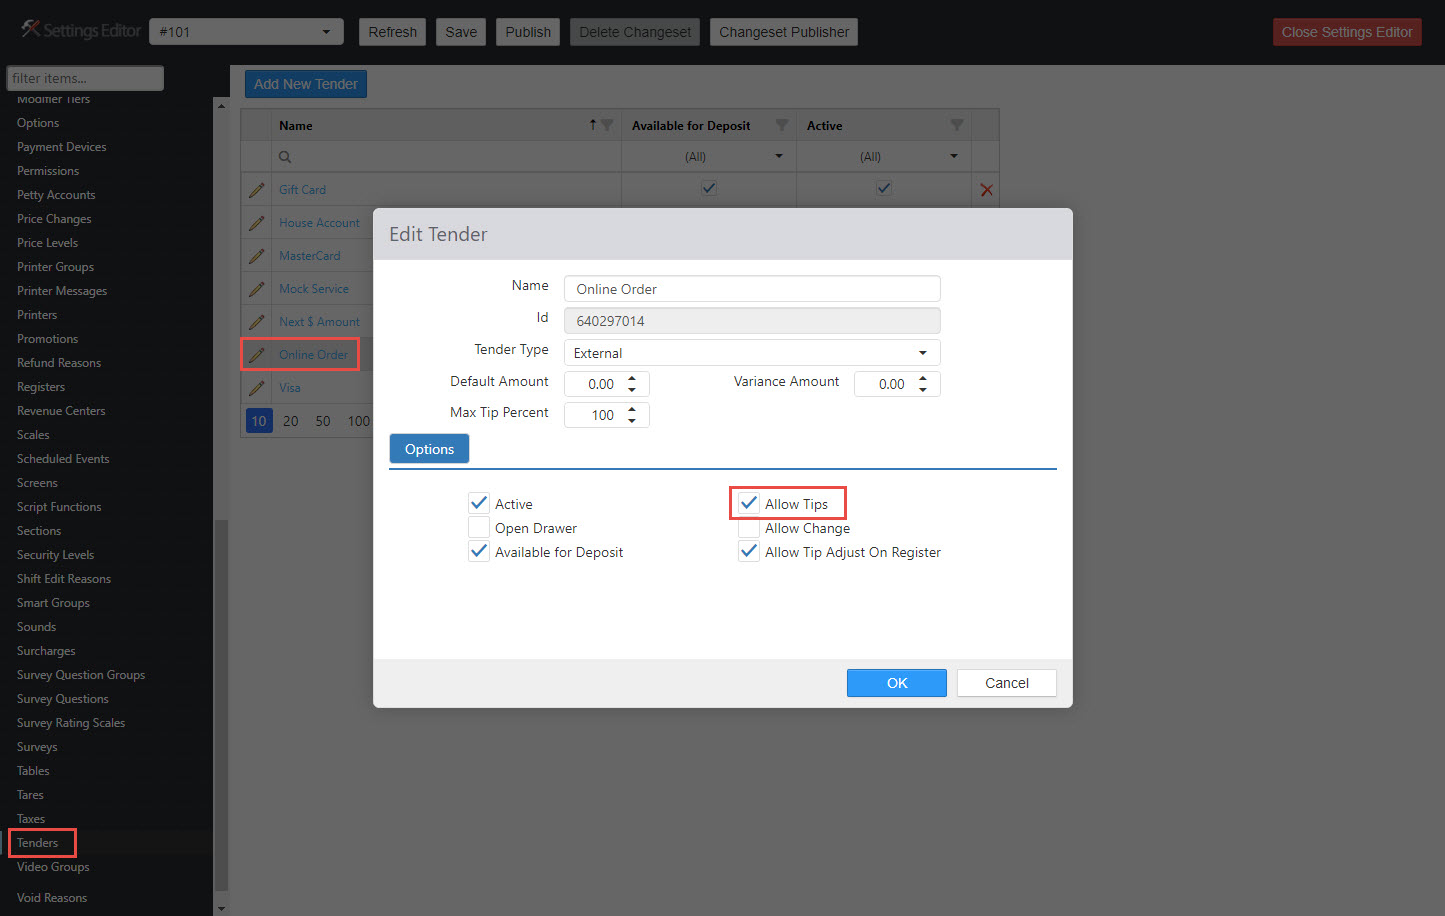
You will also need to enable tips under the appropriate Tender Type by selecting Tenders in the lefthand menu
Click the pencil to the right of the tender type that will be used for online ordering
Enable the checkbox next to Allow Tips and any other options that you need
Delivery Configuration (for Self-delivery or DaaS)
You will need to configure a few extra settings to allow Brink to accept Delivery orders from NovaDine, whether it be orders for the store to deliver or DaaS orders. Please complete the following steps:
Enable Delivery in Destination
In order for your Brink POS to accept a delivery address from NovaDine, Delivery has to be enabled in the Delivery Destination or the order will be rejected.
Create a destination for ‘Delivery’ or create a destination for each Delivery Service Type and/or DSP (ex: Online Delivery, Uber DaaS Delivery, Postmates DaaS Delivery, etc), as explained in Destination IDs
Ensure that ‘Delivery’ is enabled under the Delivery Tab of any Destination that will require a delivery address
Leave the Delivery Time field set at ‘0’
Provide the Delivery Destination ID to NovaDine
Setup Delivery Surcharge
In order for NovaDine to pass down a Delivery Fee to your POS, you must create a Delivery Surcharge in Brink or the order will be returned to NovaDine with the delivery fee removed.
In the Brink Admin Portal, click on Configuration and then open the Settings Editor
Click on Surcharges in the lefthand menu
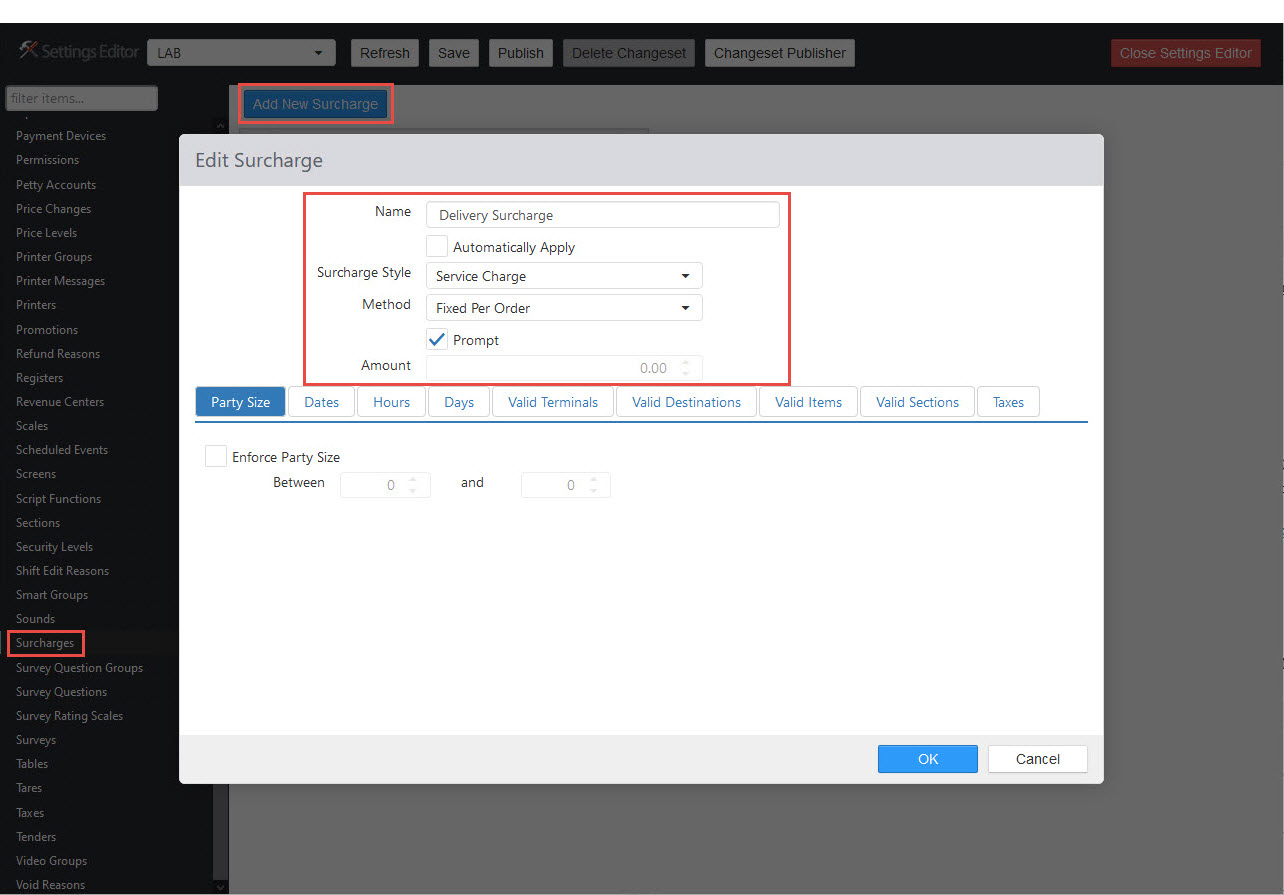
Click ‘Add New Surcharge’
Setup a new Surcharge with the following, as shown in screenshot:
- Name: Delivery Surcharge
- Automatically Apply: leave unchecked
- Surcharge Style: Service Charge
- Method: Fixed Per Order
- Prompt: checked
There is no ID field for the surcharge, so once the changeset is published, you will need to find the ID in the logs. The ID will be listed under <Surcharges> in the logs (see screenshot)
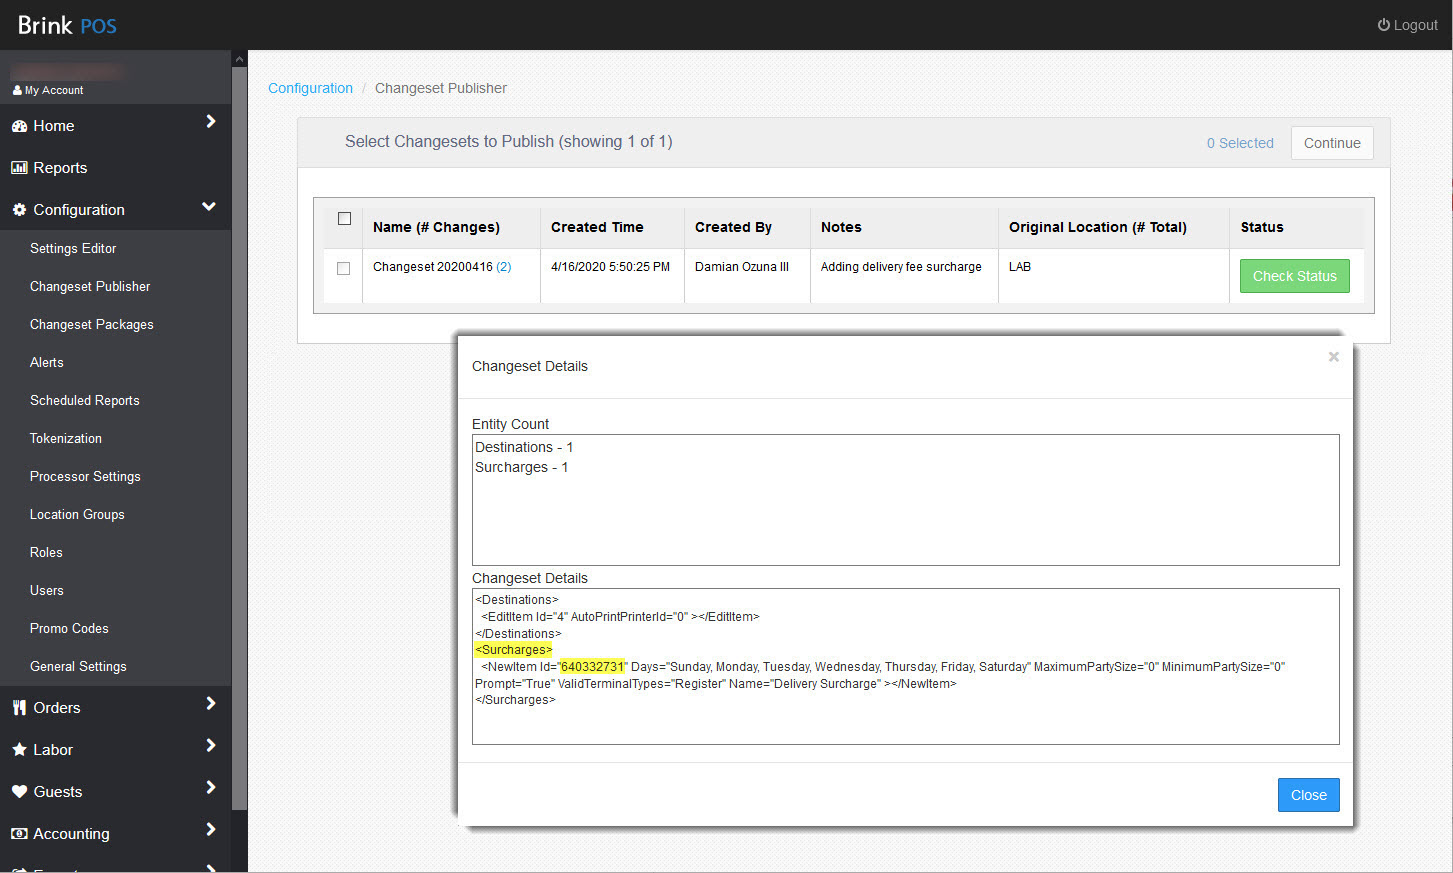
Copy the new Surcharge ID and send it to NovaDine
Coupon Setup
In order for NovaDine to successfully send discounts/coupons to Brink, you will need to add a Discount in Brink for each discount type you plan to offer.
To setup the Discount in Brink:
In the Brink Admin Portal, click on Configuration and then open the Settings Editor
Click on Discounts in the lefthand menu
Click Add New Discount
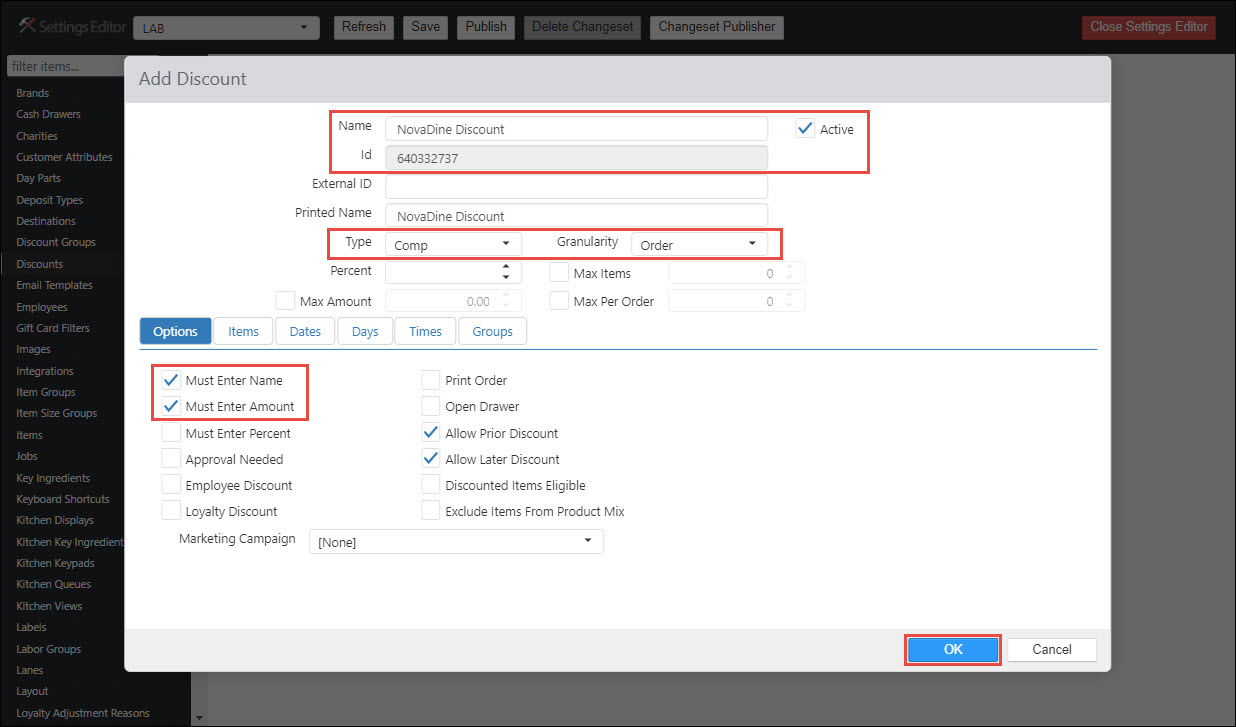
Enter the following information, specific to your discount:
- Name
- Enable the Active checkbox
- Select Comp from the Type drop-down
- Select Order from the Granularity drop-down
- Enable the Must Enter Name checkbox
- Enable the Must Enter Amount checkbox
Copy the ID number listed
Send the copied ID to NovaDine labeled Coupon ID
Click OK
Troubleshooting
Error Messages
- POS Error: This event is logged on the Event Logging Tab in management when NovaDine encounters an error communicating with the POS. These errors will begin with Error sending order to POS: followed by the specific error from Brink.
Order Errors
Error sending order to POS: Error Code 1 - Unknown error - This error could be one of many things. Below is a list of things to check:
- Confirm that the Comment Item ID is setup and configured properly
Error sending order to POS: ‘pickup_destination_id’ - Please confirm the following:
- The correct Destination ID was provided to NovaDine
- The destination is set as Active for the location in Brink
Error sending order to POS: Error Code 103 - Ordering not allowed - Please confirm the following:
- Brink is configured to accept Online Orders from NovaDine
Error sending order to POS: Error Code 104 - Invalid payment type - Please confirm the following:
- The Tender Type is set to External in the Brink Portal. Settings editor -> Tenders -> Edit Tender -> Change Tender Type to External
Error sending order to POS: Error Code 104 - Invalid tip amount specified for payment - Please confirm the following:
- Tips have been enabled in Brink
Error sending order to POS: Error Code 104 - Delivery details required - Please confirm the following: Delivery is selected for the current destination in Brink and the cooresponding Service Type in NovaDine is not sending a delivery address. Please contact your NovaDine Rep to troubleshoot the issue further.
Error Code 104 - Delivery details provided for non-delivery destination - Delivery is not selected for the current destination in Brink and the cooresponding Service Type in NovaDine is sending a delivery address for the order.
- Please enable delivery for the destination in Brink.
Unable to check-in: Master terminal is offline (0) - This means that NovaDine is unable to connect to the master terminal, typically due to Register 1 (or your Primary Register) losing power or connection to the network.
- Please check connection