Backend Management
Contents: This guide will show you how to access the Backend of your site where you will be able to manage users, locations, service types, business hours, coupons, discounts, and reports.
To access Backend Management for your site, proceed to your online ordering website and follow the below steps:
- Click the
icon in the top right corner of your site
- Login with your management account credentials
- Click the
icon in the top right corner that displays after successful login, which will open your Backend Management site in a new tab
Note
If you do not have an account with management access, please register as a customer and ask your NovaDine Rep to upgrade your account
Management Overview
The management tools to customize your online service to match your in-store service are divided into separate tabs. The following provides a summary for each tab:
- Update store hours or apply menu hour overrides
- Search, create, and edit coupons. Opt stores out of coupons
- Create and edit delivery maps and rules. View delivery service hours
- View recent changes, errors, and set up event notifications
Finance Reports Tab (Franchisee’s Only)
- View weekly and period sales reports for the store
- View and edit store’s address and contact information. This is also where you can see the last time the NovaDine Agent checked-in and the most recent menu export
- Create users, manage user access, and assign existing users permission to a store location
- Search customers who have ordered or opted-in for emails for this store and also view marketing information
- Customize menu at global and local level. Define store business hours
- View order details, as well as refund and cancel orders
- Adjust order offset time and escalation alerts for the store
- Adjust business reporting hours and suggested tip settings for the store or apply order throttling rules
- View, accept, and complete orders. Enable and disable service for the day
- View a list of stores that have Agents not checking in
- Generate a series of reports for orders and payment information between desired dates
- Customize availability, payment types, tax information, adjust lead and prep times, and exclude service hours for the store’s service types
- Search, create, and edit staff users for chain
Business Hours
The Business Hours Tab is where you can view and edit a store’s business hours.
To update the business hours of a location:
From the Business Hours Tab, search for and select the store that you wish to update hours for
If there are multiple menus assigned to your location, select the menu that you wish to update hours for from the dropdown
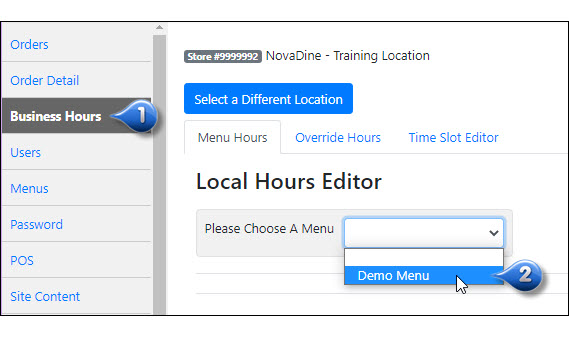
Your current menu hours will be listed underneath the menu selector
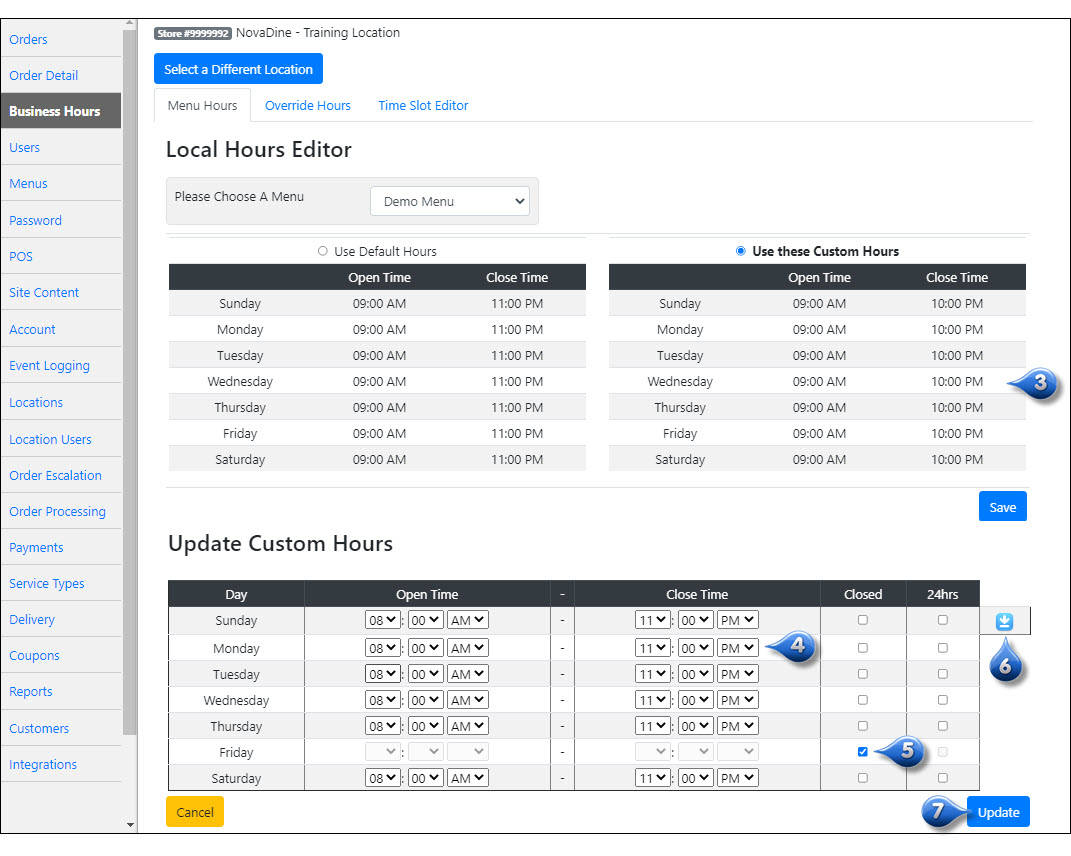
Update the menu hours for each day of the week by choosing the open and close time from the appropriate drop downs
If the menu will be unavailable on certain days, check the Closed box next to appropriate day
If the menu will have the same hours for each day, simply enter the hours in the first row and click the blue down arrow to copy the hours to the below days
Click Update to save your changes
Note
If the store is using Third Party Delivery and the hours need to be pushed to the DSP sites, please remember to Publish Menu under the Menus Tab for the location to push the updated hours immediately
Time Slot Editor
Time Slots can be assigned to menu items, throttling rules, and scheduled based on when the item should be available. This can be done at the global level (No Store selected), or at the local-level (Store selected).
To update the Time Slots or Schedules:
From the Business Hours Tab, select the Time Slot Editor sub-tab and search for the store you wish to update time slots for, or do not search for a location to update global Time Slots.
Create a new time slot by specifying Slot Name, and External ID (If applicable). Then, select Create Slot
Choose a Time Slot from the Time Slot Name drop-down.
Specify Day(s) of the week for this time slot to be available.
Select a Start Time and End Time for the time slot’s schedule.
If needed, specify a Start Date and/or End Date.
Select Add Schedule
If you are viewing local-level Time Slots, you can also select the
 to configure a local level override.
To remove a schedule, select
 next to the time slot’s schedule.
You may also change available fields and select Update to modify existing time slot schedules.

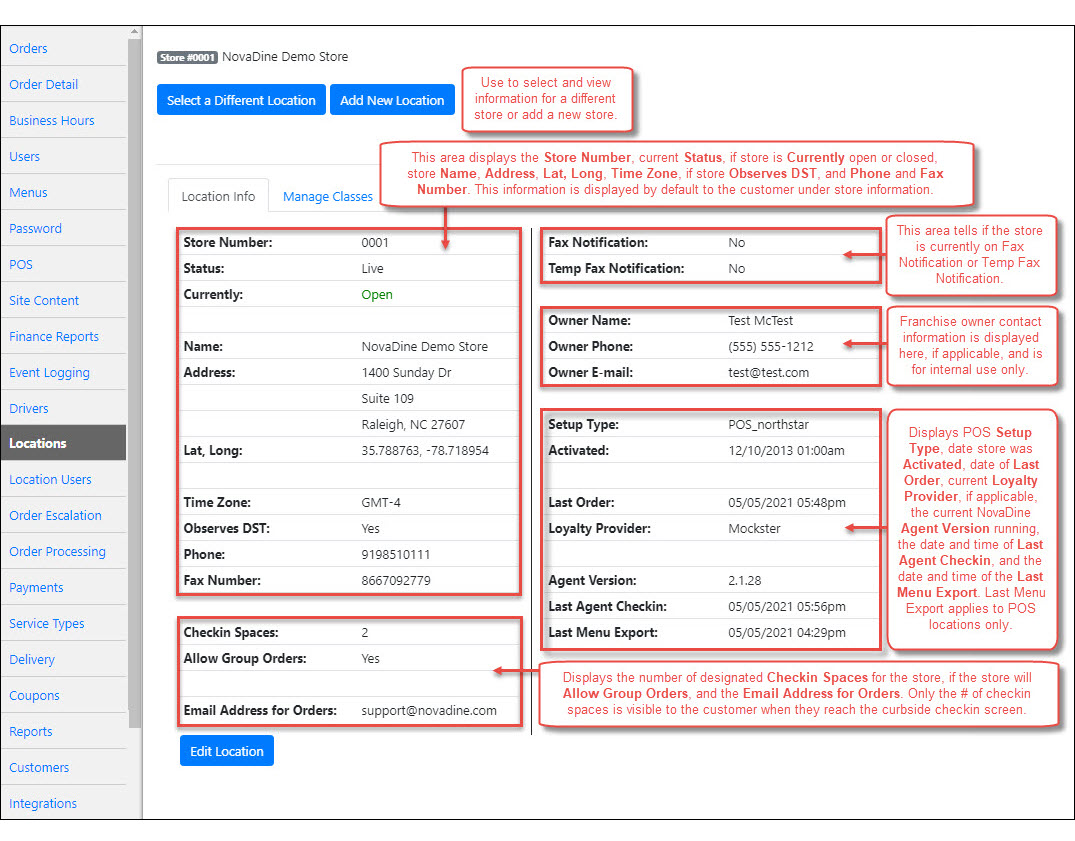
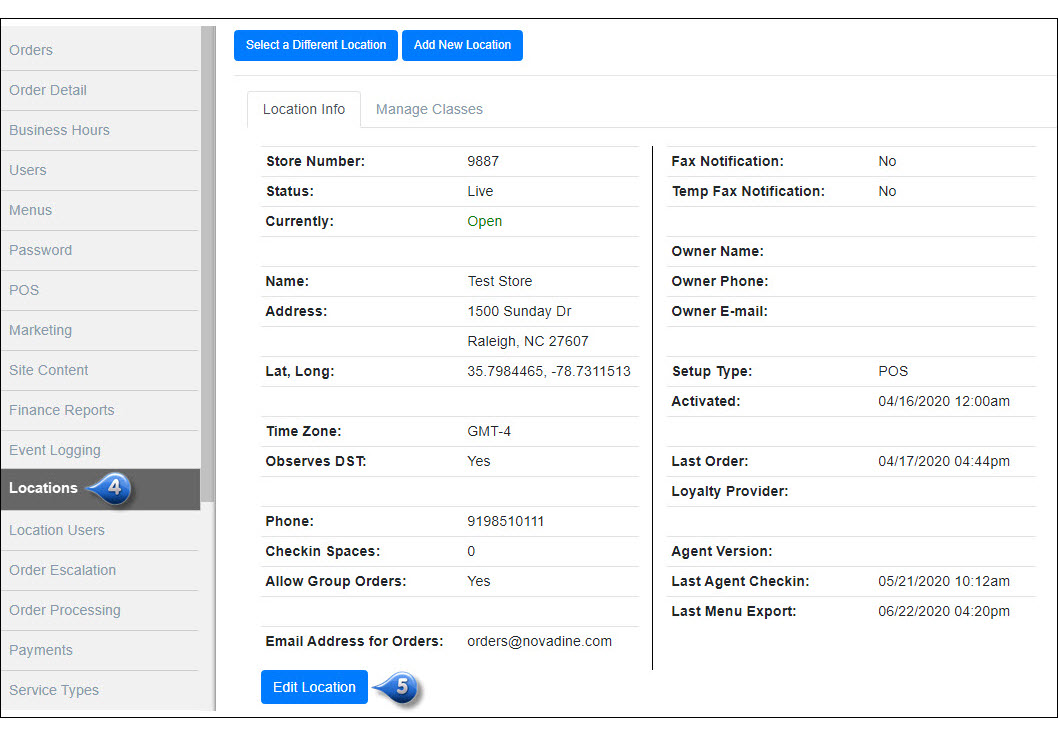
Locations Tab
The Locations Tab is where you can view and edit a store’s address and contact information. This is also where you can see the last time the Agent has checked-in and menu exported
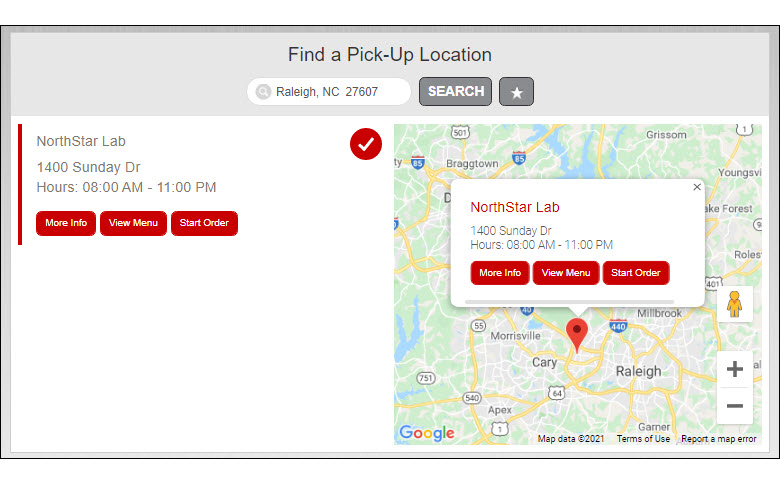
The information from the Locations Tab that is shown on the front end to the customer displays as below:
Things to note about the Locations Tab:
- The geocode for each location is pulled from Google Maps. The Latitude and Longitude can be entered manually, if necessary.
- Multiple email addresses can be entered into the ‘Email Address for Orders’ field by simply separating the addresses with a comma
Store Statuses
Stores can be in a variety of statuses. Below explains what each status means:
- Activation Requested: Store is ready to go live and activation has been requested, but there is still information outstanding
- Approved: Store has been approved for service and can be placed online once ready
- Canceled: Store has been taken offline but not closed (i.e., moved locations)
- Closed: Location is permanently closed for business
- Live: Store is active and able to accept online orders
- Live - Need Paperwork: Store is active and able to accept online orders, but required paperwork is still outstanding
- New: Location has been setup in our system but is not yet ready for activation
- Offline: Store has been temporarily taken offline (i.e., internet issues)
- Suspended: Location has been taken offline and cannot be re-activated without NovaDine’s approval (i.e., financial issues)
- Temporarily Closed: Store has been taken offline for a limited period of time (i.e., remodeling)
Note
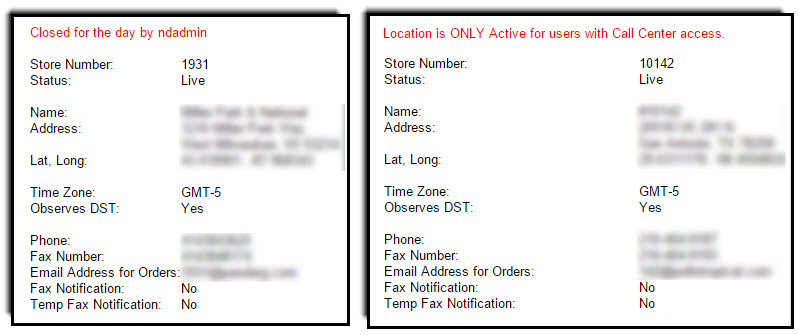
A store can be in Live status, but have the following conditions:
Closed for the day by ndadmin (or other user): this is usually due to the location being automatically taken offline for the day due to internet issues. The location may also take itself offline for the day if they are experiencing issues (closed due to inclimate weather, store repair, etc.)
Location is ONLY Active for users with Call Center access: this location can only accept orders through the Call Center. Customers are not able to order online
Note
A Test Location will show ‘Test Store’ in red beside the Store Status. Only users with Corporate Manager, Chain Administrator, NovaDine Support, and Call Center access can place orders at a test location
Add a Location
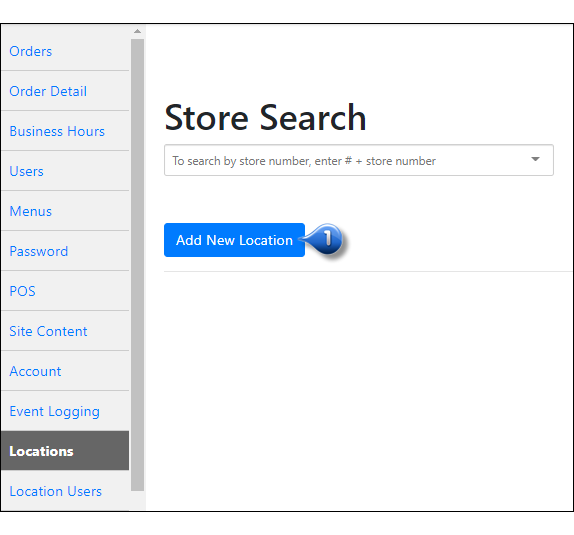
To add a new location, you must have Chain Admin or Corporate Manager access and follow the below steps:
Click Add New Location link
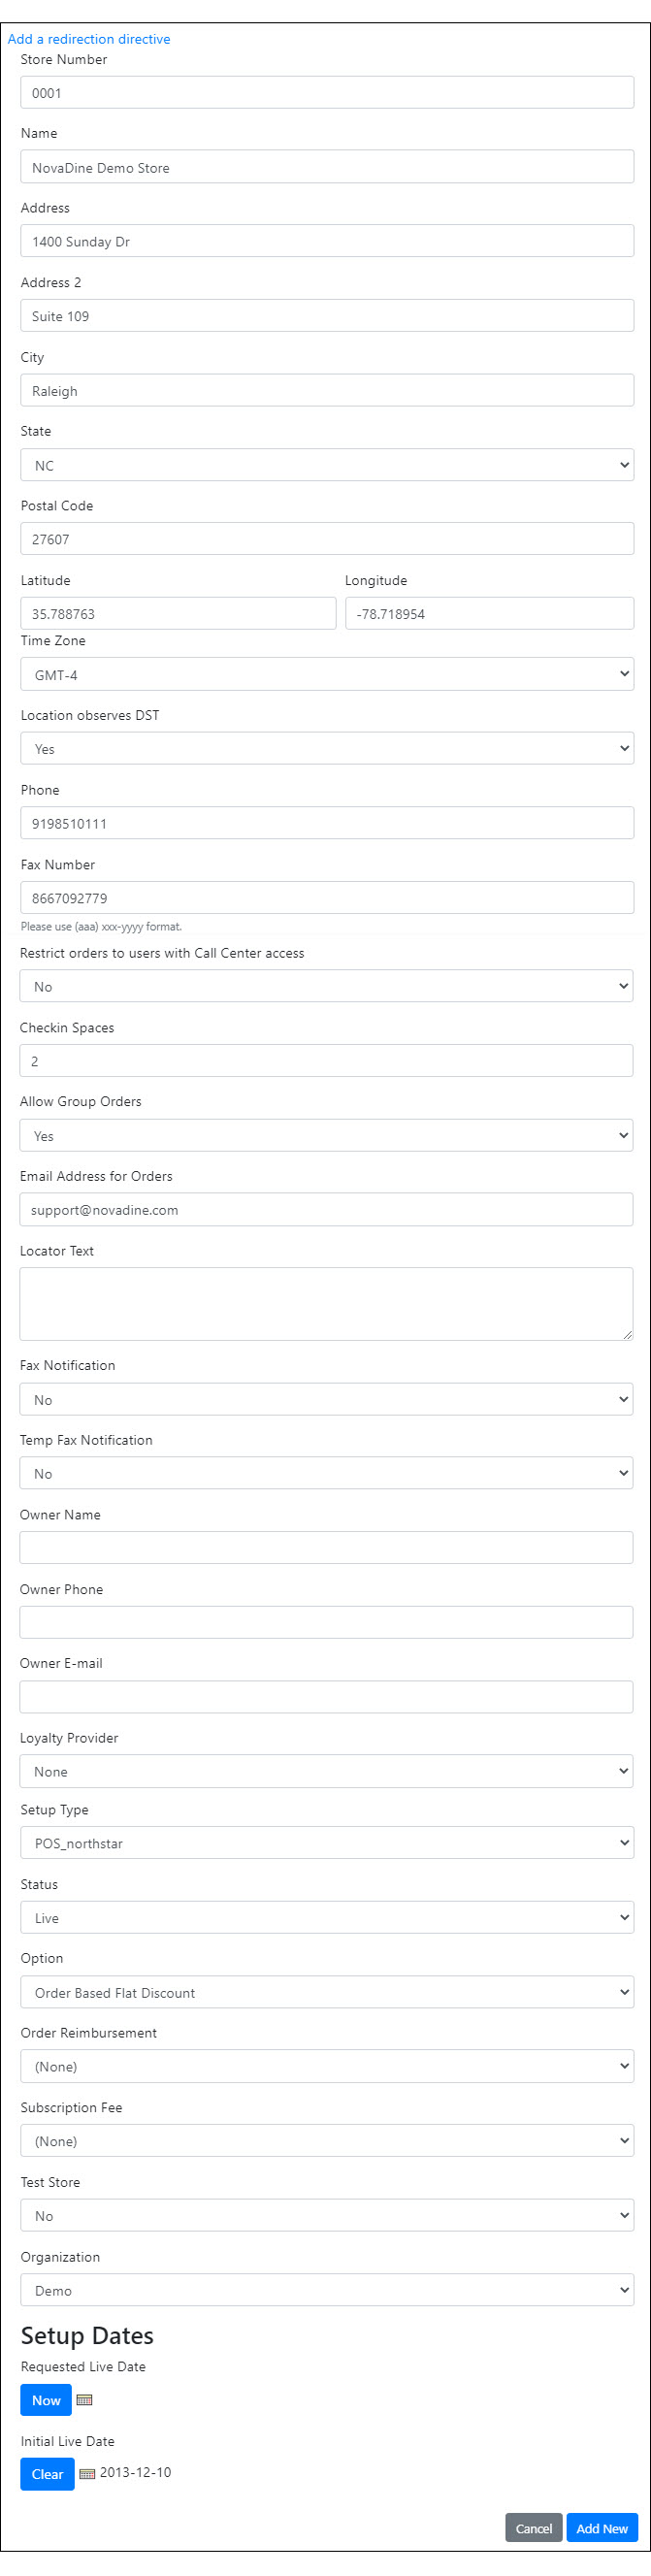
Enter the following required information:
- Store Number
- Store Name
- Address
- City, State, Zip Code
- Store Phone Number
- Email Address for Orders
- Owner Name (Franchisee locations only)
- Owner Phone Number (Franchisee locations only)
- Owner Email Address (Franchisee locations only)
- Setup Type
- Organization
Click Add New
Note
Latitude and Longitude fields will automatically populate once the address has been entered and store added
Edit a Location
To edit an existing location, you must have Chain Admin or Corporate Manager access and follow the below steps:
Click Edit

Update/verify information
Click Save
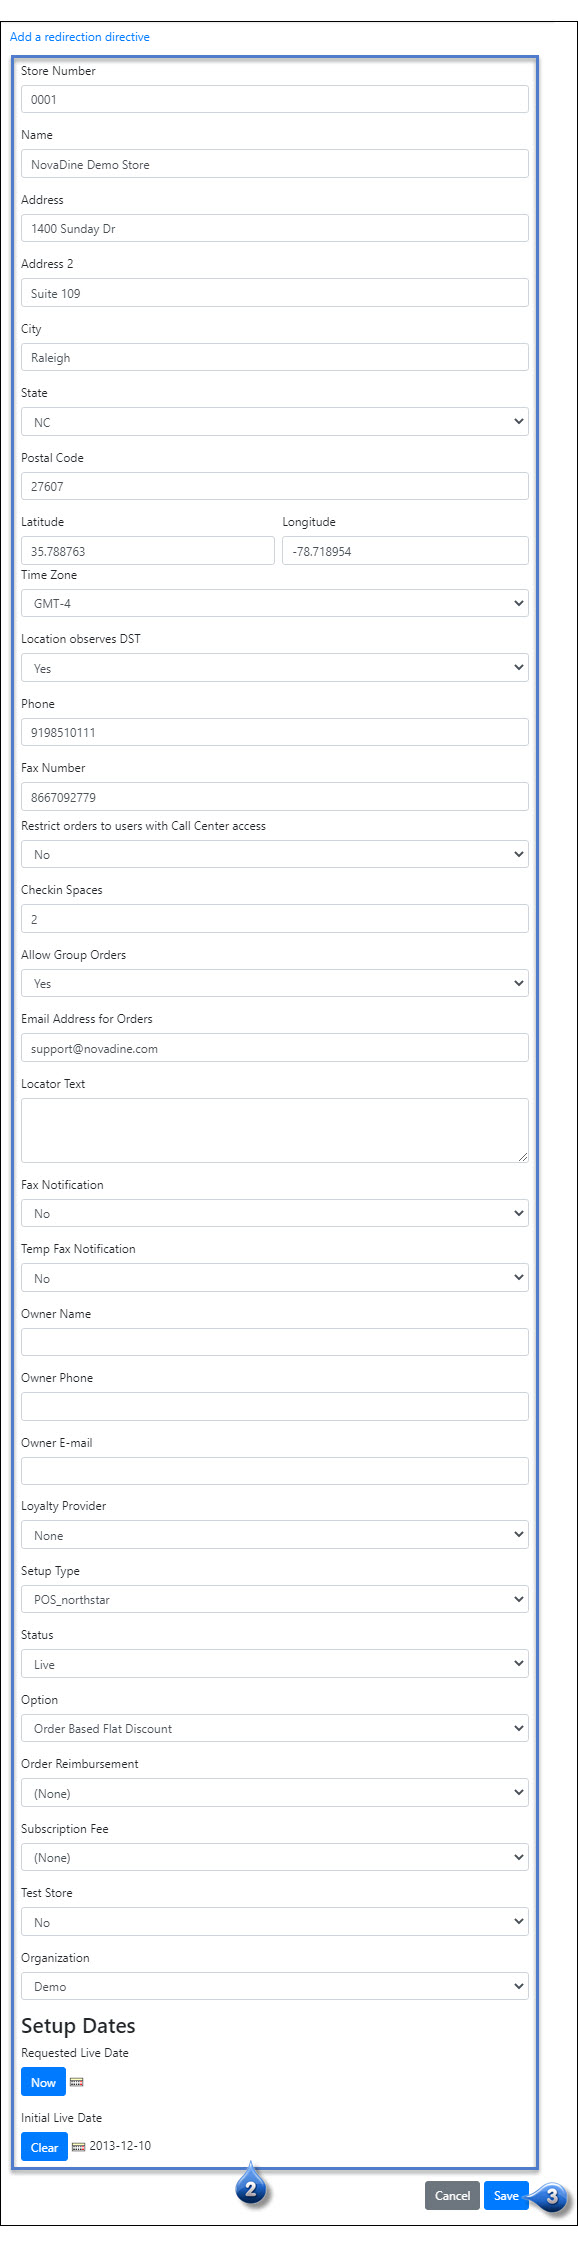
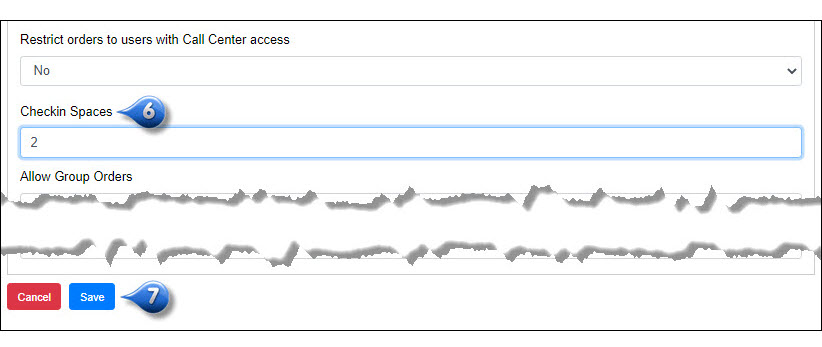
Mark a Store as Call Center Only
For testing purposes or for placing a store online for Call Center Orders only, please follow the below steps:
- Sign in to your management account and navigate to the back-end management
- Search and select the store you wish to edit, in the Locations tab
- Choose the Edit Location button for this location (bottom left-hand side of this page)
- Select Yes from the drop-down menu for the field labeled Restrict orders to users with Call Center access
- Click Save
- The location will now only be available for users that have Call Center access
Users Tab
The Users Tab is where you can search, create, edit, and assign roles to staff users for your chain
User Roles
NovaDine is configured to allow a tiered delegation of user management for access to the site. The below list explains each role’s access:
- Call Center: access to the Call Center only. No access to the management tabs
- Chain Admin: access to all tabs in management, access to edit the Master Menu, ability to create corporate users and chain admins or upgrade existing users’ access
- Corporate Manager: access to update menu pricing/availability, business hours, service types, manage orders, and view reports for any store. Corporate Managers have access to all management functions for all stores, but no Master Menu access
- House Account Admin: access to create and view customer house accounts, modify spending limits and accept payments
- House Account Manager: access to view customer accounts and accept payments
- Reports Manager (Corporate-level): able to access only Reports and Order Detail Tabs, but are not able to cancel or refund orders. Report Managers can be given access to issue refunds, if requested by the Chain.
- Reports User (Corporate-level): able to access only Reports Tab, but are not able to export results, cancel or refund orders
Note
Only users with Corporate or Admin access are able to view locations on the front end that are marked as a ‘test store’
Adding Corporate Users
If you are a Chain Admin, you have the ability to create and upgrade existing users to a Chain Admin, Call Center, Corporate-level Report Manager, or Corporate Manager via the Users Tab
Add a New User
To create a new user from the Users Tab:
Click Add an account for a new staff member at bottom of page
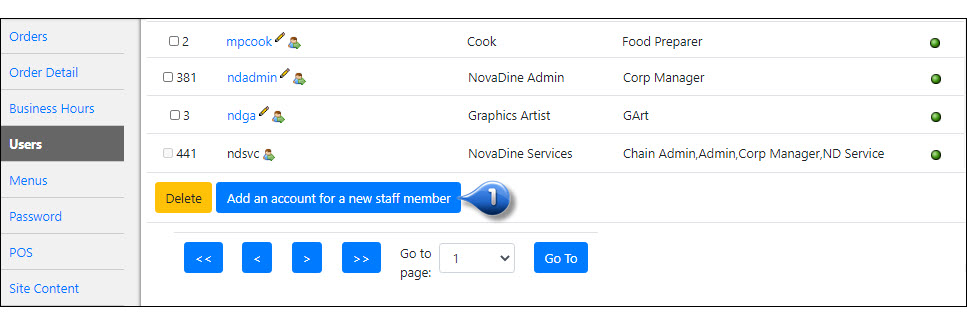
Enter the new user’s information in the required fields
Click Create Account

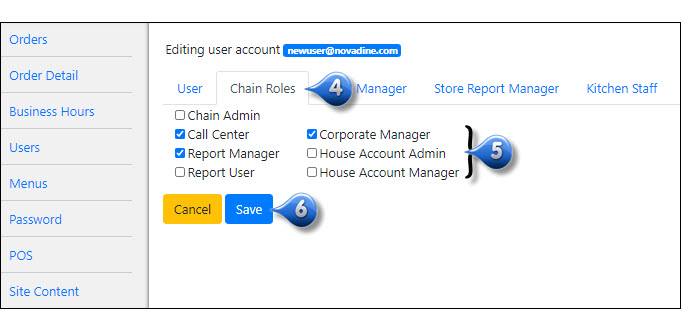
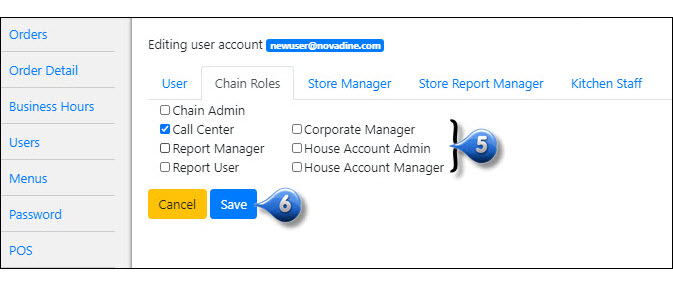
Select the Chain Roles subtab
Check the box(es) next to the role(s) you want to grant the user
Click Save when done
Note
If you are adding a registered user that does not already have Management Access, you will need to select Show Inactive before searching
Locate/Edit an Existing User
To locate and edit an existing user:
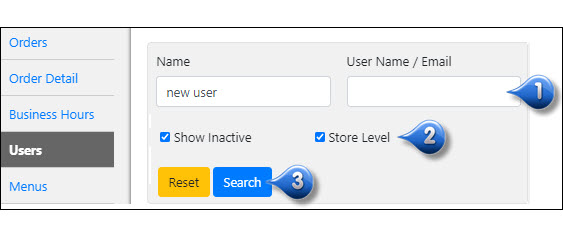
Search for a user by entering their name (case sensitive) and/or email address in the corresponding fields
Select any additional search filters:
- Show Inactive: enable this checkbox to include Inactive Users (users with no management access) in search results
- Store Level: enable checkbox to include Store Level Users in search results
Click Search
Edit user by clicking the pencil icon next to their name in the search results
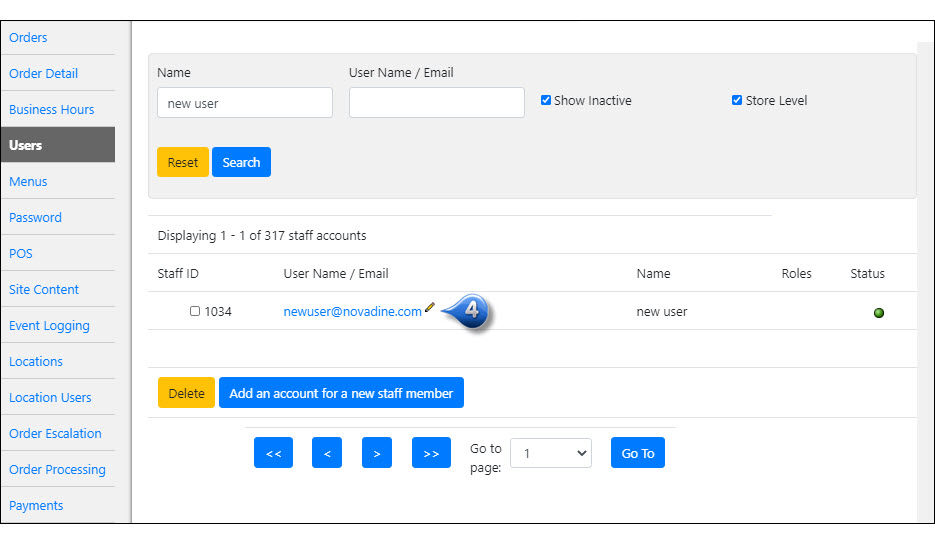
Make any necessary updates on the appropriate subtabs - you can update user’s first and last names, password, assigned role(s)
Click Save when done
Note
Name search is case sensitive
Delete an Existing User
To delete an existing user:
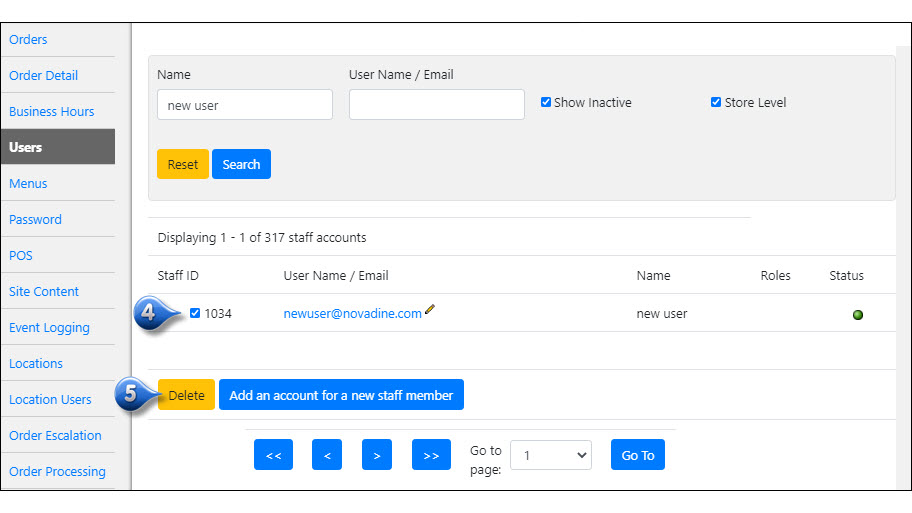
Search for a user by entering their name (case sensitive) and/or email address in the corresponding fields
Select any additional search filters:
- Show Inactive: enable this checkbox to include Inactive Users (users with no management access) in search results
- Store Level: enable checkbox to include Store Level Users in search results
Click Search
Enable the checkbox to the left of the user that you wish to delete
Click Delete
Activate/Deactivate User
To activate/deactivate an existing user:
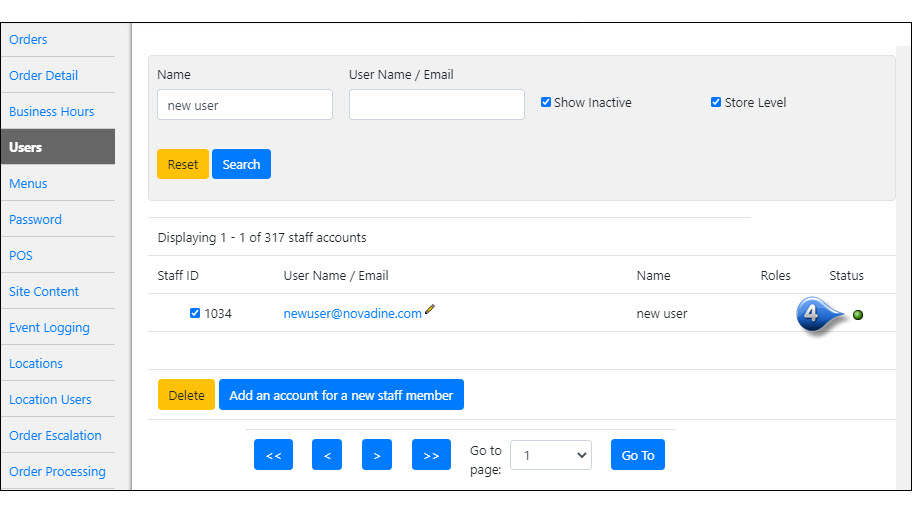
Search for a user by entering their name (case sensitive) and/or email address in the corresponding fields
Select any additional search filters:
- Show Inactive: enable this checkbox to include Inactive Users (users with no management access) in search results
- Store Level: enable checkbox to include Store Level Users in search results
Click Search
Deactivate a user by clicking the green button under the Status section (turning it red/disabled). Activate an inactive user by clicking the red button (turning it green/enabled)
Location Users Tab
From the Location Users tab, you can assign Store Manager, Report Manager and Kitchen Staff roles to new or existing users at the store level. If you are logged in as a corporate user, you will need to search for the location in which you are creating the user to access this view
The below list explains each role’s access:
- Kitchen Staff: access is limited to the Orders Tab for the assigned location
- Reports Manager (Local-level): access is limited to the Reports and Finance Reports Tabs for the assigned location(s)
- Store Manager: update menu item pricing/availability and business hours, manage orders, and view reports for any stores assigned to them. Stores have to be explicitly assigned
Create a New Location User
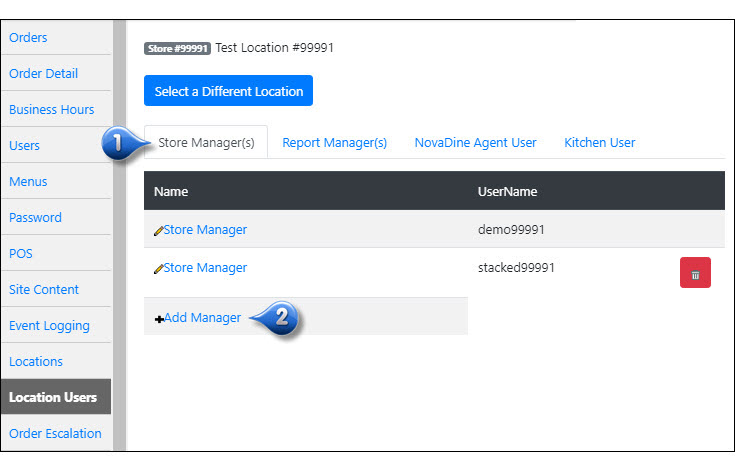
After selecting the appropriate store, to add a new location user:
From the Location Users Tab, select the appropriate subtab for the type of user you wish to create
Click the +Add... button next to the appropriate role for the new user
Click New User
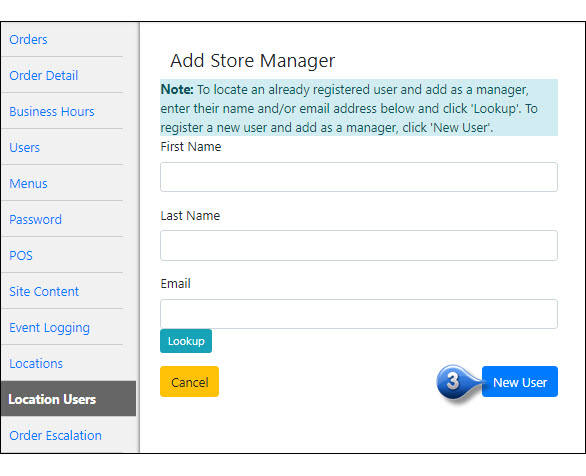
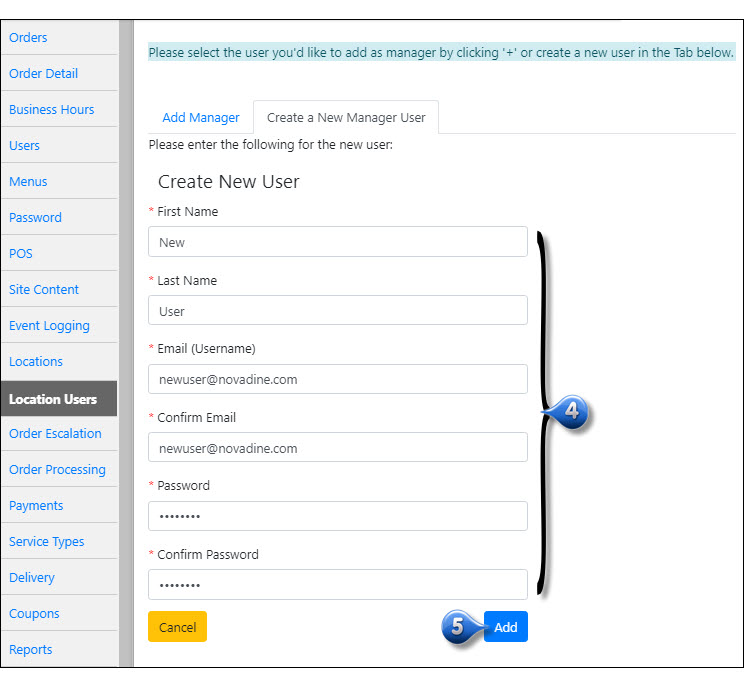
Enter the new user information in the required fields (once the user is added, they can login and update their password under their user account, if necessary)
Click Add
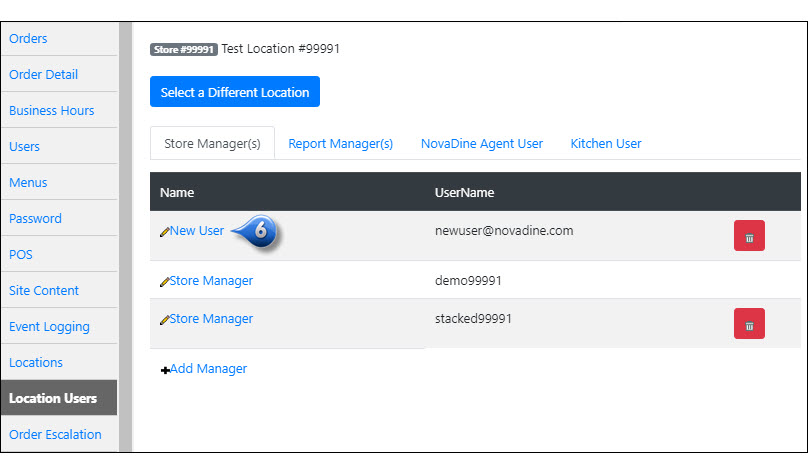
You will now see the newly added user
Add an Existing User to a Location
After selecting the appropriate store, to add an existing user for that location:
From the Location Users Tab, select the appropriate subtab for the type of user you wish to edit
Click the +Add... button next to the appropriate role for the new user
Enter their First Name, Last Name and/or Email address in the corresponding fields
Click Lookup

Add as manager by clicking + next to the name in the search results
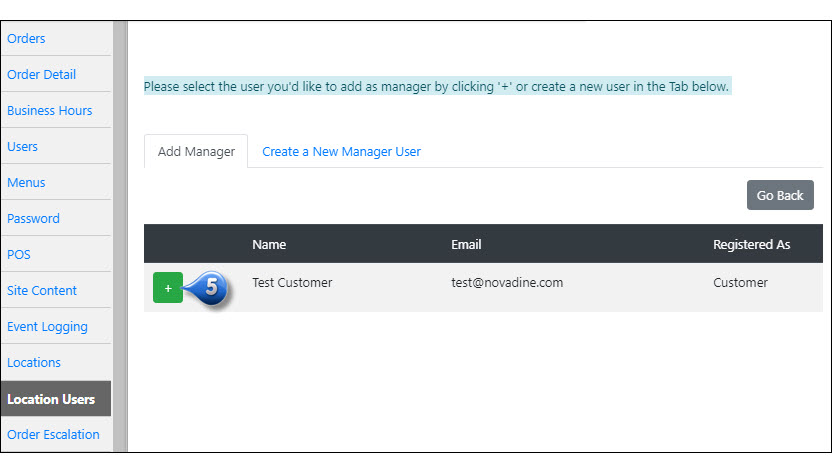
The added user will now be displayed under the appropriate role
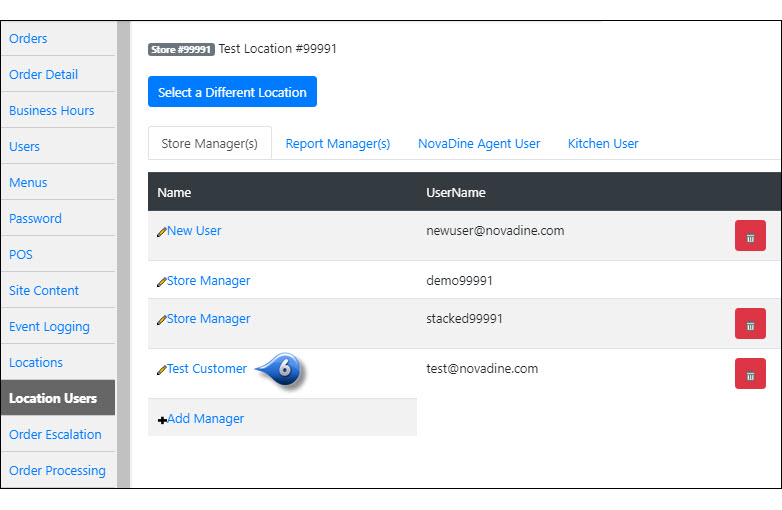
Delete a Location User
After selecting the appropriate store, to delete a user from a location:
From the Location Users Tab, click the red trashcan icon to the right of the user that you wish to delete
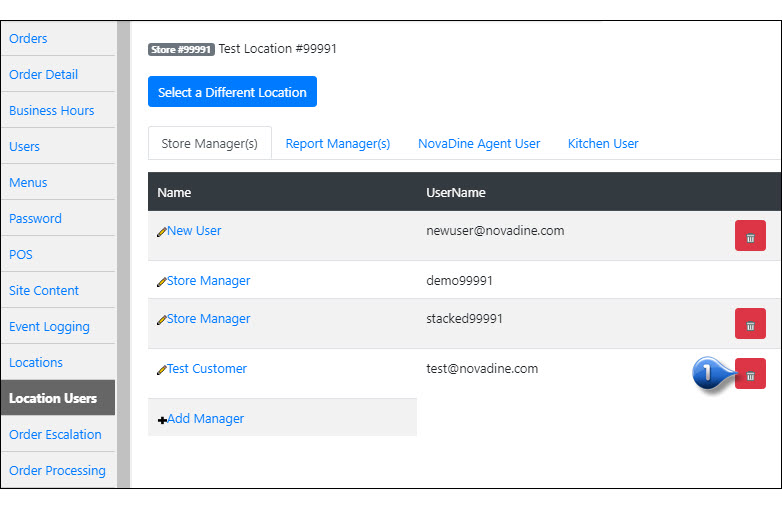
Note
The default Store Manager login for a location will not present an option to delete the user
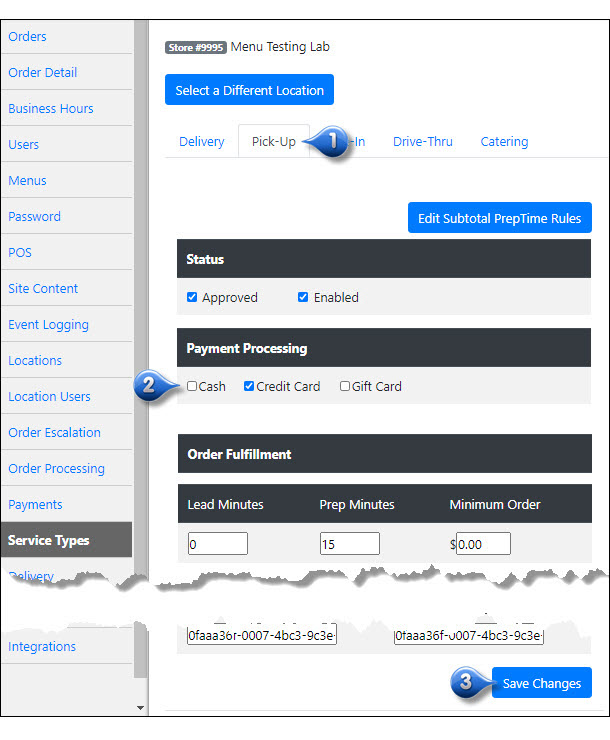
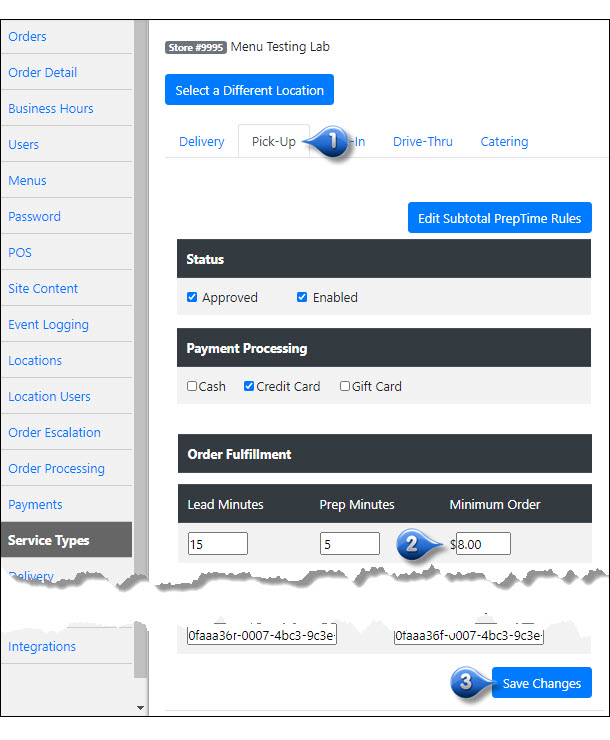
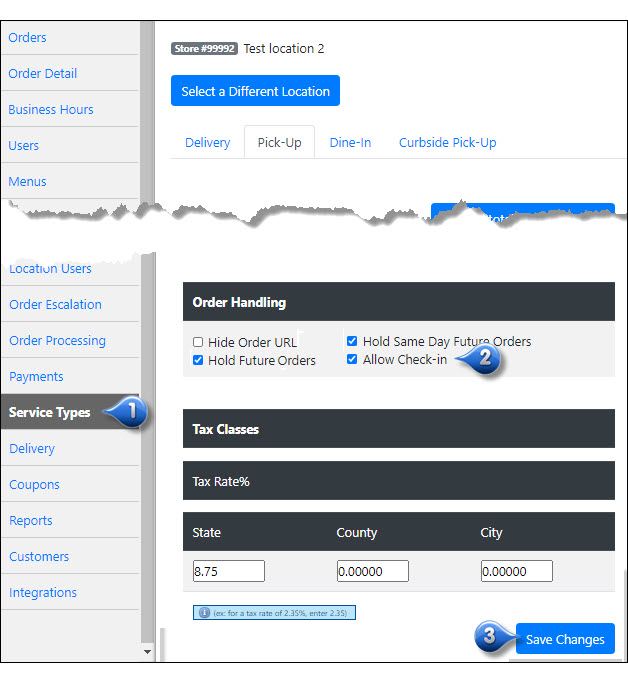
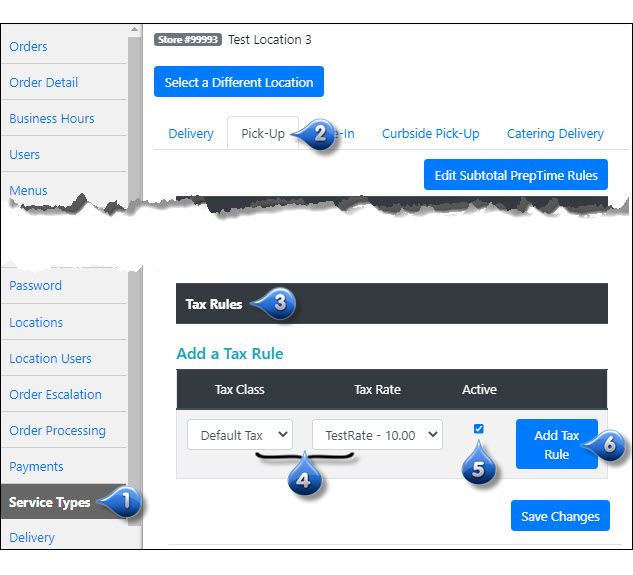
Service Types Tab
Use this tab to manage the services offered by your store. Under each service type subtab, you have access to:
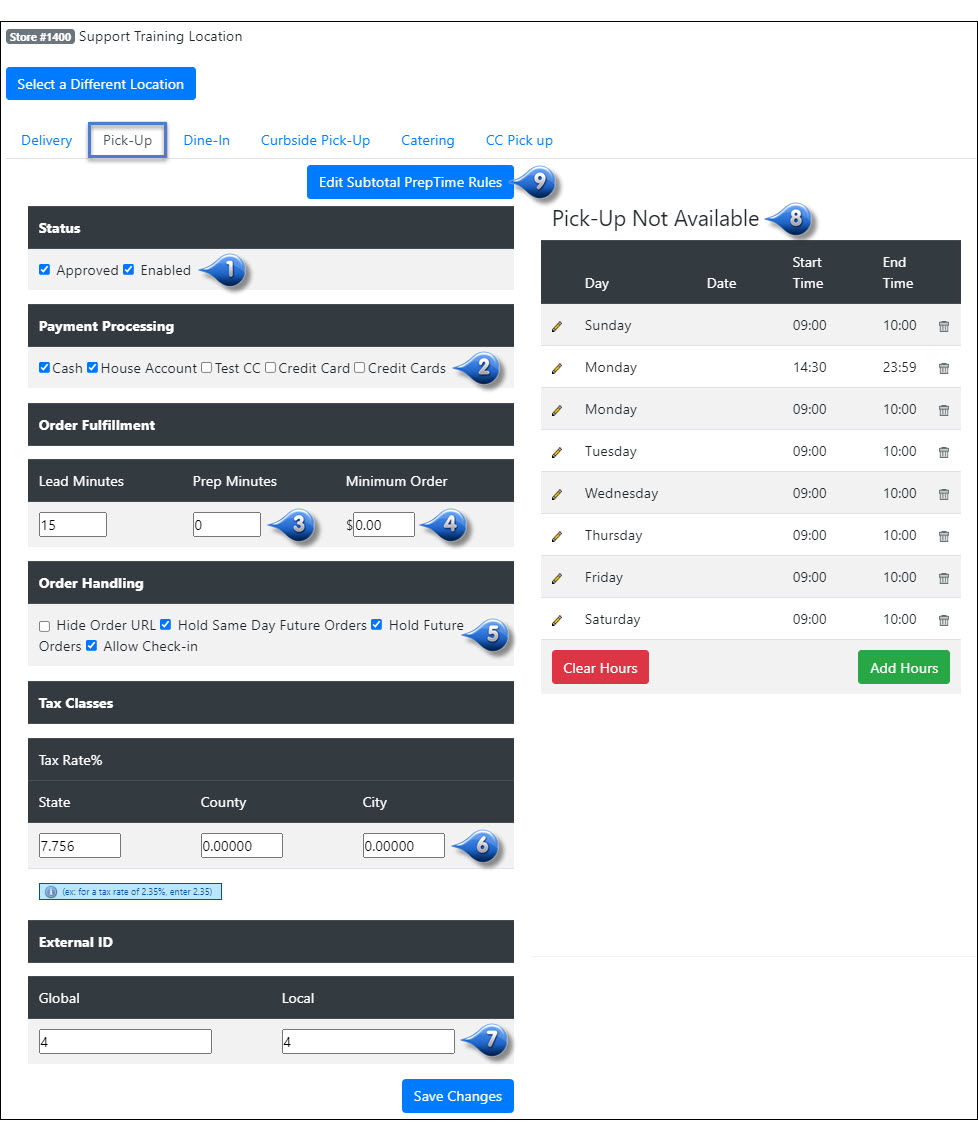
Note
In this screenshot, pick-up is the only service type displayed
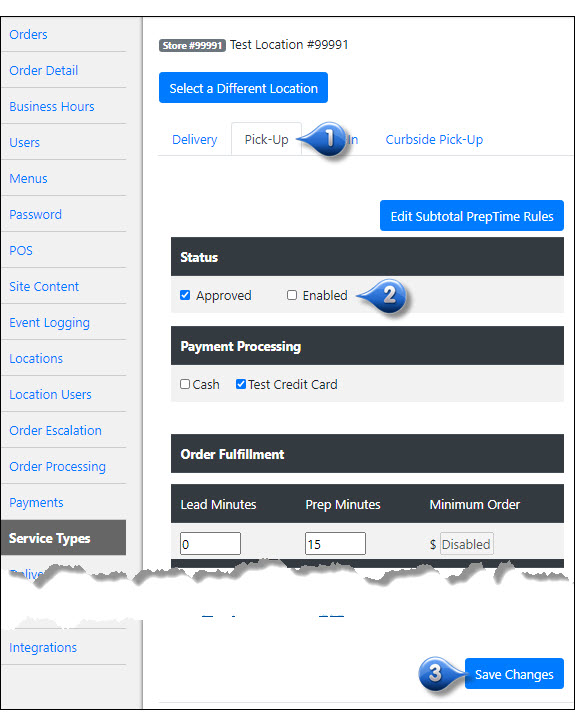
Enable and/or Disable Service Types
To enable and/or disable service types:
- From the Service Types Tab, choose the subtab for the Service Type that you wish to enable/disable
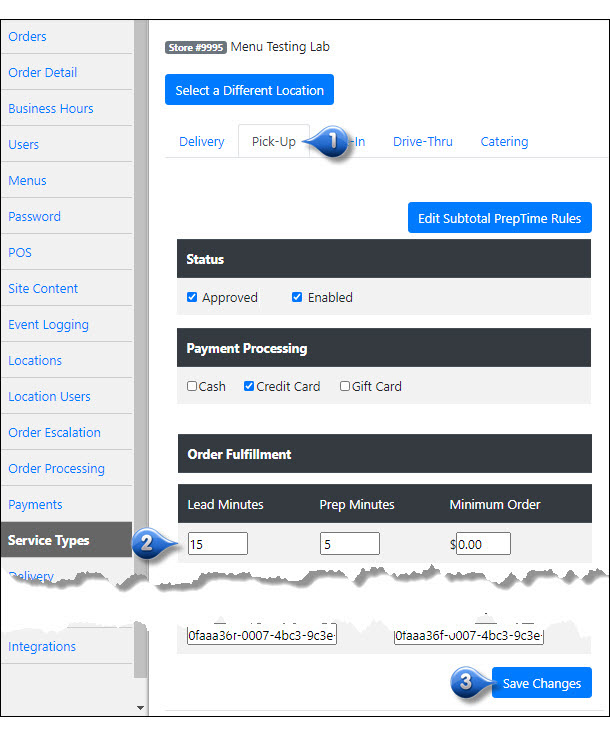
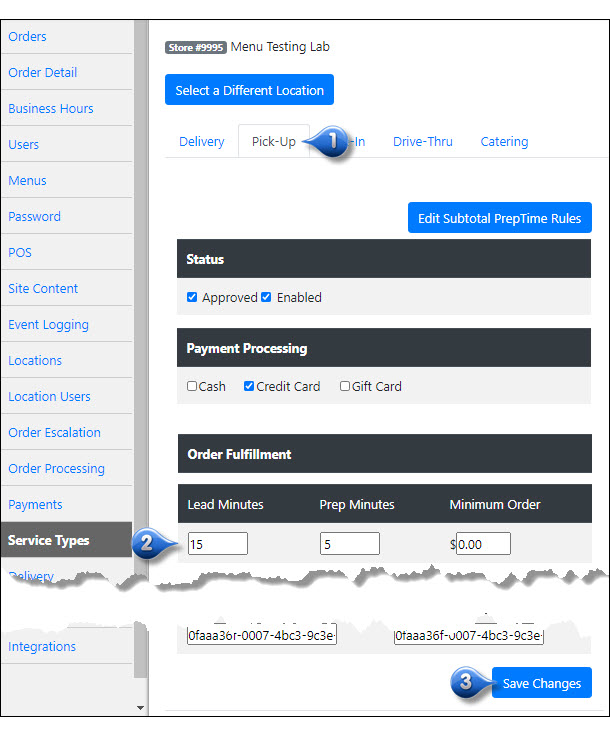
- Under the Status section, click the checkbox next to Enabled to enable the Service Type
- If box is checked, the Service Type is Enabled
- If box is empty, the Service Type is Disabled
Click Save Changes
Repeat these steps for each Service Type you wish to Enable or Disable
Note
Service types must be Approved by NovaDine before they can be Enabled
Manage Methods of Payment
You have the option of enabling different methods of payment for each service type offered. To enable a payment for a particular service type:
From the Service Types Tab, select the subtab of the service type that you wish to update payment information for
Check the box next to each payment method you will offer for that particular service type
Click Save Changes
Repeat the above steps for each service type that you wish to update the payment types for
Note
Payment types must first be configured under the Payments Tab to be available as an option under the Service Types Tab
Manage Lead Time
The Lead Minutes are the earliest possible time that a customer can order
Key Concepts of Lead Time:
- Used to determine earliest available time when customer is placing an order
- Manages customer expectations on earliest order time
- Used only when customer starts an order
- Configurable by service type (pick-up, delivery, catering) and location
- Configurable using time slots by service type
- Phone order use case:
- Customer: “I’d like to place a catering order. How soon can I get it?”
- Restaurant: “We need at least 4 hours on catering orders” before knowing what the customer will actually order
Edit Lead Time
To set the Lead Time for a location:
From the Service Types Tab, select the subtab of the service type that you wish to update the lead time for
Enter the decided time into the Lead Minutes field
Click Save Changes
Repeat the above steps for each service type that you wish to update the lead time for
Note
Lead Time should be at least 10 minutes higher than Prep Time. This allows the majority of customers to complete their order without being prompted with a new order time at check out.
Manage Prep Time
The Prep Minutes are the general time it takes to prepare and package an order
Key Concepts of Prep Time:
- Used to determine order ready time
- Calculated at check out after customer has added entire order to cart
- Ensures restaurant has enough time to prepare customer’s order
- Determines the time that the order is fired to POS, if you have a POS integrated system
- Consists of 3 cumulative components:
- Prep time per service type - configurable by location
- Prep time by menu item - configurable at chain level
- Prep time by order subtotal - configurable at chain level
- Phone order use case:
- Customer: “I’d like to place a pick-up order. How early can I get it?”
- Restaurant: “We need at least 15 minutes”
- Customer places large order
- Restaurant: “Due to the size of your order, we will need two hours to complete it. Would you like to pick it up in two hours or set another time?”
Note
For example, if a customer orders 2 items that each have a prep time of 3 minutes, the order will be fired to the POS and kitchen 6 minutes before the desired order ready time
Edit Prep Time for a Location
To set the Prep Time for a location:
From the Service Types Tab, select the subtab of the service type that you wish to update the prep time for
Enter the decided time into the Prep Minutes field
Click Save Changes
Repeat the above steps for each service type that you wish to update the prep time for
Note
For large orders, the system will automatically adjust the order’s ready time based on the items ordered and quantities of items
Edit Prep Time Globally (All Locations)
To set the Prep Time for all locations:
From the Service Types Tab, select the subtab of the service type that you wish to update the prep time for
Select the Global Sub-tab
Enter the decided time into the Prep Minutes field
Click Save Changes
Repeat the above steps for each service type that you wish to update the prep time for
Note
For large orders, the system will automatically adjust the order’s ready time based on the items ordered and quantities of items
Lead Time vs. Prep Time
| Lead Time | Prep Time | |
|---|---|---|
| Used when starting an order | X | Only if greater than Lead Time |
| Used in calculating total order prep time | X | |
| Varies based on orders in the queue | X |
Lead Time is used to set the earliest time a customer can place an order for, before we know what the order is, how big, etc. For example, if a customer comes to the site at 11:00 a.m. and wants to start an ASAP order, and the lead time is set to 15 minutes, then the earliest time they can select is 11:00 + 15 minutes = 11:15 a.m. This is before they’ve added any items to their cart, etc.
Prep Time is calculated, using the specified prep time rules, when the customer checks out. Using the example from above, if the same customer starts checking out at 11:03, with an order of $15.00, the prep time is calculated to be 10 minutes based on the prep time rules. Since 11:03 (current time) + 10 minutes (prep time) = 11:13 and is still less than 11:15, they are allowed to check out and keep the 11:15 promise time. However if they place a $40.00 order, prep time is calculated to be 30 minutes based on the rules, and since 11:03 (current time) + 30 minutes = 11:33 and is greater than the original time customer selected (11:15), the customer is prompted to accept the new ready time of 11:33 or select a new, later time.
So lead time is a static value that is used to set customer expectation as to the earliest time they can place their order, and it’s set per Service Type in Management. Prep time is calculated at check-out time and order promise time is adjusted accordingly.
Dollar Based Prep Time
Other than a global prep time, you can also set a prep time based on the dollar amount of the order. These rules can be setup globally, to apply to all orders, or be broken down by Service Type. Example: Pickup orders between $0.01 and $50 might have a prep time of 10 minutes, while orders between $50 and $100 have a prep time of 30 minutes. It’s all based on your preferences.
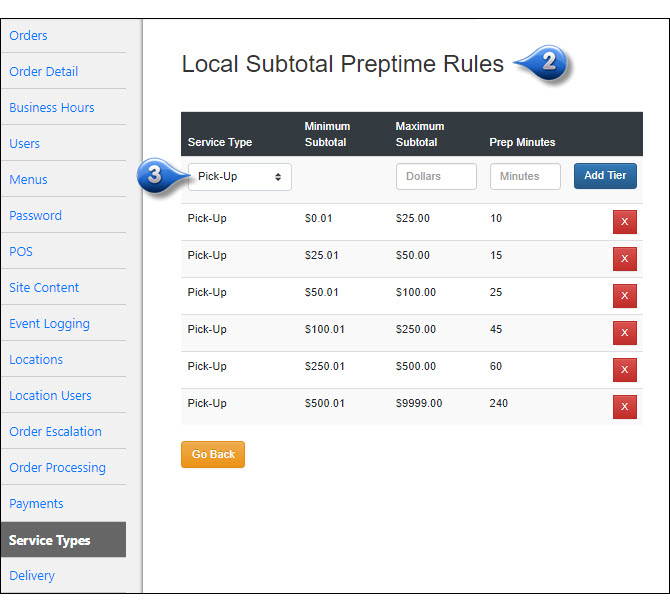
View Dollar Based Prep Time Rules
To view the dollar based prep time rules:
From the Service Types Tab, click the Edit Subtotal Prep Time Rules button
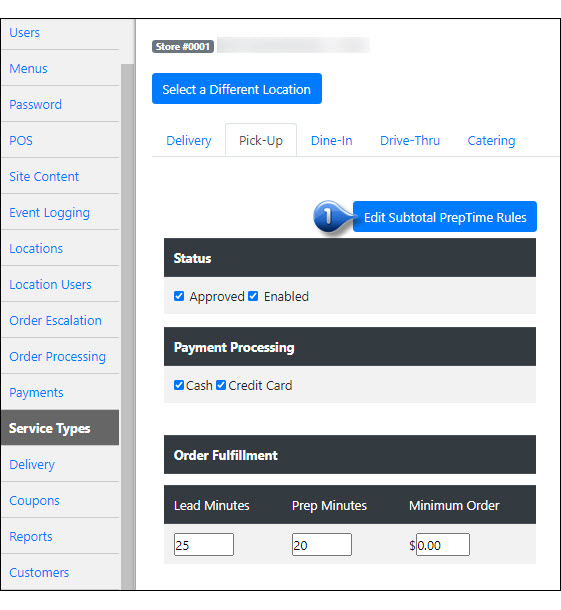
You will be taken to the Local Subtotal Preptime Rules screen that allows you to view, edit, or delete subtotal prep time rules at the store level
Select the Service Type from the drop-down that you wish to view, add, or delete rules for. Once selected, any current rules that are configured for that Service Type will display below
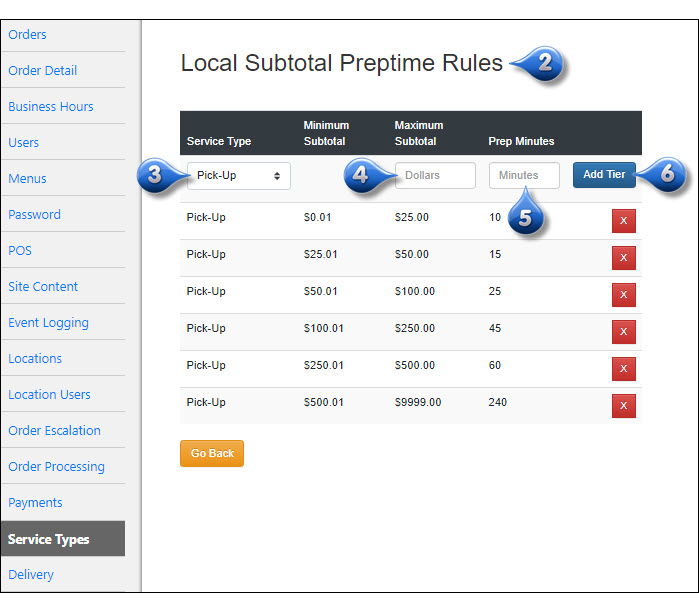
Add Dollar Based Prep Time Rules
To add new dollar based prep time rules:
From the Service Types Tab, click the Edit Subtotal Prep Time Rules button
You will be taken to the Local Subtotal Preptime Rules screen that allows you to view, edit, or delete subtotal prep time rules at the store level
Select the Service Type from the drop-down that you wish to view, add, or delete rules for. Once selected, any current rules that are configured for that Service Type will display below
Enter a Maximum Subtotal amount in the appropriate field (if you want to enter a rule for $0-$25, enter 25.00 in that field)
Enter the Prep Time needed for orders up to that amount in minutes
Click the Add Tier button
Delete Dollar Based Prep Time Rules
To delete existing dollar based prep time rules:
From the Service Types Tab, click the Edit Subtotal Prep Time Rules button
You will be taken to the Local Subtotal Preptime Rules screen that allows you to view, edit, or delete subtotal prep time rules at the store level
Select the Service Type from the drop-down that you wish to view, add, or delete rules for. Once selected, any current rules that are configured for that Service Type will display below
Click the
to the right of the prep time rule that you wish to delete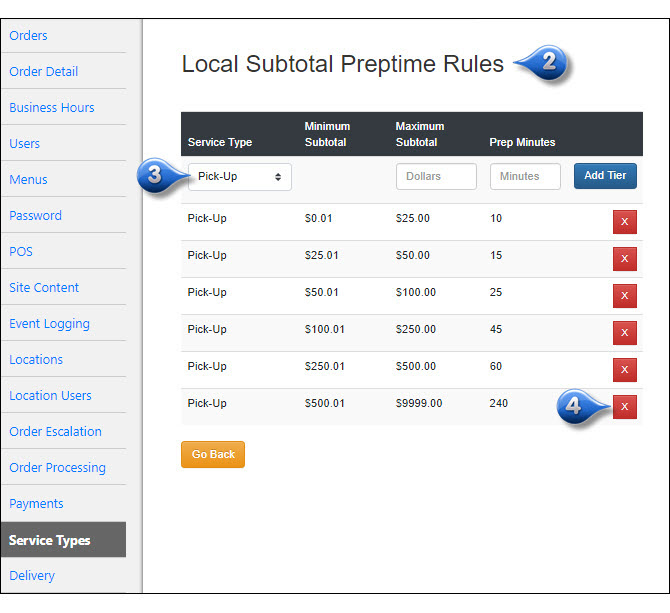
Set Order Minimums
To set the Order Minimums for a location:
From the Service Types Tab, select the subtab of the service type that you wish to adjust the order minimum for
Enter the amount in the Minimum Order field
Click Save Changes
Repeat the above steps for each service type that you wish to update the minimum order amount for
Note
Delivery order minimums are defined via your Delivery Rules. See the Delivery Training Section for details
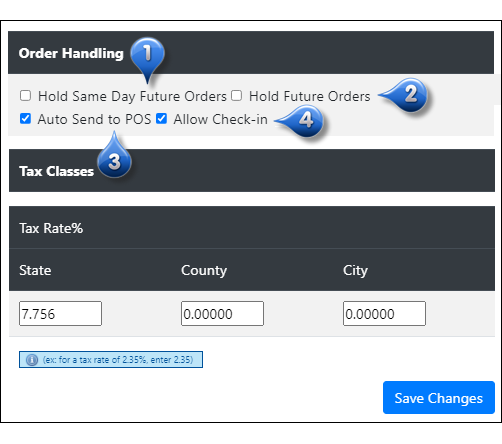
Manage Order Handling
You have the option of our system holding future orders, including same day, before sending to the NovaDine Agent or transmitting by fax. If you enable this option, the order is held on the NovaDine servers and the ND Agent is not notified until the calculated firing time
Hold Same Day Future Orders: choose to hold an order based on order ready/firing time for same day future orders. Check the box to enable, or uncheck to disable, Hold Future Same Day Orders and click Save
Hold Future Orders: choose to hold an order based on order ready/firing time for future orders (next day and beyond). Check the box to enable, or uncheck to disable, Hold Future Orders and click Save
Auto Send to POS (For POS locations only): enabling this option automatically sends the order to the POS system. The order is held on the NovaDine servers and the POS is not notified until the calculated firing time. Check the box to enable, or uncheck to disable, Auto Send to POS and click Save
Allow Check-in: select to allow Curbside Check-in for the specific Service Type. See Curbside Check-in
Curbside Check-in
Curbside Check-in allows customers that choose the pick-up order option to check-in upon arrival and have their order delivered to them, without ever leaving the car. The location will need to have numbered parking spaces designated for Curbside Check-in Only. When the customer checks-in via their mobile device, they will be prompted to enter their parking space number, so an employee will know exactly where to deliver the order to the customer.
To enable Curbside Check-in:
From the Service Types Tab, select the subtab of the service type that you wish to enable Curbside Check-in for (typically this will be Pick-Up, but could be Catering Pick-Up, etc., if separate service types have been configured)
Check the box next to Allow Check-in under the Pick-Up service type
Click Save Changes
Click the Locations Tab
Click Edit under the location information
Enter the number of parking spaces that your location has designated in the Check-in Spaces field
Click Save
Tax Rules
To add a Tax Rule for a location:
Navigate to the Service Types Tab and select the location that you wish to add a tax rule for
Select the subtab of the service type that you wish to update
Scroll down to the Tax Rules section
Specify a Tax Class and Tax Rate from the drop-down
Select Active
Click Add Tax Rule
See also
For additional information on setting up Sales Tax, please see Sales Tax Tab
Delivery as a Service (DAAS)
NovaDine is fully integrated with Grubhub, Postmates, Uber Rush Delivery As A Service (DAAS) services. DAAS allows you to offer delivery to your customers by leveraging 3rd party delivery providers without the need to build and maintain a delivery operation. NovaDine’s DAAS Delivery Engine automatically selects the best delivery provider per customer address, and is fully integrated with our online ordering and your POS. Please contact your NovaDine Representative for additional information regarding the setup of this service.
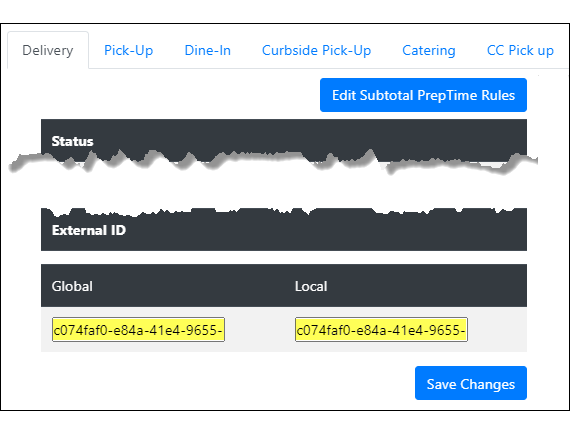
Order Destination (POS Locations Only)
You have the ability to send orders to different destinations in the POS based on Service Type. To enter an external ID that will apply to all locations (chain-wide), you will need to contact your NovaDine Rep. However, users with Chain Admin access have the ability to update the local external ID. To update the local service type external ID for a specific location, you will first need to have the IDs from your POS and then enter those external IDs under the appropriate Service Types:
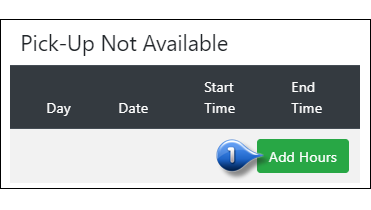
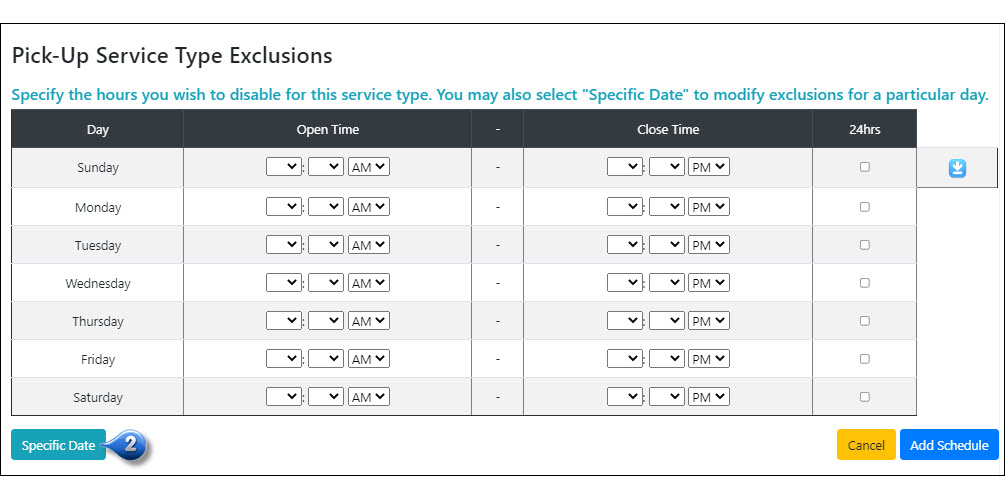
Service Type Exclusions
You may use exclusions to adjust the available service time, if they will differ from your normal business hours
Click Add Hours next to the service type for which you wish to add the exclusions
Specify exclusion hours for any day of the week by choosing the open and close time from the appropriate drop downs
If the service type should be unavailable on certain days, check the 24 hours box next to appropriate day
If the store will have the same exclusion hours for each day, simply enter the hours in the first row and click the blue down arrow to copy the hours to the below days
Click Add Schedule
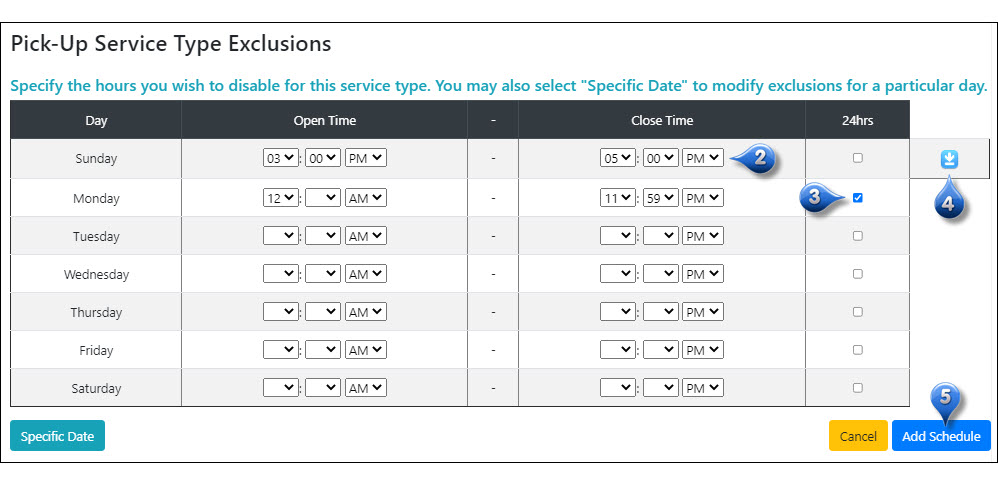
Note
You can specify each day individually, or you can select the  icon to apply the exclusion hours to all days.
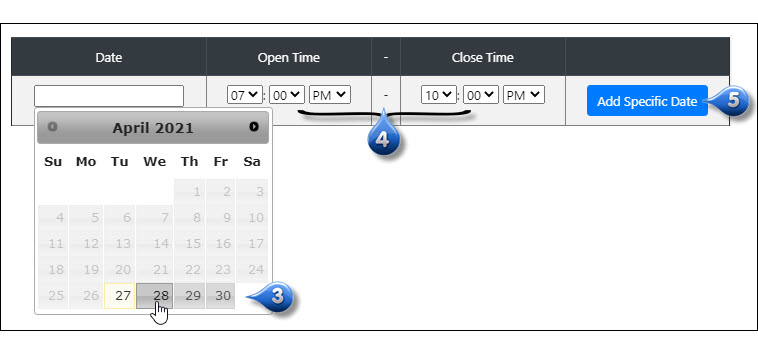
Setting Exclusions for Specific Dates
You can use specific date exclusions to adjust the available service time for future events or holidays
Click Add Hours next to the service type for which you wish to add the exclusions
Select the Specific Date button
Click in the Date field and select the desired date from the calendar
Use the dropdown menus to specify exclusion hours (these are the hours that the store is operational but not offering this service)
Click Add Specific Date
From the specific Service Type subtab, select the |trash| icon to delete an exclusion from the service type
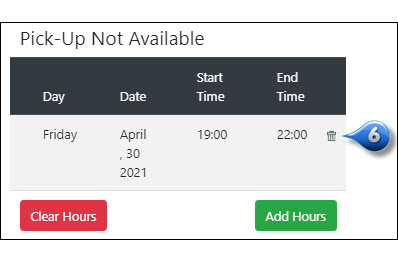
Repeat this for each service type offered, as needed
Reports Tab
This section will show you how to access the Reports Tab, where you will be able to run several reports. All reports can be printed or exported to excel. You can also learn how to print an order receipt and issue a refund
Reports Overview
There are two types of reports, Store Specific and Chainwide. Store Specific Reports can be run by store managers or any user with Corporate Access. Chainwide Reports can only be run by users with Corporate Access.
Store Specific Reports
To run a Store Specific Report, you must first select a location for which you wish to run the report. You can access the following Store Specific Reports from your Reports Tab:
Catering Orders: This report displays all catering orders for the selected location within the time frame you select, the customer’s information associated with the order, the status of each order, the total of the order, and refund amounts, if any.

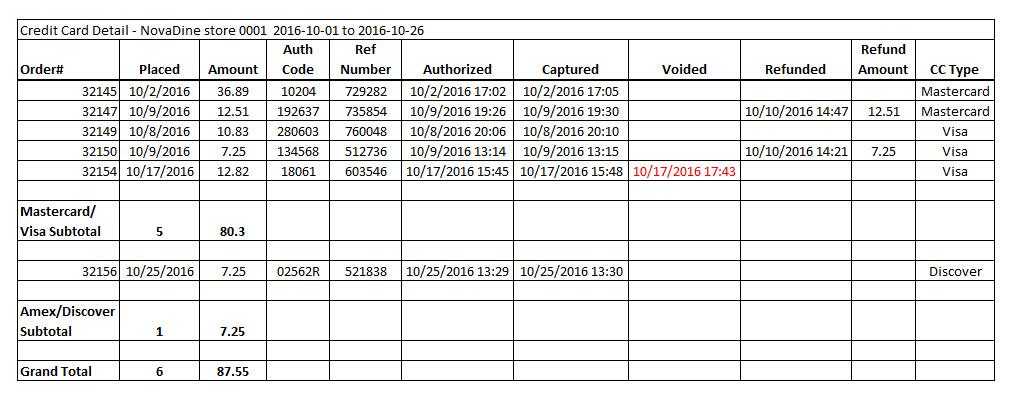
Credit Card Detail: This report displays the selected location’s online orders, total $ amounts, credit card type used for the orders, authorization codes sent by your merchant when the credit card was authorized, reference number for the captured amount, and refund date/amount, if any.
Credit Card Sales: This report breaks down the selected store’s online orders paid for by a credit card. Refunds will also display on this report. This report will also show gift card payments, if applicable.
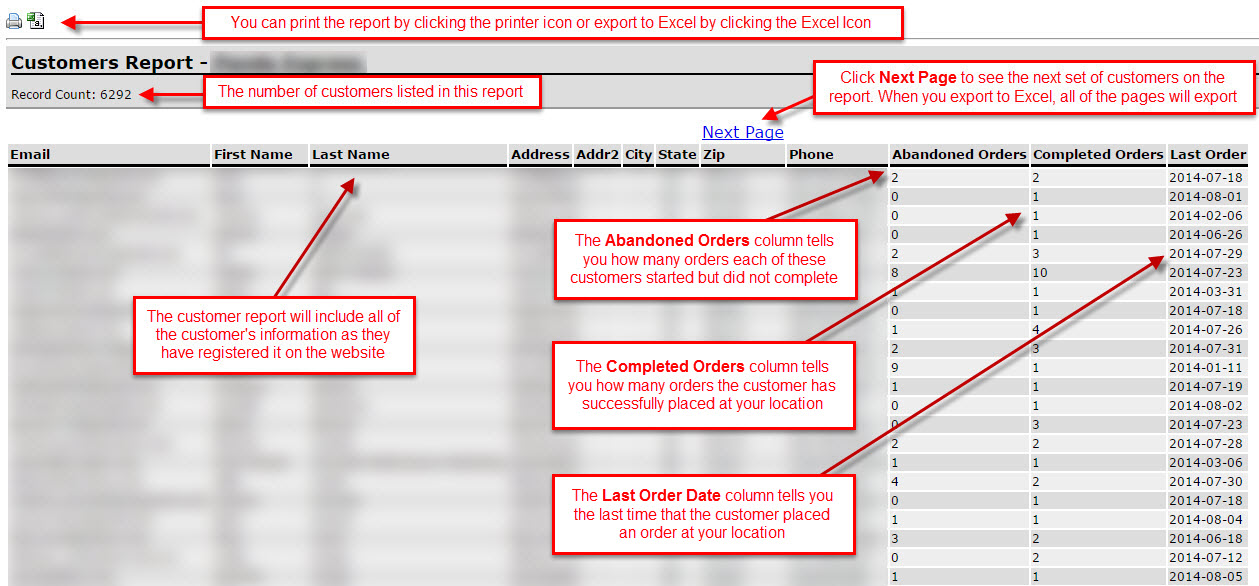
Customer List: This report breaks down the customers that have registered and placed orders at the selected store. This report displays customer information, including account creation date, opt-in status, # of orders placed, total $ spent, and date of first and last order.

DAAS Orders: This report displays DAAS orders for the chosen location, within the selected time frame, the order numbers, the customer’s information associated with the order, the placed and promised time of each order, the subtotal, discount, item tax, delivery charge, delivery charge tax, tip and total order amounts, if any.

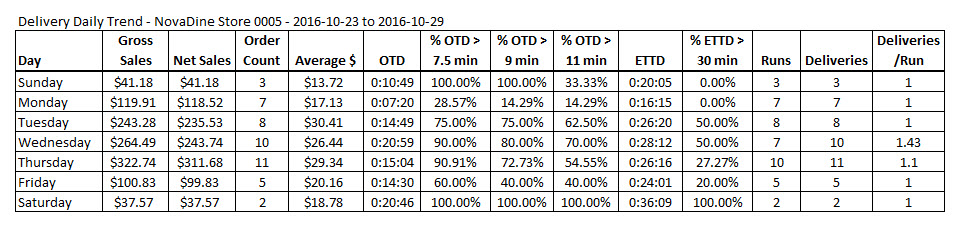
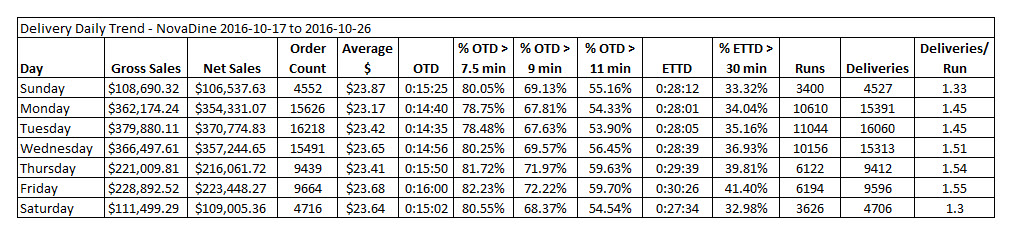
Delivery Daily Trend: This report returns total delivery sales for the selected store during the chosen time period by day of the week, along with order count, average order amount, average out the door time, percentage of orders that were out the door in less than 7.5, 9 and 11 minutes, average estimated time of delivery, percentage of deliveries estimated less than 30 minutes, number of deliveries, runs, and deliveries per run.
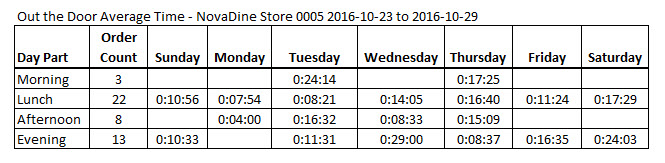
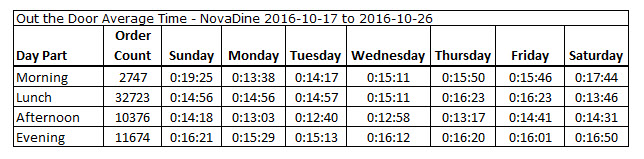
Delivery Dispatch Stats: This report returns order count for the selected location and average out the door time for deliveries by day of the week and time/part of the day.
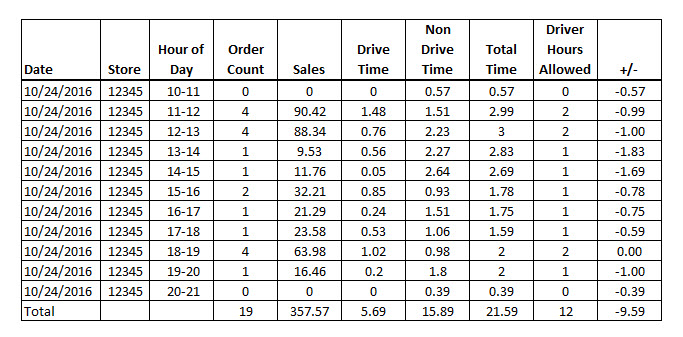
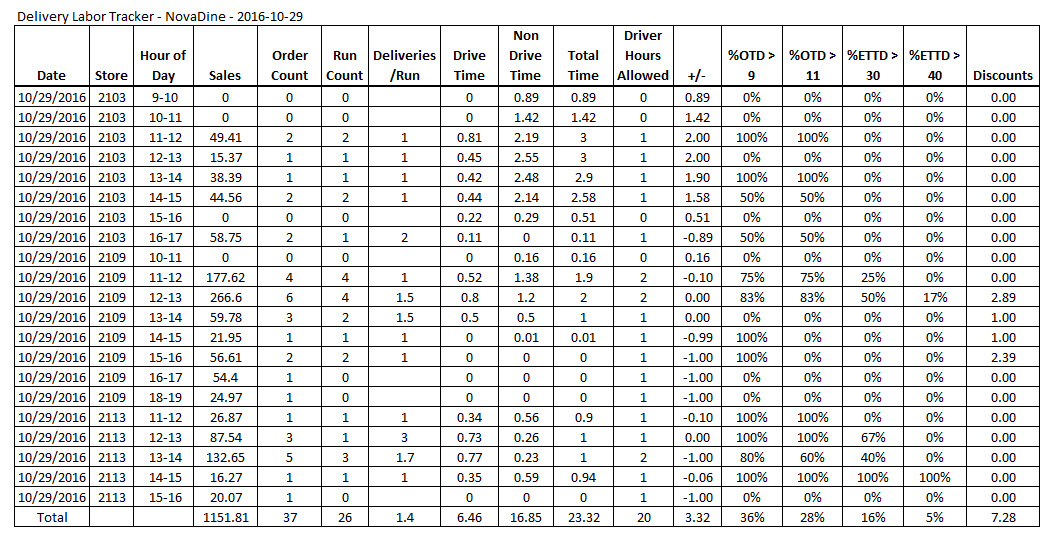
Delivery Labor Tracker: This reports returns delivery orders during the selected time frame for the selected location, hour of the day, number of orders, sales dollars, delivery driver drive time and non-drive time, total time, driver hours allowed and the over/under of total time to driver hours allowed.
Delivery Orders: This report displays all of the delivery orders for the selected store within the time frame you select and includes customer information, order information, promised time of delivery, time assigned to driver, time driver dispatched, time order delivered, out the door time, order totals, driver name, miles driven, and calculated driver fee.

Discount Sales: This report displays a list of discounted online orders for the selected location, the order totals, the customer information associated with the orders, and the discount they used, including the CLU they entered.
Order Checkins: This report returns a list of online orders for the selected location in which customers had checked in for order pickup during the selected time period, along with customer information, order information, checkin time, store checkin acknowledgement time, parking space number or checkin details supplied by customer.

Orders: This report displays orders for the chosen location, within the selected time frame, the customer’s information associated with the order, the status of each order, the total of the order, and refund amounts, if any.

Production Sheet: This provides a duplicate copy of a packing list. You will need to enter an Order ID to receive any results.
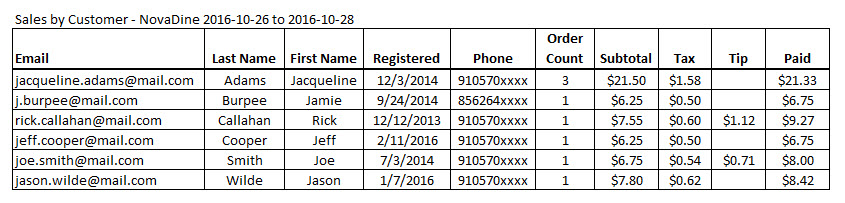
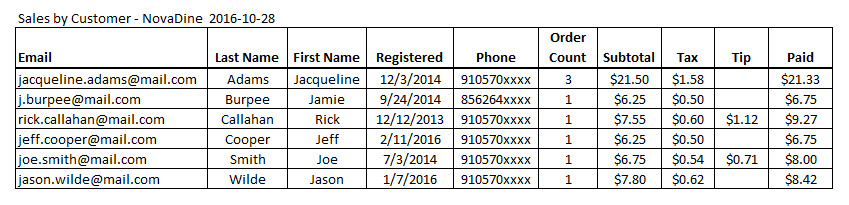
Sales by Customer: This report allows you to pull up a list of the customers who ordered from the selected location within the time frame you select. Report provides customer’s name, phone number, date registered, order count, and order amount
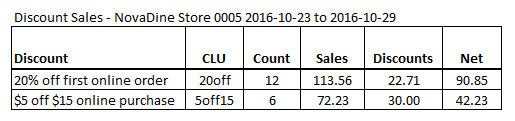
Sales by Discount: This report shows the total number of discounts/coupons redeemed on online orders for the selected location by customers during the selected time frame, along with total sales dollars, total discount dollars, and net dollar amount after discount applied.

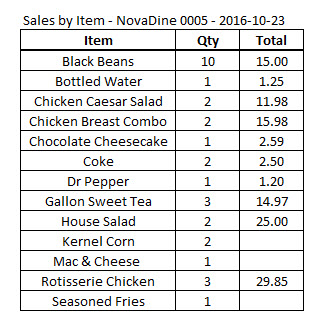
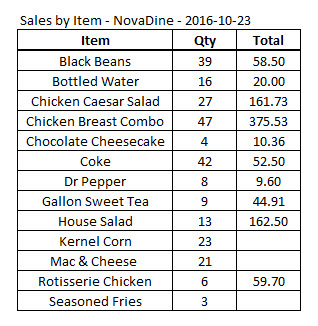
Sales by Item: This report provides a comprehensive list of all the items sold in the selected store’s online orders within the time frame you select, the quantity of each item sold, and the total cost.
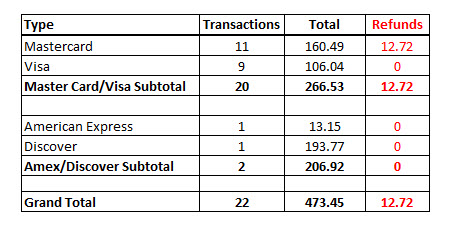
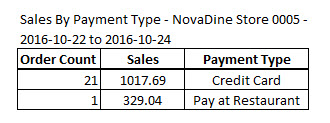
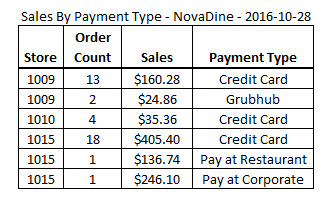
Sales by Payment Type: This report will display the number of orders, and the total amount of those orders, for each of the payment types you accept online.
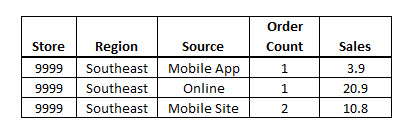
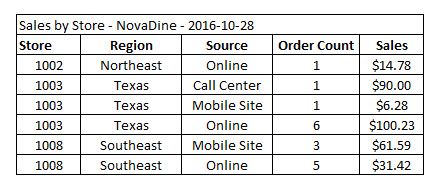
Sales by Source: This report shows the selected store’s sales information by source (online, mobile, mobile app, etc).
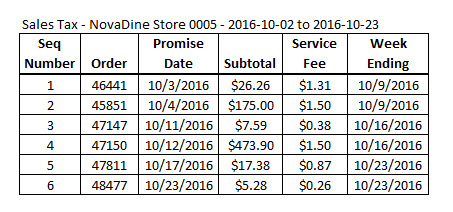
Sales Tax: This report displays each type of sales tax and the total amount paid in sales tax on the online orders for the selected location during the time frame you select.

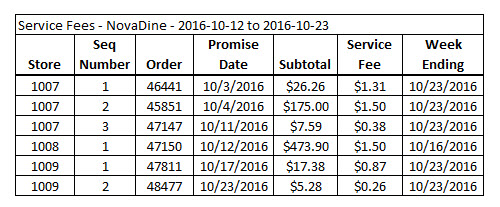
Service Fees Report: This report is used to show you how much you are billed on a particular order or group of orders for the selected location.
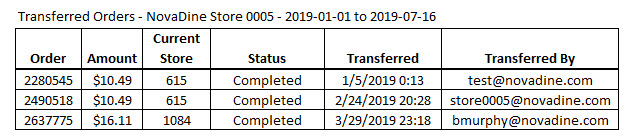
Transferred Orders: This report shows you all of the orders transferred by the selected store during the chosen time period.
Note
Reports listed here may not be available to all chains. If a report requires that a restaurant be selected first (Orders, Catering Orders etc.), the report option will not be shown in the drop down until a location has been selected.
Chainwide Reports
To run a Chainwide Report, you must have Corporate Access. These reports return results for the entire chain as a whole. You can access the following Chainwide Reports from the Reports Tab:
Catering Orders: This report displays catering orders for all locations within the time frame you select, the customer’s information associated with the order, the status of each order, the total of the order, and refund amounts, if any.

DAAS Orders: This report displays DAAS orders for all locations, within the selected time frame, the store numbers, the order numbers, the customer’s information associated with the order, the placed and promised time of each order, the subtotal, discount, item tax, delivery charge, delivery charge tax, tip and total order amounts, if any.

Delivery Daily Trend: This report returns total delivery sales for all locations in the selected time period by day of the week, along with order count, average order amount, average out the door time, percentage of orders that were out the door in less than 7.5, 9 and 11 minutes, average estimated time of delivery, percentage of deliveries estimated less than 30 minutes, number of deliveries, runs, and deliveries per run.
Delivery Dispatch Stats: This report returns order count and average out the door time for deliveries by day of the week and time/part of the day.
Delivery Labor Tracker: This reports returns delivery orders for all stores during the selected time frame broken down by location, hour of the day, number of orders, sales dollars, delivery driver drive time and non-drive time, total time, driver hours allowed and the over/under of total time to driver hours allowed.
Delivery Orders: This report displays delivery orders for all stores within the time frame you select and includes customer information, order information, promised time of delivery, time assigned to driver, time driver dispatched, time order delivered, out the door time, order totals, driver name, miles driven, and calculated driver fee.

Discount Sales: This report displays a list of online orders for all stores in which discounts were used, the order totals, the customer information associated with the orders, and the discount they used, including the CLU they entered.

Locations: This report will return a list of locations assigned to that specific user or the store list for the entire chain, depending on access level. This report shows the basic store information: store #, store name, address, phone #, fax #, region, time zone, email address, setup type, Agent version, last Agent Check-in, last Menu Export, status, delivery enabled and any current redirects for each location.

Order Checkins: This report returns a list of stores in which customers had checked in during the selected time period, along with customer and order information, checkin time, store checkin acknowledgement time, parking space number or checkin details supplied by customer.

Orders: This report displays online orders for all locations, within the selected time frame, the customer’s information associated with the order, the status of each order, the total of the order, and refund amounts, if any.

Production Sheet: This provides a duplicate copy of a packing list. You will need to enter an Order ID to receive any results.
Sales by Customer: This report allows you to pull up a list of the customers who ordered from all locations within the time frame you select.
Sales by Discount: This report shows the total number of discounts/coupons redeemed by customers for all stores during the selected time frame, along with total sales dollars, total discount dollars, and net dollar amount after discount applied.

Sales by Item: This report provides a comprehensive list of the items sold in online orders for all locations during the time frame you select, the quantity of items sold, and the total cost.
Sales by Payment Type: This report will display the number of orders, and the total amount of those orders, for each of the payment types you accept online for all locations.
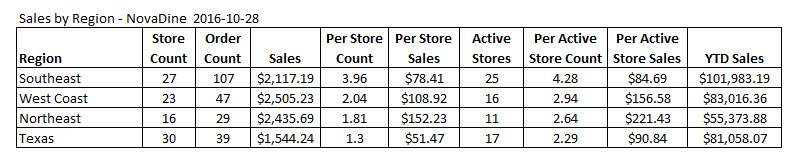
Sales by Region: This report will display the number of stores in each region, number of orders, number of active stores, the total amount of those orders, and YTD sales for each of your chain’s regions.
Sales by Source: This report shows the sales information by source for all locations (online, mobile, mobile app, etc).

Sales by Store: This report displays the total sales by store for the entire chain within the time frame you select.
Service Fees Report: This report is used to show you how much you are billed on a particular order or group of orders.
Store Orders: This report displays a list of the online orders placed at the chosen location within the time frame you select. It displays the order #, the customer’s information associated with the order, the status of each order, the total of the order, and refund amounts, if any.

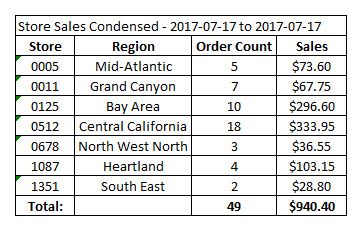
Store Sales Condensed: This report shows you the total number of orders by store for the selected time frame.
Transferred Orders: This report shows you all of the orders transferred between stores during the selected time period.
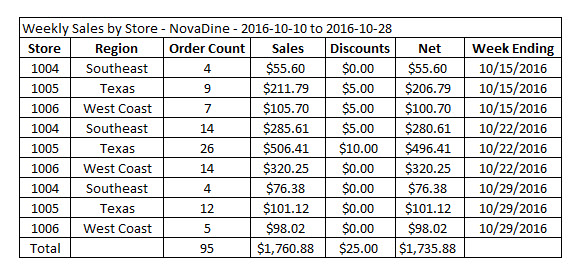
Weekly Sales by Store: This report displays the weekly sales for all the stores in your chain by location.
Note
Reports listed here may not be available to all chains.
Run a Report
To run a report, from the Reports Tab:
- Select the report to wish to run from the drop down menu
- Select the date range
- Click View to run the report
Note
Canceled/voided orders do not show up on the Orders Report. Refunded orders, however, will display
Print Report Results
To print your report:
- Once you have your report results, click the
 to print
 - Select your printer
- Click Print
Export Report Results to Excel
To export your report to Excel:
- Once your report has run, click the
 to export the results to Excel
 - Edit in Excel, as needed
Export Report Results to CSV
To export your report to CSV:
- Once your report has run, click the
 to export the results to a CSV file
 - Edit, as needed
View a Specific Order
Besides running a report, you can also lookup individual orders from the Reports Tab. You can access an order by Order ID or External Order ID (POS Order ID)
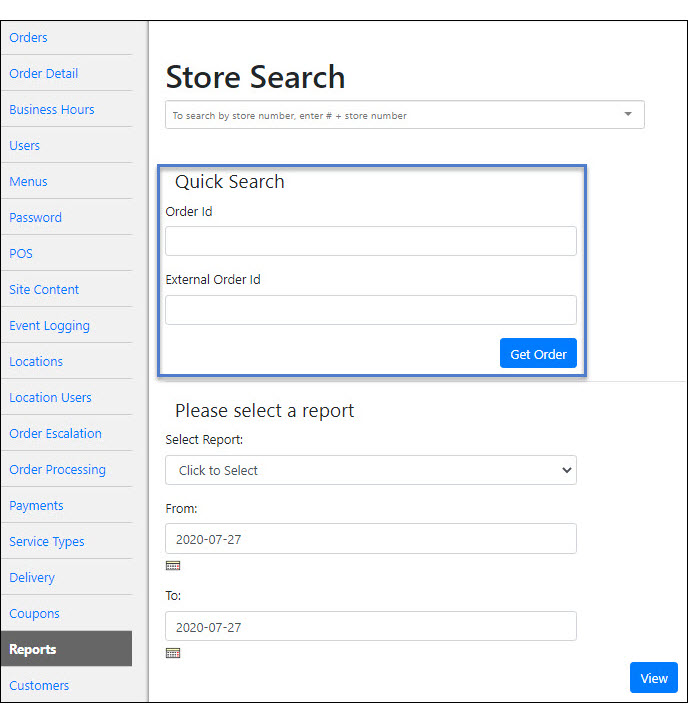
View a Specific Order by Order ID
To view a copy of a specific order, from the Reports Tab:
- Enter the order # in the Order ID field
- Click Get Order and you will be taken to the orders page
- Click on the order number to view a copy of the receipt
View a Specific Order by External Order ID (POS Order ID)
To view a copy of a specific order with an external order # (POS Order ID), from the Reports Tab:
- Enter the external order # in the External Order ID field
- Click Get Order and you will be taken to the orders page
- Click on the order number to view a copy of the receipt
View a Specific Order by Provider Order ID (3rd Party Order ID)
To view a copy of a specific order using a 3rd party provider order # (Grubhub, EatOutIn, Postmates, etc), from the Reports Tab:
- Enter the 3rd party provider’s order # in the Provider Order ID field
- Click Get Order and you will be taken to the orders page for that specific order
- Click on the order number to view a copy of the receipt
Note
Looking up an order by Provider Order ID is only available for chains that offer 3rd party services through our site
View a Specific Order by Survey Token
To view a copy of a specific order that is associated with a survey response, from the Reports Tab:
- Enter the token number found on the survey response in the Survey Token field
- Click Get Order and you will be taken to the orders page
- Click on the order number to view a copy of the receipt
Note
Looking up an order by Survey Token is only available for chains that offer online surveys through our site
Issuing Refunds
You have two available options when it comes to issuing refunds. You can refund the entire order or only refund specific items from the order. Refunds may also be issued using the Order Detail Tab
Issue a Full Refund
To issue a refund for an order, from the Reports Tab:
- Search for the specific order that you wish to refund
- If the order is able to be refunded, click the Refund link to the left of the order number, in the first column. If there is no Refund link, please see Refund Notes
- The refund page will be displayed and, from here, you can issue a full refund by clicking the ‘Full Refund’ button
See also
For step-by-step refund instructions, please see Issuing Refunds
Issue a Partial Refund
To issue a refund for only certain item(s) on an order, from the Reports Tab:
If the order is able to be refunded, click the Refund link to the left of the order number, in the first column. If there is no Refund link, please see Refund Notes
The refund page will be displayed and, from here, you have two options:
- Issue a full refund by clicking the ‘Full Refund’ button
- Issue a partial refund by selecting the quantity in the dropdown box beside the item(s) you wish to refund. The total amount displays at the top of the page under ‘Refund Amount’
See also
For step-by-step refund instructions, please see Issuing Refunds
Things to keep in mind when issuing a refund
- Refunds cannot be issued the same day that the payment was captured
- If it is a future order and has not been sent to POS, you will want to cancel the order, as the refund button will not be available
Sales Tax Tab
The Sales Tax Tab is where tax data can be viewed, edited, or entered. A brief overview of the steps required can be found below, followed by a detailed example.
- Identify existing tax, or create new taxes, as needed, under the Tax sub-tab for each sales tax you need to charge and report individually (State Tax, County Tax, etc. or just Sales Tax if you only have one Tax).
- Set Tax Rates(s) for each tax you’ll be using. Multiple rates can be set for each tax. For example if your standard tax rate is 7.5%, but bottled water doesn’t get taxed, you would create two tax rates, 7.5% and 0%.
- Create tax classes. Tax classes are used to group items based on their tax rate (Bottled Water, Sugary Drinks, etc). You don’t need to create a tax class for items that get your standard tax rate.
- Create or use existing Tax Groups for tax reporting purposes.
- Assign Tax Classes to Items. You only need to do this for items that get a different tax rate than your standard tax rate (bottled water, sugary drinks, etc)
- Create tax rules for each service type under the Service Types tab, by assigning Tax Rates (from Step 2) to Tax Classes or the Default Tax Class (from Step 4)
Sales Tax Setup Example
Let’s say that you have a standard sales tax rate of 10% in Ohio, but bottled water will be taxed at a reduced rate of 3%, 2% for state tax and 1% for city tax, for 3PD orders in Cleveland starting on July 1, 2021. We would create/configure the following:
We will use the default Sales Tax from the Tax subtab
Set up a Tax Group for both State Tax and City Tax on the Tax Groups subtab
Create a Tax Tate of 2% for State Bottled Water Tax on the Tax Rates subtab
- Select Sales Tax for Tax
- Select State Tax for Tax Group
- Enter a start date of 2021-07-01
Create a Tax Rate of 1% for City Bottled Water Tax on the Tax Rates subtab
- Select Sales Tax for Tax
- Select City Tax for Tax Group
- Enter a start date of 2021-07-01
Create a Tax Class with the name Bottled Water on the Tax Class subtab
Assign the Tax Class to your bottled water item on the Assign Tax Classes to Items subtab
Once the above is configured, we will need to assign both the State Bottled Water Tax Rate and the City Bottled Water Tax Rate, along with the Bottled Water Tax Class, under the Tax Rates section of the 3PD service type on the Service Types Tab, for each store in Cleveland, OH.
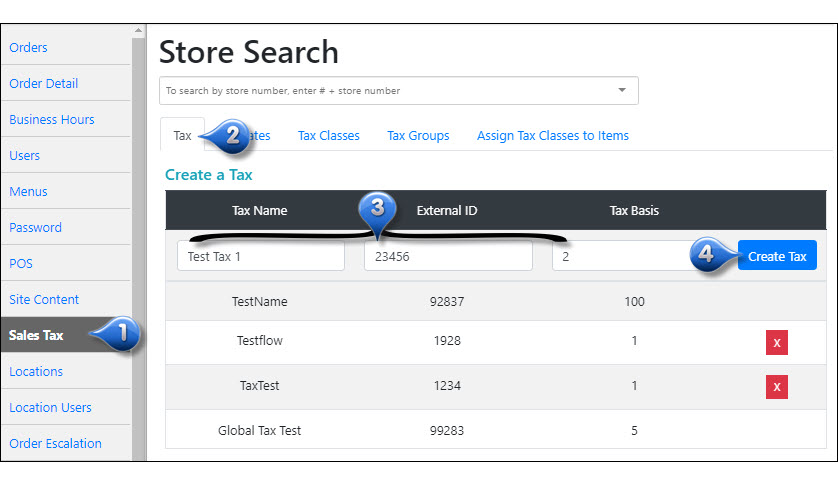
Create a Tax
To create a global tax:
Navigate to the Sales Tax tab in backend management
Select the Tax Subtab
Specify a Tax Name, External ID (if needed), and Tax Basis
Select Create Tax
Note
You can delete a manually created tax by selecting the icon
Create a Tax Rate
To create a global tax rate:
Navigate to the Sales Tax tab in backend management
Select the Tax Rates Subtab
Specify a Tax Rate Name, Tax Rate(%), Tax, and Tax Group. You can also specify a Start Date and End Date for the tax rate, as needed
Select Create Tax Rate
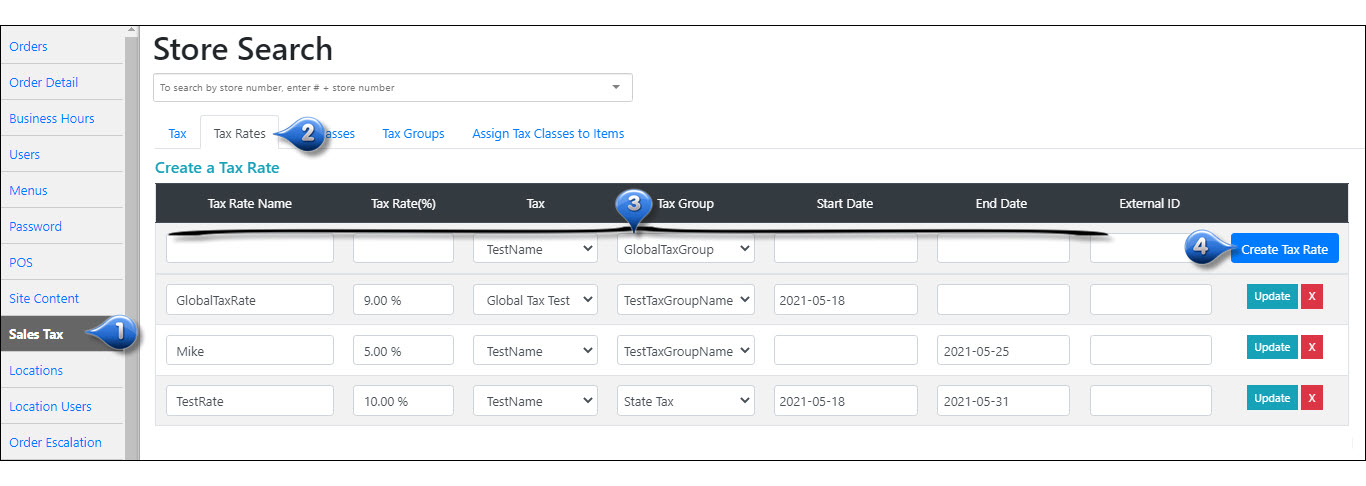
Note
You can delete a manually created tax by selecting the icon. You can also modify an existing Tax Rate by changing fields on the table and selecting Update
Create a Tax Class
After creating your desired individual taxes, create a new tax class for these taxes. A tax class is a collection of tax rates. Creating a tax class lets you select specific items that are subject to this tax. To create a global tax class:
Navigate to the Sales Tax tab in backend management
Select the Tax Classes Subtab
Specify a Tax Class Name and External ID (if needed)
Select Create Tax Class
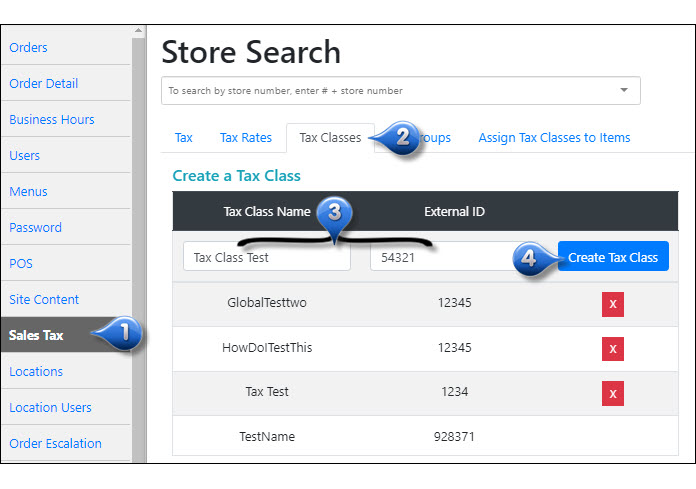
Note
You can delete a manually created tax class by selecting the icon
Create a Tax Group
Tax groups can be created for reporting/accounting purposes when multiple tax rates are applicable (Ex: State and City taxes). To create a global tax group:
Navigate to the Sales Tax tab in backend management
Select the Tax Groups Subtab
Specify a Tax Group Name and External ID (if needed)
Select Create Tax Group
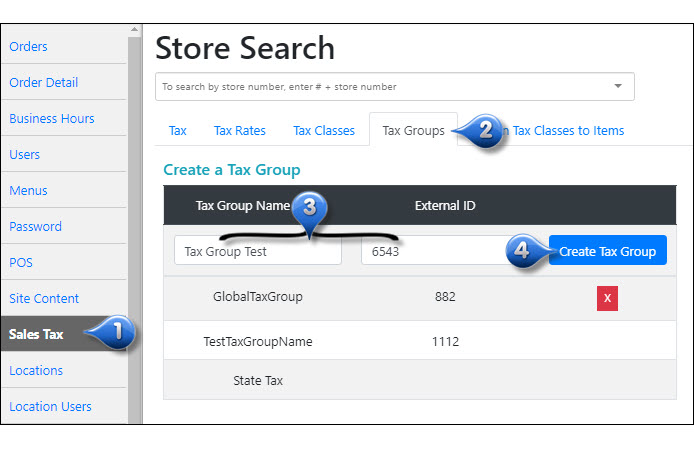
Note
You can delete a manually created tax group by selecting the icon
Assign Tax Classes to Items
Once you’ve created your tax classes, you need to assign your items to them. To assign a tax class to an item:
Navigate to the Sales Tax tab in backend management
Select the Assign Tax Classes to Items Subtab
Search for the menu item you wish to assign a tax class to
Select the Tax Class from the Class drop-down.
Select Assign Tax Class

Note
You can delete a manually assigned tax class by selecting the icon
Orders Tab
This section will show you how to access the Orders Tab in management in order to view, accept and complete orders (non-delivery locations only)
Orders Tab Overview
Use the Orders Tab to view, accept and complete orders and enable/disable service types for the day. This is an alternate method to the agent and should only be used temporarily if the agent is down or if you are a fax notification location that needs to access their orders. If your location offers delivery, by clicking the Orders Tab, you will be taken to the Delivery Driver Management System.
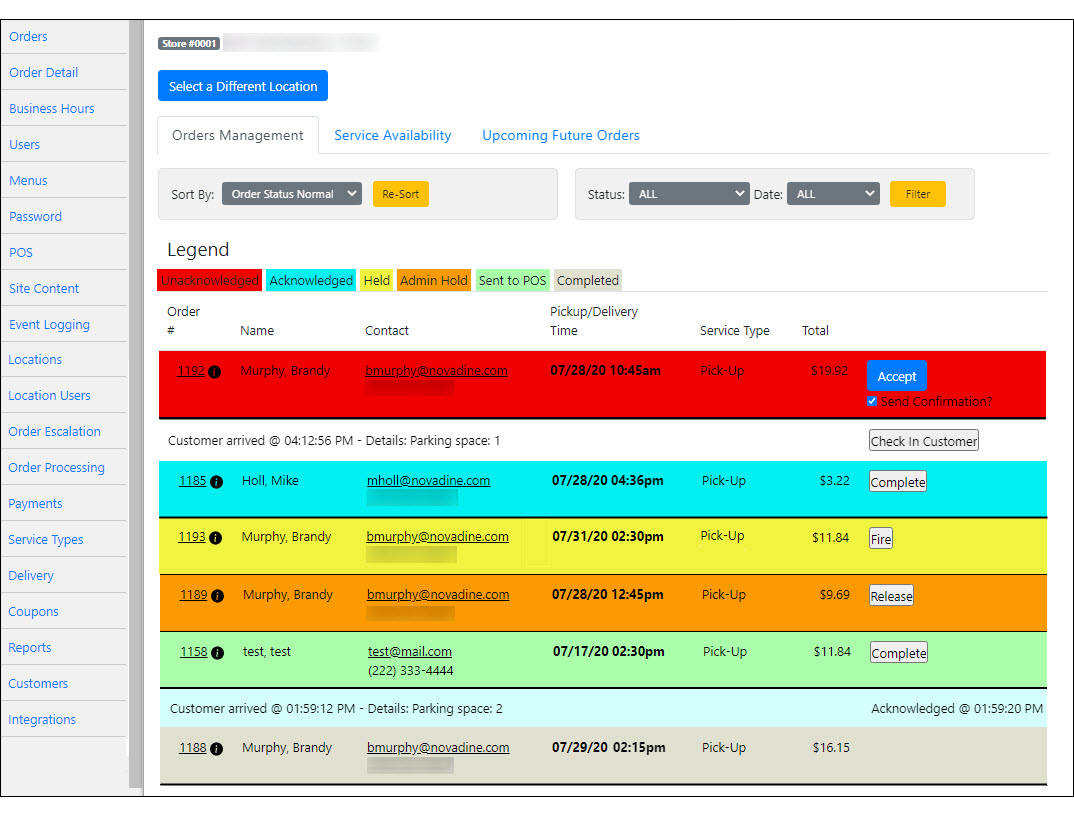
The Order Tab shows the status of your location’s orders:
- Red: Paid, waiting for acknowledgement. For POS locations, an order would be Red between the time it is placed and the time it is sent to the POS. DO NOT manually accept the order if your location is POS integrated, as it will keep the order from being sent to the POS.
- Teal: Paid, waiting to be filled. Order has been manually accepted.
- Yellow: Held until prep time (future order).
- Orange: There was an error when trying to send order to the POS. Please see Admin Hold for more information.
- Green: Sent to POS
- Tan: Paid and filled (complete)
Note
You can click the i icon to navigate to the order details page for the selected order
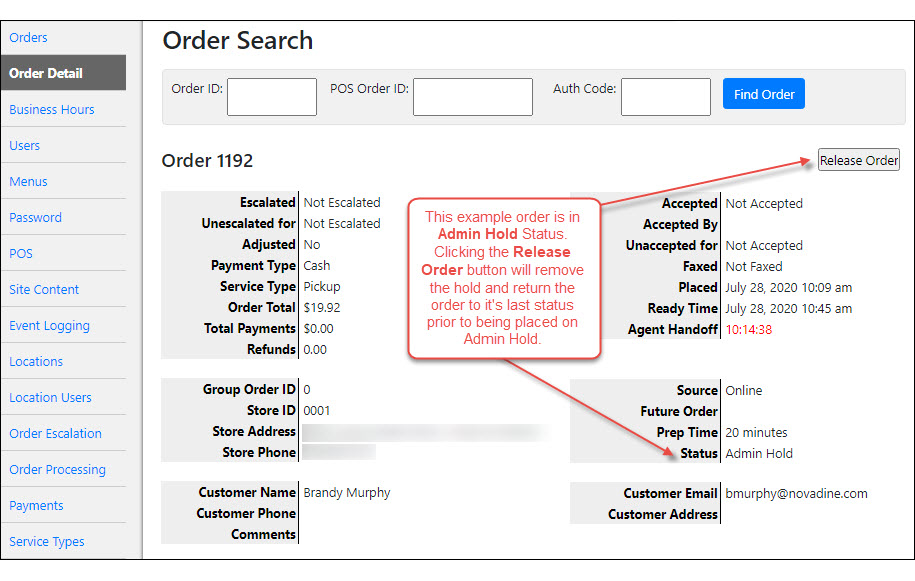
Admin Hold
Upon request, we can stop trying to send an order to the POS after it errors out a certain number of times (the default is set to 10 times). For example, a customer may want NovaDine to set it for 10, so if an order errors out going to the POS more than 10 times, we put it in a new status called Admin Hold.
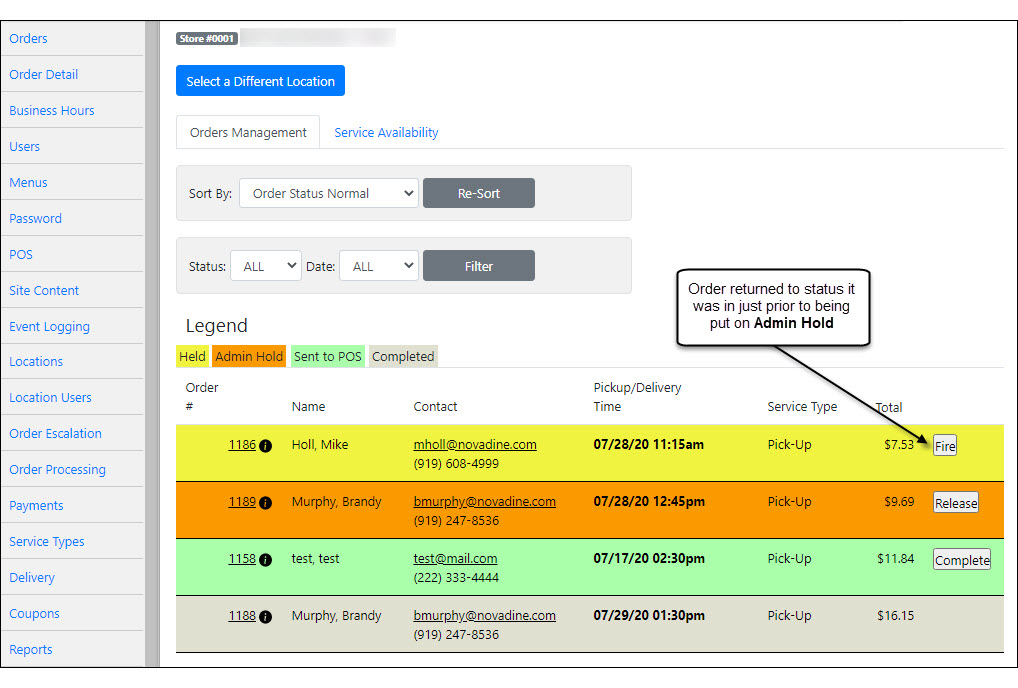
You have the ability to Release the order from Admin Hold via the Orders tab or Order Details tab in Management.
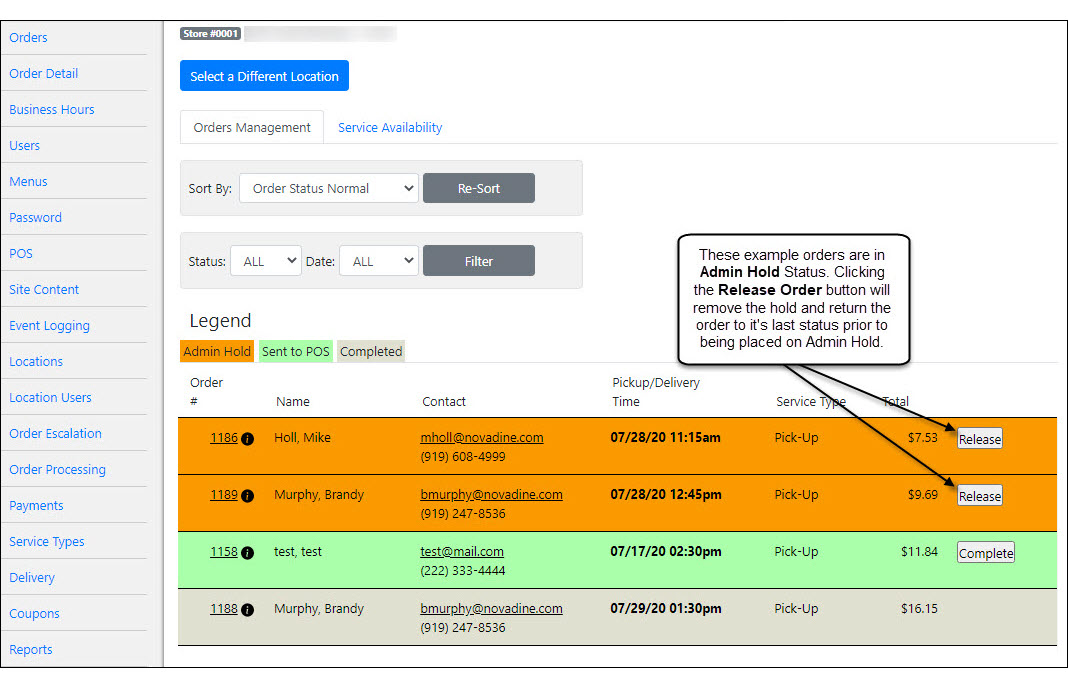
When an order is released, it is restored back to the status it was when it errored out. This gives the POS team the ability to release the order after they’ve fixed the problem, and the order can then go to POS. If an order continues erroring out over and over, it will cause issues in the POS, especially Xpient.
Order Detail Tab
This section will show you how to access the Order Detail Tab, where you can view order details as well as refund and cancel orders. Refunds may also be issued using the Reports Tab
Order Detail Tab Overview
Use the Order Detail Tab to search for orders by Order ID, POS Order ID, Survey Token, Authorization Code, Provider Order ID (3rd Party Order ID), Discount Code, or Email Address
Note
Depending upon your chain’s setup, some search options, Survey Token for example, may not be available
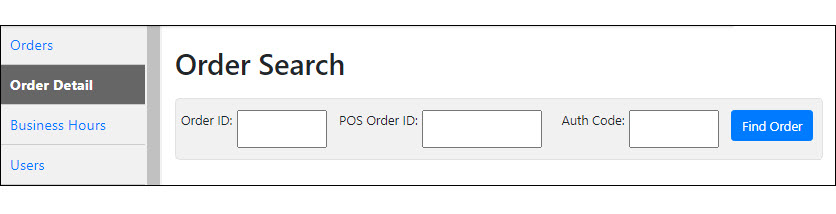
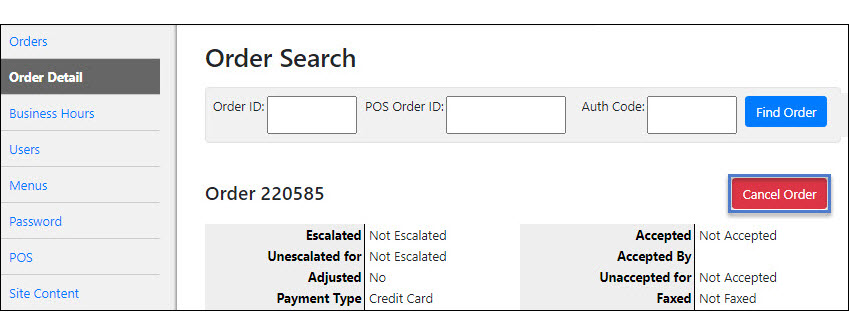
Search for an Order
To search for a specific order:
Click the Order Detail Tab
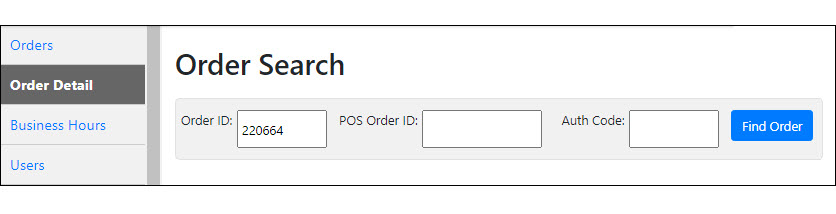
Enter one of the following to lookup your order:
- Order ID
- POS Order ID
- Auth Code
Click Find Order
Note
Depending upon your chain’s setup, some search options, Survey Token for example, may not be available
View Order Details
Once you locate your order, you can view the order details
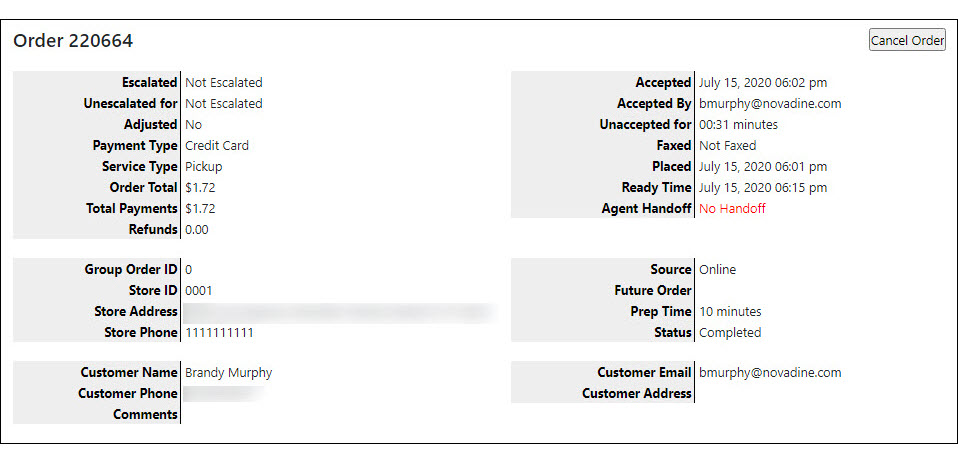
Order Details
The top section of the Order Detail shows the following information:
- Order number
- Escalated status
- Adjustments
- Payment Type
- Service Type
- Order Total
- Total Payments
- Refunded status
- Group Order ID
- Store ID, address, and phone number
- Customer name, phone number, email and address
- Customer Comments
- Accepted time
- Accepted by
- Unaccepted time
- Faxed
- Order placement and ready time
- Time sent to POS
- Order Source
- Future Order
- Prep Time
- Order Status
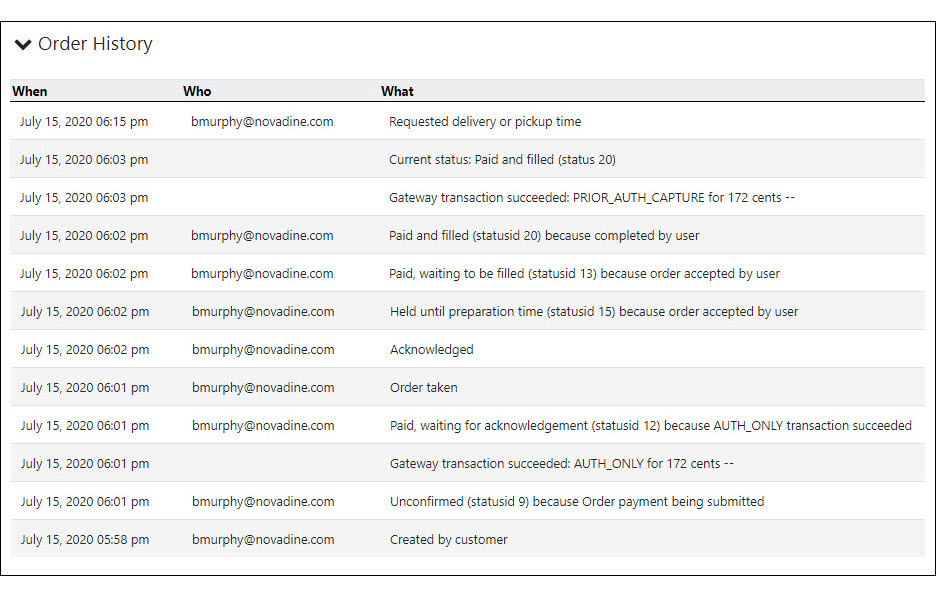
Order History
The Order History section of the Order Detail shows the following information:
- Time of order creation
- Time of order placement
- Time sent to POS
- Time of order acknowledgement
- Payment status
- Current order status
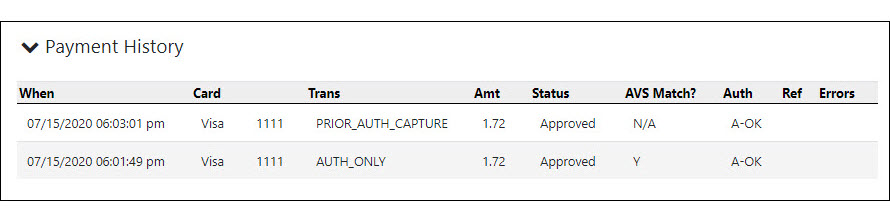
Payment History
The Payment History section of the Order Detail shows the following information:
- Order time
- Card type and last 4 digits
- Transaction
- Amount
- Status
- AVS Match
- Auth Code
- Reference number
- Errors
Email History
The Email History section of the Order Detail shows the following information:
- When emails were sent
- Who emails were sent to
- Why emails were sent
- Last attempt
- Status

Items
The Order Items section of the Order Detail shows the following information:
- Guest name
- Quantity of items ordered
- Product ordered
- Price each
- Total price by item
- Subtotal
- Sales Tax
- Total
- Amount paid

Cancel or Refund Order
Depending upon the order status, you will be able to cancel or refund the order from the Order Detail Tab
- If the order has been completed, you will be able to process a refund for the order by clicking Refund Order at the top of the order
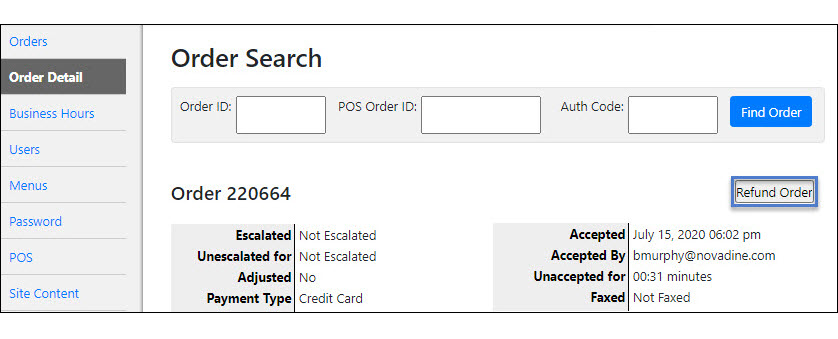
- If the order has not been sent to POS, you will be able to cancel by clicking Cancel Order at the top of the order
See also
For step-by-step refund instructions, please see Issuing Refunds
Admin Hold
Upon request, we can stop trying to send an order to the POS after it errors out a certain number of times. For example, a customer may want NovaDine to set it for 10, so if an order errors out going to the POS more than 10 times, we put it in a new status called Admin Hold.
You have the ability to Release the order from Admin Hold via the Orders tab or Order Details tab in Management. When an order is released, it is restored back to the status it was when it errored out. This gives the POS team the ability to release the order after they’ve fixed the problem, and the order can then go to POS. If an order continues erroring out over and over, it will cause issues in the POS, especially Xpient.
See also
Order Escalation Tab
The NovaDine system has a built in order escalation function that detects when orders are not accepted in a timely manner. Under the Order Escalations Tab, you can manage a list of individuals to receive email and/or text alerts when the order is escalated. If the order is not accepted within a predetermined time, the notification will be sent for each rule created until the order is accepted.
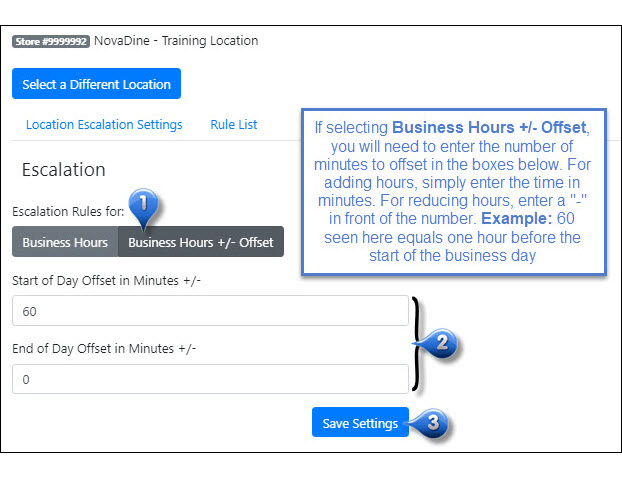
Set Hours of Notifications
These are hours of notifications for non-accepted orders:
- From the Order Escalation Tab, select one of the below options:
- Business Hours: Select this option to only escalate orders during normal business hours (recommended)
- Business Hours +/- Offset: Choose this option if you wish to receive escalations outside of normal business hours
If you chose to offset business hours, enter the # of minutes to offset in the appropriate fields
Click Save Settings
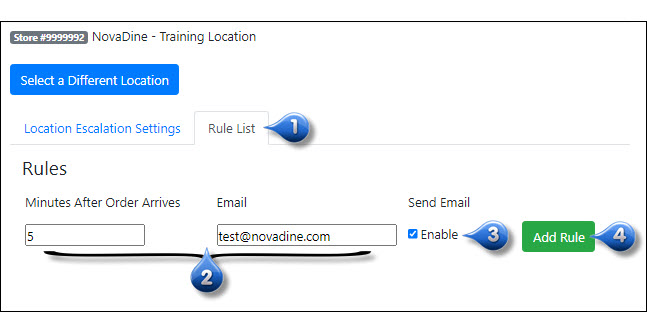
Set Email/Text Notifications Contact Information
Set email addresses and/or text message format to alert you of non-accepted orders:
From the Order Escalation Tab, select the Rule List sub-tab
Specify the below, as needed:
- Minutes After Order Arrives: The number of minutes that pass before you are alerted about an order has not been accepted by the location. Ex: After an order hasn’t been acknowledged for 5 minutes, an alert email will be sent to the address provided
- Email: Email address that the alerts should be sent to. These can also be configured to be sent as text messages. See note below
Check the box next to Enable under Send Email to turn on that notification
Click Add Rule
Note
Use your mobile provider’s email address starting with your cell phone number to receive text alerts. Contact your mobile provider to confirm text email. Here are a few examples:
- T-Mobile: yourcellnumber@tmomail.net
- Sprint: yourcellnumber@messaging.sprintpcs.com
- AT&T: yourcellnumber@txt.att.net
- Verizon: yourcellnumber@vtext.com
Order Escalation Procedure (Non-POS Locations)
After a customer places an order it will be sent to your store via the NovaDine Agent installed on your designated PC. You will need to accept the order on the Agent
If an order is not accepted within 4 minutes on the NovaDine Agent, the order will be escalated by support personnel and automatically faxed. Once escalated, support personnel will call the location to make sure your store receives the order and try to determine the issue with the NovaDine Agent
Note
A technician will make 3 attempts to contact the location to ensure that they receive and process the order. If NovaDine is unable to make contact, we will mark the order status to “investigation” which prevents the customer from being charged. The online service will be disabled for the rest of the day and will reactivate the following morning. NovaDine will make every attempt to follow up with the location the next day.The order can be charged once we have confirmed the order was fulfilled.
To help ensure orders are accepted by the location, our system offers several additional notification features:
Note: Important things to remember to avoid escalations:
- Turn on the computer; reboot and make sure an account is logged on to the computer
- Speakers plugged in, turned on and volume turned up
- Printer needs to be turned on and have paper/toner
Order Escalation Procedure (POS Locations)
- After a customer places an order it will be sent to your POS, once the prep time has been met, via the NovaDine Agent installed on your designated PC
- If the NovaDine Agent is not able to make contact with the POS, the order will be escalated by support personnel. Once escalated, support personnel will call the location to make sure your store receives the order and try to determine the issue with the NovaDine Agent
Order Processing
The Order Processing Tab is used to adjust business reporting hours, suggested tip settings, and order throttling rules for the store
Set Reporting Hours
To set reporting hours for a location:
Enter in a time for the location’s end of day for reporting purposes using a 24 hour format
Click Save
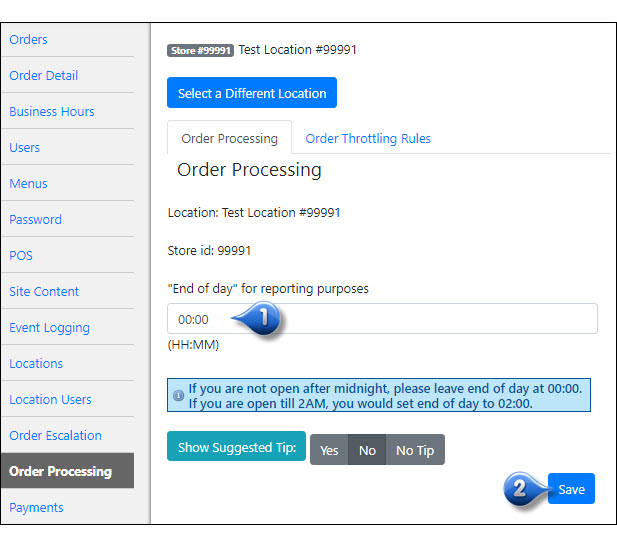
Note
When a report is generated, it will include all data for the day up to this particular point
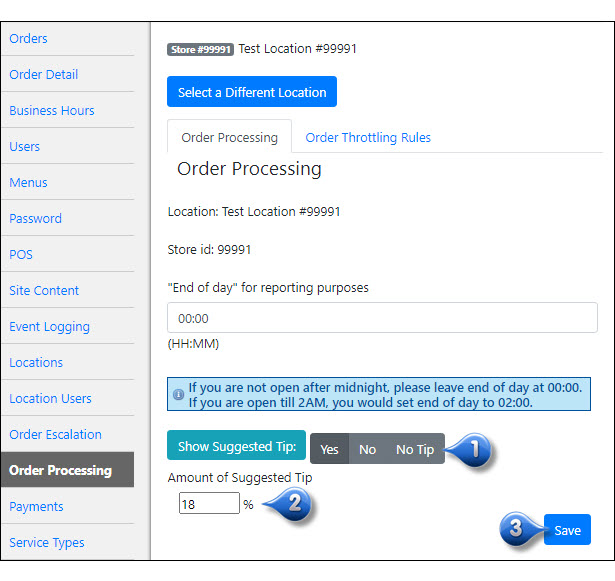
Set Suggested Tip
To set a suggested tip for a location:
Select the appropriate radio button:
- Yes: select to show suggested tip on order receipt
- No: select to show tip line but not suggest a tip amount (skip to step 3)
- No Tip: select to hide tip line (skip to step 3)
Enter the suggested tip % to be shown to the customer at the checkout screen, if applicable
Click Save
Order Throttling
NovaDine’s Order Throttling feature allows you to adjust order ready time based on number of orders submitted for that time frame. This is the maximum number or maximum dollar amount of orders that the system will allow to be submitted before preventing new orders from be placed for the same time period. This can be done by Service Type at the Global or Store level.
For Example, during peak hours or a surprise rush, it may be necessary to slow down or limit the amount of online orders that you receive. Throttling orders allows you to set a maximum number of orders or a maximum dollar amount of orders that can be received in a given time frame.
Set Order Throttling Rules
To add an Order Throttling Rule (Global or Local):
Select the Order Throttling Rules subtab from the Order Processing Tab
Choose the appropriate subtab (Global or Local)
- Global Rules adds a throttling rule for all locations
- Local Rules adds a throttling rule for a specific location
Select the appropriate Service Type that you wish to create a rule for from the drop-down
Enter the Maximum Order criteria based on your preferences (enter at least one or both):
- Maximum Sales $ (maximum amount of sales for the chosen service type in the specified time frame)
- Maximum # Orders (maximum amount of total online orders for the chosen service type in the specified time frame)
Note
If Max Sales $ and Max # Orders are both set, the time slot should be unavailable if EITHER condition is met.
Enter the Interval in Minutes (the number of minutes that correspond with the service type and maximum orders in the previous steps)
Click Add...Rule next to the appropriate section
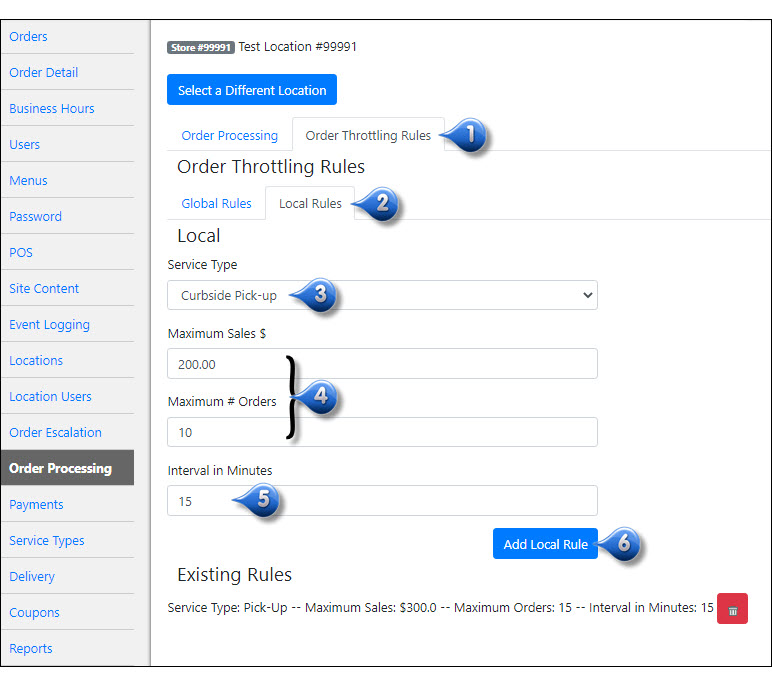
The rule that you just set up will now be displayed under the appropriate section - Global or Local
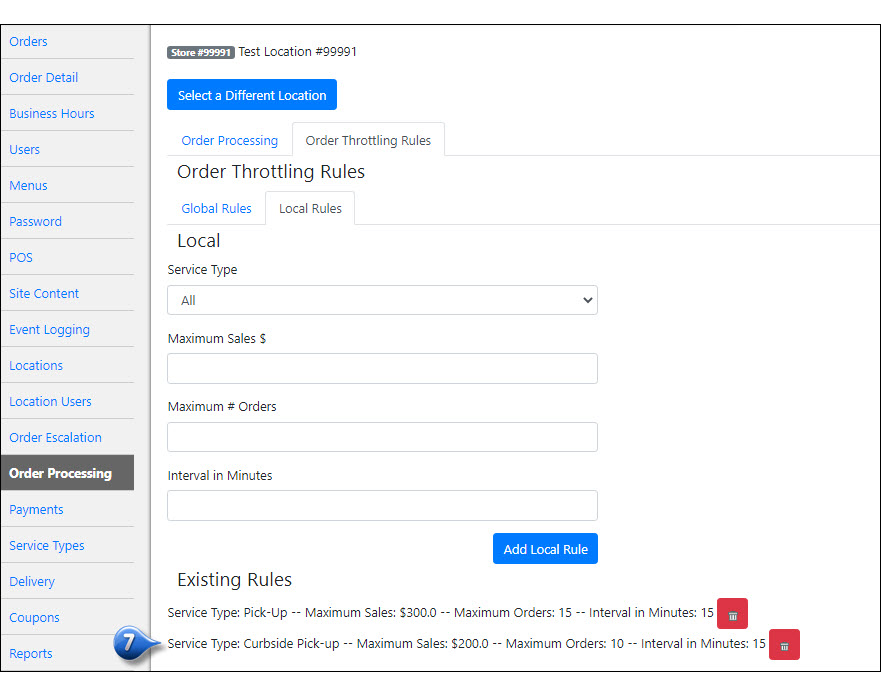
Repeat the above steps for each Order Throttling Rule that you wish to create
Note
The Global Throttling Rules will only be available for adding, editing, and/or deleting by users with Chain Admin access
POS Tab
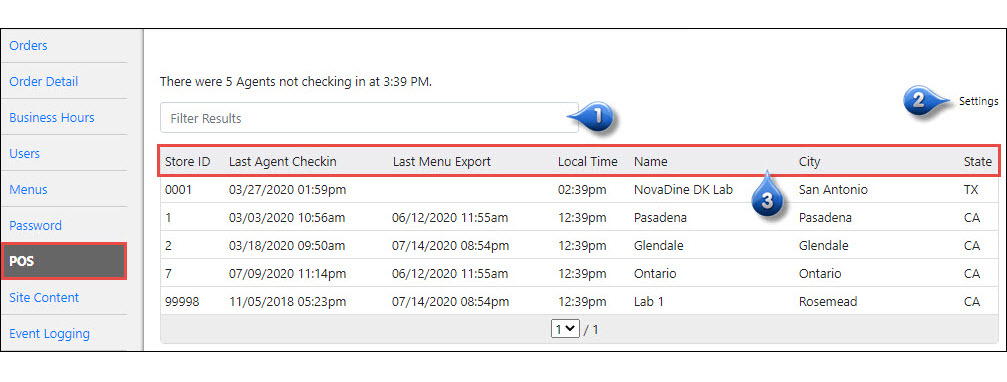
This section will show you how to access the POS Tab, where you have the ability to view a list of stores that agents are not checking in
POS Tab Overview
The POS Tab shows you a list of stores that Agent’s haven’t checked in for 10 minutes or more.
The information shown on this tab is as follows:
Filter Results
Settings
Columns
- Store ID
- Last Agent Checkin - Date and time
- Last Menu Export - Date and time
- Current Local time for that location
- Store Name
- Store City
- Store State
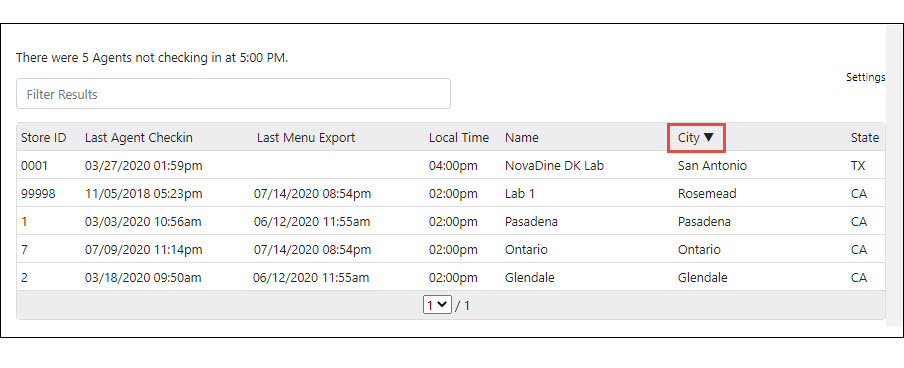
Sort
To sort the information by a specific column, follow the below:
Depending on which column you wish to sort by, click the column name and the information in the table will be sorted from least to greatest
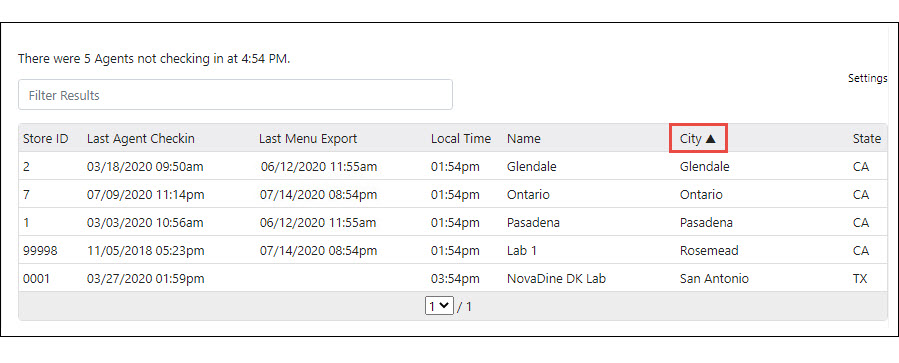
To sort from greatest to least, click the column name again and the information will be reversed
Filter Results
To filter the results, type in the information that you wish you filter by. These filters can include the following:
- Store Number
- Date and/or time
- Store Name
- Store City
- Store State
Note
You can type just partial information, like store #. If the store # is 4567, you can type in just 45 and it will return any information with those two numbers
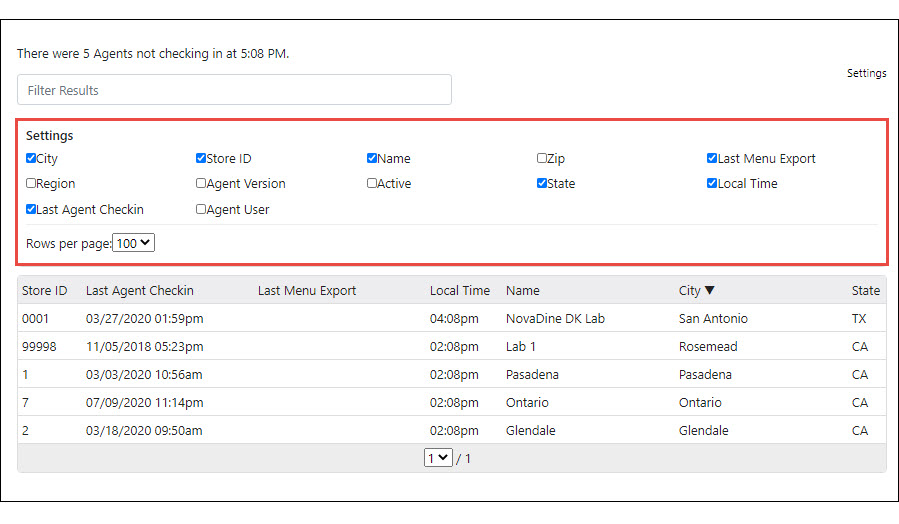
Settings
To change the information that is displayed on your POS Tab, follow the below instructions:
From the POS Tab, click “Settings” - this will bring down a box with the available options that can show on this tab

Enable the check boxes next to the information you wish to display on this tab or disable any check boxes that are currently displaying that you do not need
Once complete, click the “Settings” button again
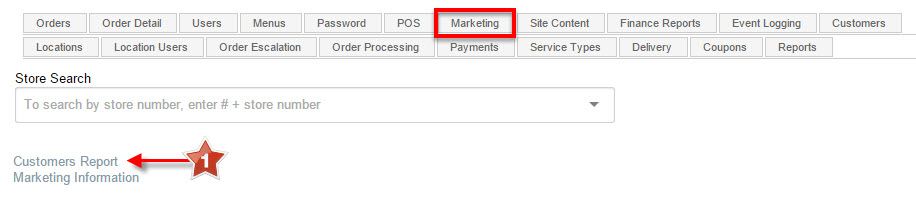
Marketing Tab
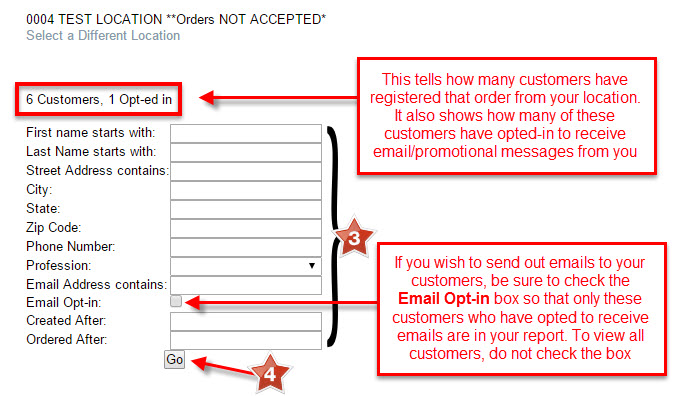
To boost online ordering, you may want to access and send promos or emails to your valued customers. To avoid any fines, legally you can only send such promo emails if a customer has opted-in to receive emails from your establishment. Customer lists can be found under the Marketing Tab. You can look up a specific customer, look up all the customers that have opted-in, look up customers by date they last ordered, look up all customers (opt-in and out), etc.
Customers Report
Corporate Customers Report (Chain-wide)
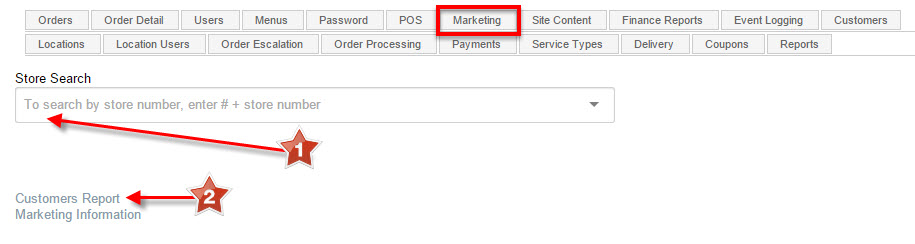
To run a Customers Report for the entire chain, from the Locations Tab:
Click the Customer Report link
Fill in the information relevant to your search
Click “Go”
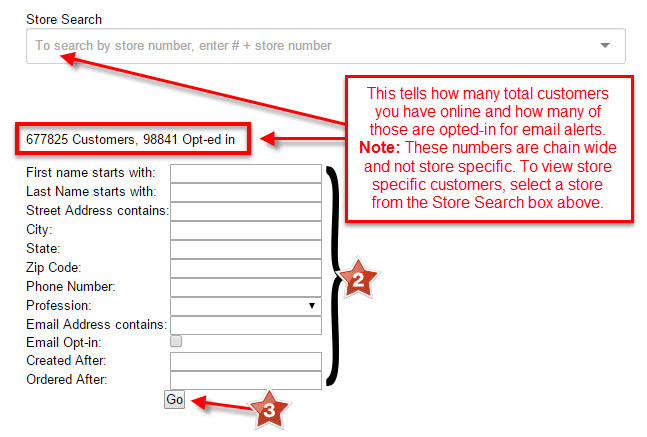
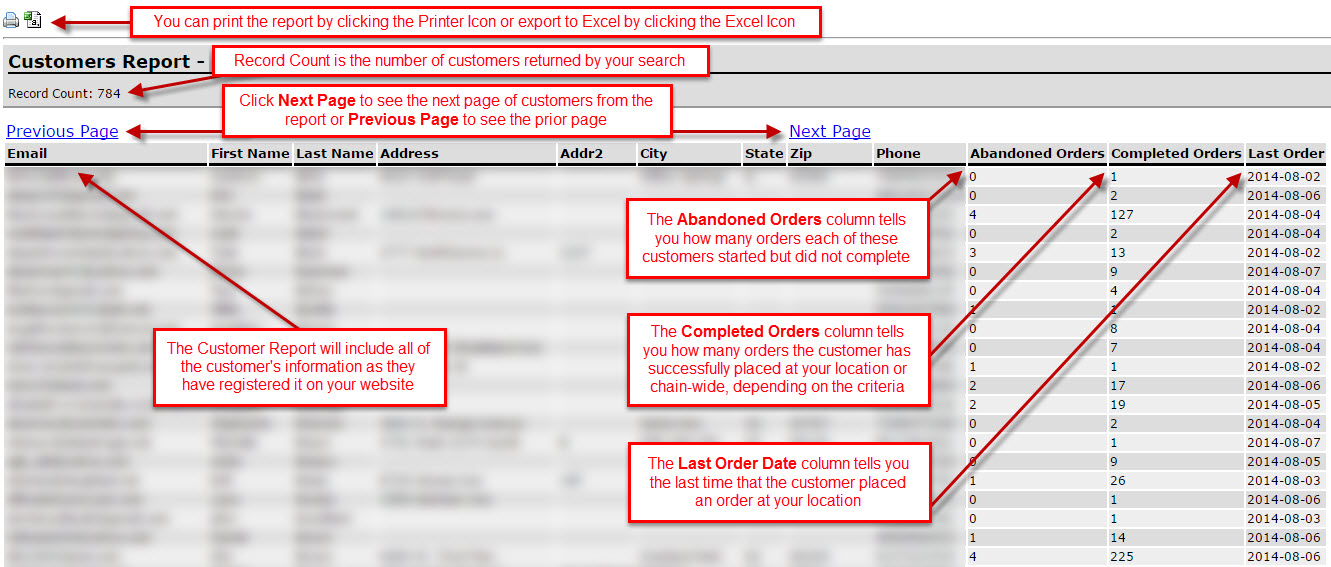
The list of customers will open in a new window, where you will be able to export to excel or print the file
Store Customers Report (Store Specific)
Select a location from the Store Search box
Click the Customer Report link
Fill in the information relevant to your search
Click “Go”
The list of customers will open in a new window, where you will be able to export to excel or print the file
Finance Reports Tab (Franchisee’s Only)
This section will show you how to access the Finance Reports Tab, where you will be able to run several Franchisee reports
Finance Reports Tab Overview
The Finance Reports tab gives you access to your NovaDine Weekly Sales Report for billing purposes. Also located here is the Period Report, which separates information by shift, among other uses
- Weekly Sales Report: this report provides a summary of transactions and fees associated with your NovaDine account
- Period Report: this report separates specific time periods, which is helpful when separating information by shift. You must start the report and then end the report for the information to be collected

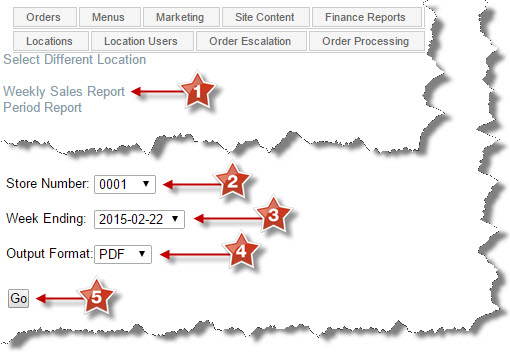
Weekly Sales Report
To run a Weekly Sales Report, from the Finance Reports Tab:
- Click the Weekly Sales Reports link
- Select the store number (dropdown is only available if you have more than one location)
- Select the Week Ending date from the dropdown
- Select the Output Format from the dropdown
- Click “Go” to run the report
Note
The report will pop up in a new window on your browser and show a ‘Generating Report’ message with a percentage bar that adjusts until it reaches 100%. Once complete, the report displays
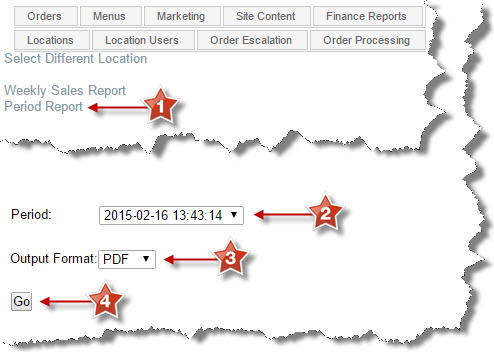
Period Report
To run a Period Report, from the Finance Reports Tab:
- Click the Period Report link
- Select the Period date from the dropdown
- Select the Output Format from the dropdown
- Click “Go” to run the report
Event Logging Tab
This section will show you how to manage event alerts for your location(s). Email alerts can be set up and customized to inform whomever you choose (owners, managers, tech support, etc) of specific events that occur at your location. These alerts are used to inform your stores of issues with orders or changes made to your store’s settings.
Recent Events
Recent Events sections will be the spot you’ll want to check first if your location is experiencing issues. It will show you anytime an order is voided, transferred, refunded and/or escalated, and any errors that your store has experienced. These Events will show the time that the Event occured and who performed the Event, if applicable. Use the Filter dropdown to view only certain events.

Filter to View Specific Events
You have the ability to filter and view specific events for your location. This will remove all events other than the one you selected in the dropdown.
Global Alerts
Global alerts are set up by chain to alert specific people to events occuring at any location. For example, your technical support team would be alerted any time an Agent doesn’t check in for any location
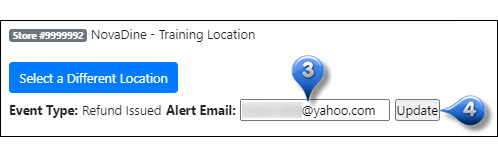
Edit Global Alerts
To edit a Global Alert, from the Event Logging Tab:
Select the Global Alerts subtab
Click the
 to the left of the Global Alert that you wish to edit
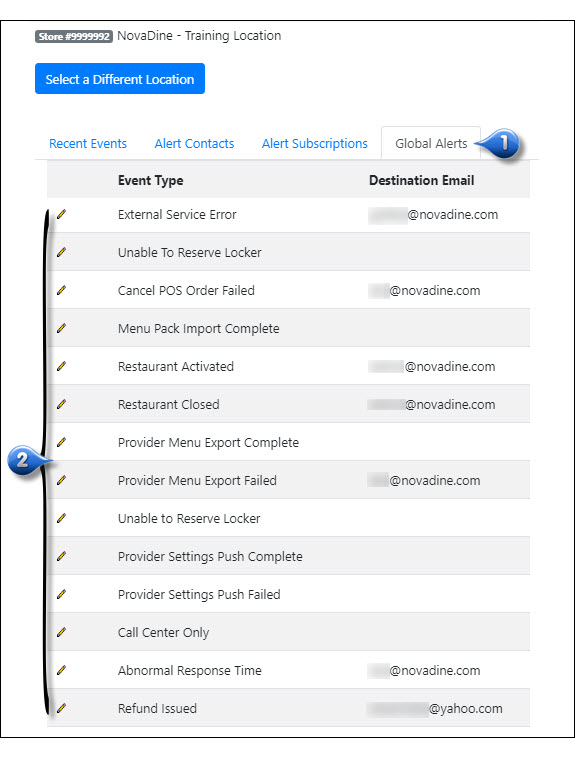
Enter the email address where you would like the alert sent
Click Update
Repeat above steps for each Global Alert that needs editing
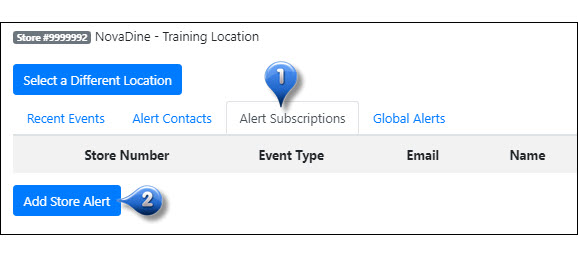
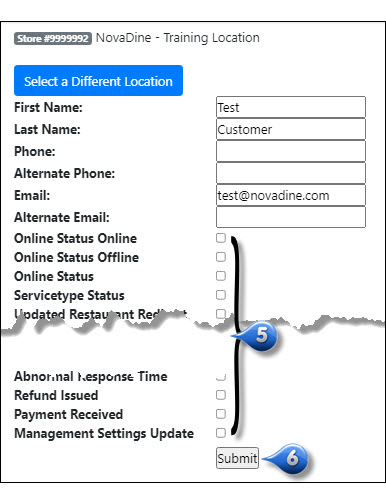
Create an Event Alert for a Location
To create an event alert, from the Event Logging Tab:
Select the Alert Subscriptions subtab
Select Add Store Alert
Enter the email address where you would like the alert sent
Click Lookup
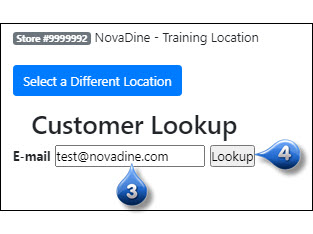
Check the boxes next to any events that this email address should receive
Click “Submit”
Edit an Event Alert for a Location
To edit an existing alert, from the Event Logging Tab:
Select the Alert Subscriptions subtab
Click the
to the left of the alert or alert subscription that you wish to edit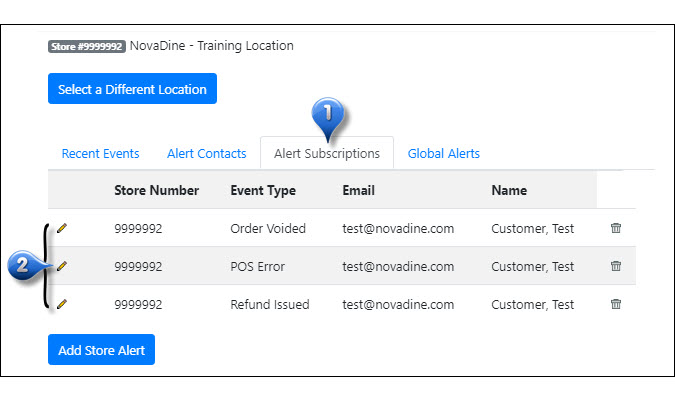
Update the alert subscriptions, as needed
Click Submit

Cancel an Event Alert
To delete an existing alert, from the Event Logging Tab:
Select the Alert Subscriptions subtab
Click the
 to the right of the alert or alert subscription that you wish to delete
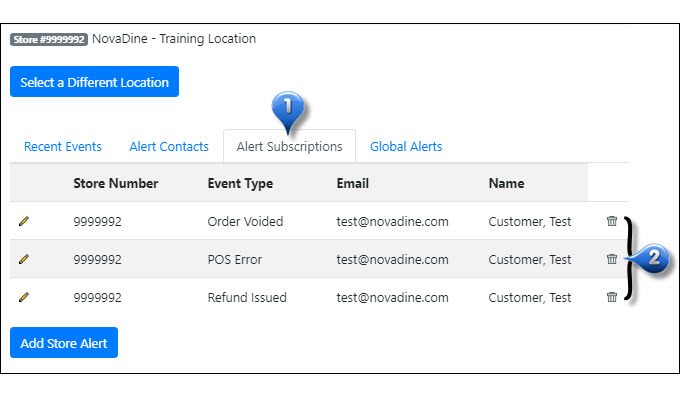
POS Locations Only
There are only two POS related events/emails:
- No Agent Check-In: The NovaDine Agent installed at each store checks for new orders every minute. If an Agent doesn’t check-in for a period of one hour, this event is logged and emails sent. This can be caused by multiple issues, mainly a loss of internet connectivity at the store. Requested action from chain would be to correct the problem as quickly as possible so the store can receive orders.
POS Error: This event is logged when the NovaDine Agent encounters an error communicating with the POS. This happens under 3 circumstances:
- Xpient xsPOSServer service has stopped/hung/crashed on the back office server. The alert email would start with: “Error communicating with IRIS” and then followed by the actual error, which can be “[Errno 10061] No connection could be made because the target machine actively refused it”, or “[Errno 10053] An established connection was aborted by the software in your host machine”, or something else. If the error starts with ‘Error communicating with Iris’, requested action from chain would be to start/fix the xsPOSServer service at the store.
- Agent cannot send order to POS because of missing item in the POS. The email would be “Error from IRIS submitting order: Item not found. [Error 10]” and would include the missing item number. Requested action from chain would be to add the missing item to the POS, or make it available in the Online Order destination. Order cannot be sent to POS until this is fixed, and credit card/sales reconciliation will be off unless it’s fixed same day.
- Agent cannot send order to POS because of missing discount/coupon in the POS: The email would be “Error from IRIS submitting order: Discount has no available qty. [Error 19]” and would include the missing discount/coupon number. Requested action from chain would be to add the missing discount to the POS, or make it available in the Online Order destination. Order cannot be sent to POS until this is fixed, and credit card/sales reconciliation will be off unless it’s fixed same day.