Call Center
Contents: This guide will show you how to access the Call Center and it’s features, look up an existing customer, register a new customer, and place an order for a customer.
Call Center Overview
For your convenience, NovaDine includes a Call Center module. This feature allows a company employee to take phone orders from customers for multiple locations, utilizing NovaDine’s location finder and POS integration.
Warning
The Call Center is not supported in Internet Explorer. Chrome or FireFox must be used.
Accessing the Call Center
Click the
 icon in the top right corner of your site
Login with your management account credentials
Click the
 icon in the top right corner that displays after successful login, which will open your Backend Management site in a new tab
Click on Call Center at the top left of the management page
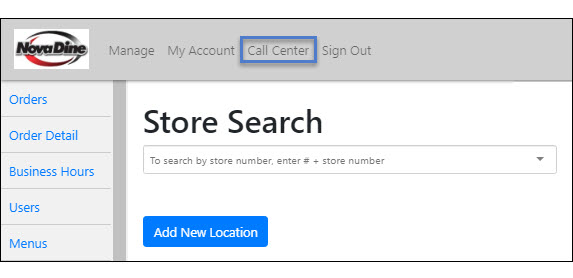
The Call Center Home Page will display:
The three tabs you will use are:
- Main Site
- Customer Ordering
- Order Dashboard
Main Site Tab
The Main Site Tab gives you a drop-down box with the following options:
Home: returns you to yoursite.com
Manage: takes you to management access for your restaurants
My Account: takes you to your personal ordering account
Call Center: returns you to the Call Center Home Page
Sign Out: will log you out entirely and return you to yoursite.com

Note
Once you start a customer’s order, you will not be able to access the Main Site Tab until you complete the order and return to the Call Center Home Page
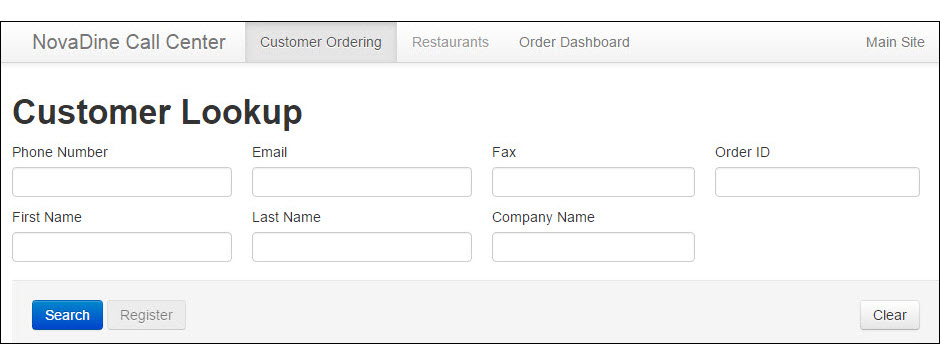
Customer Ordering Tab
The Customer Ordering Tab is pre-selected as the default Call Center Home Page. This is the tab you will use to place an order for a customer that calls in.

Customer Lookup
- See if the customer is already registered in the system. You can lookup the customer by entering any of the following information:
- Phone Number
- Email Address
- Fax Number
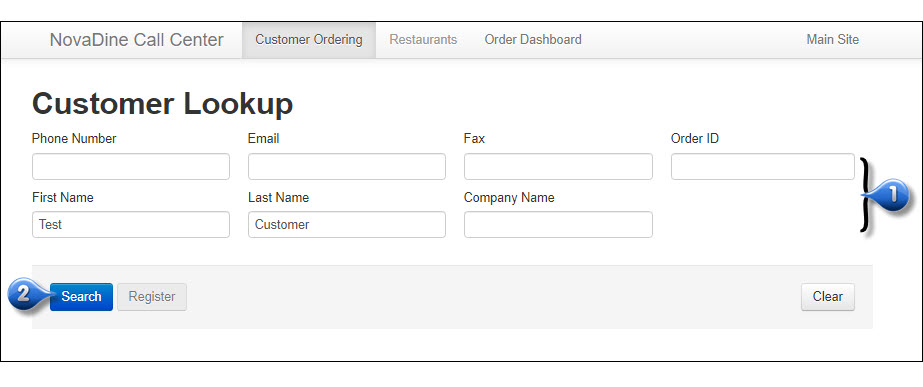
- First Name
- Last Name
- Company Name
- Order ID
Click Search
Registration
If the customer is already registered:
- The information will show below the search fields
- Click Start Order next to their name to begin the order

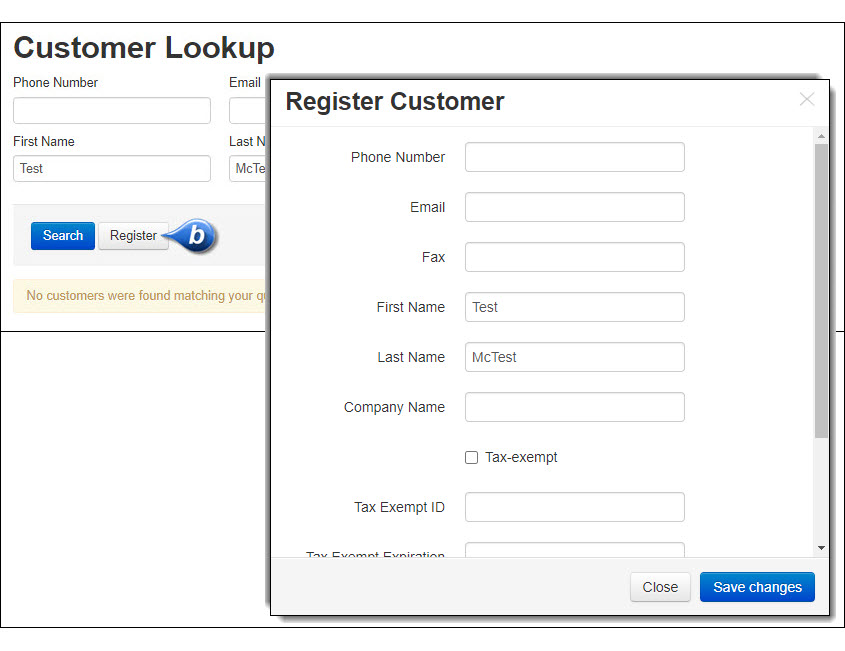
If the customer is not registered:
- Click the Register button
- Enter customer’s information into the appropriate fields
- Click Save Changes. This will automatically register the customer and take you to the Start Order Page.
Note
When you register a customer, they will receive an email requesting that they set a password for their account. This allows the customer to place future orders online.
Note
If you do not find an order under History for customer, it could be that the customer never fully checked out. The History button on the initial search result page doesn’t show incomplete or partially paid orders. If you don’t initially find an order for a customer, try clicking Start Order, and then Open Orders. If you see the order there and the button says Resume, you know it’s not fully checked out.
Start an Order
Now, let’s get started on the order!
- Select the Type of order the customer would like to place. These options may vary based on the options available at that location and/or chain
- Pick-Up
- Catering
- Delivery (if available)
- Select the Ready Time for the order (When does the customer want their order?)
- ASAP - check the box next to ASAP
- Specific time - select the corresponding boxes for the Hour, Minute, and Date that the customer wants to have their order ready. If customer is placing a future order, use the Other Date field and select the date from the pop-up calendar
Enter a PO Number for On-Account orders and/or Guest Count for Catering Orders, if applicable
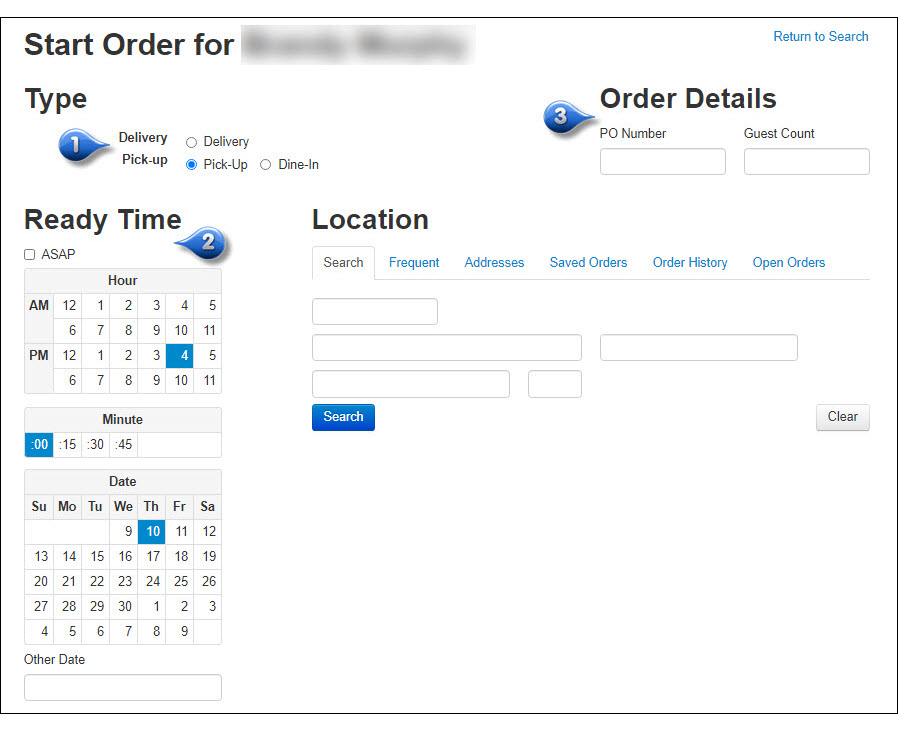
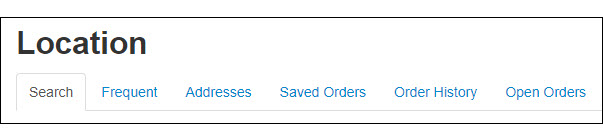
Location Search
Not only can you search for a location using a zip code or specific address, but the Location section on the Start Order screen contains six tabs that are helpful in selecting a location for the customer. The tabs listed under the Location section are:
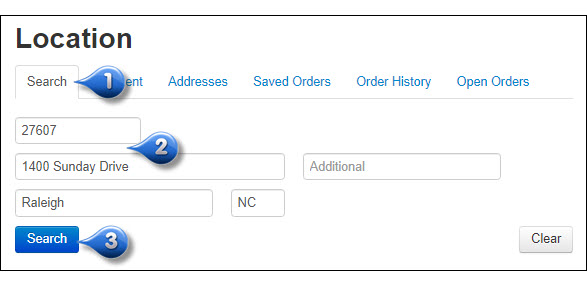
Search
The Search Tab allows you to enter an address to search for locations.
- Select the Search Tab
- Find the closest store locations by entering any of the following information:
- Zip Code
- City and State
- Full Address (for any delivery orders)
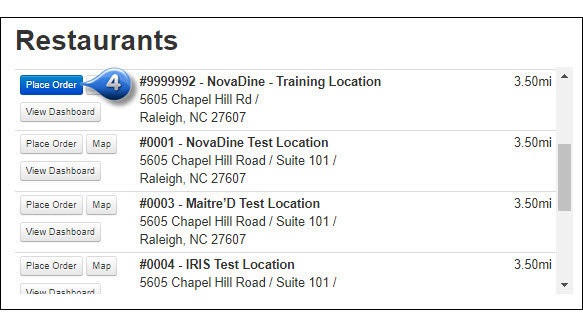
Click Search and the nearest stores will populate below
Then choose from the following options:
- Place Order: begins an order for the customer at this location
- View Dashboard: opens Order Dashboard in a new window or tab listing orders for the selected date and store (See the Order Dashboard section for more information)

Note
For delivery orders, you MUST enter the full address of the location in order to populate store results. Zip codes and city, state only will not return results - must enter street address.
Frequent
The Frequent Tab lists the stores in which the customer orders from most often.
Select the Frequent Tab and the stores most often ordered from will populate below, along with any previous order information
Click Search next to the location the customer wishes to order from
You will be returned to the Search Tab with the chosen location’s address auto-populated as well as any others nearby
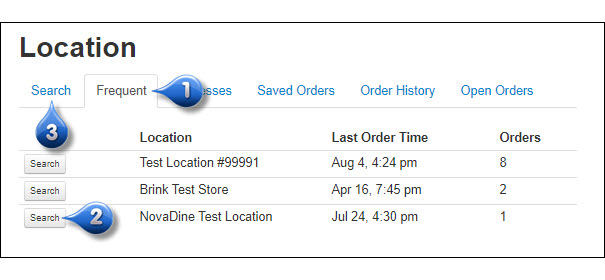
Click Place Order next to the chosen location

Addresses
The Addresses Tab is ideal when a customer wishes to place an order and have it delivered to an address that they have previously saved under their account
Select the Addresses Tab and, if the customer has saved locations to their profile, any saved addresses will display below
If the address that the customer requests is not listed and they would like to save the new address to their profile for future use, click Add Address to enter the new information
Click Search next to the address that the customer requests.
You will be returned to the Search Tab with the chosen location’s address auto-populated
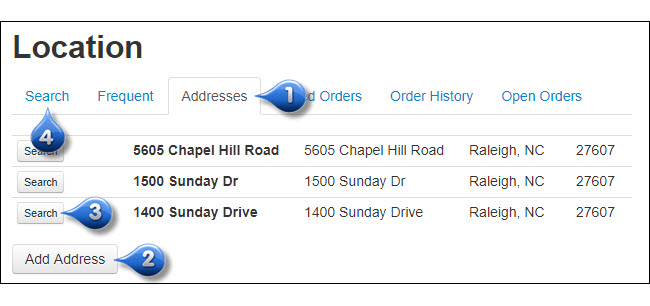
Click Place Order next to the desired store location

Saved Orders
The Saved Orders Tab lists all of the orders that the customer has previously saved under their account.
Select the Saved Orders Tab and any orders that the customer has previously saved under their account will display below
Click Repeat next to the order that the customer would like to duplicate. The dropdown arrow to the right of Repeat will also give you the option to delete the saved order, if requested
You will be returned to the Search Tab with the chosen location’s address auto-populated
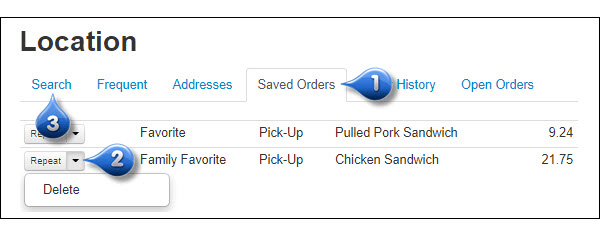
Click Place Order next to the desired location. You will be taken to the menu, with the items from the saved order already added to the cart, including any and all customizations from that saved order

Note
If you repeat a saved order and that location does not have one or more of the items from the customer’s saved order available, after clicking Place Order you will get a pop-up notifying you that the item is not available. Click Continue and you will be taken to the screen to place the order with all the items in the cart from the previous order, excluding the unavailable items
Order History
The Order History Tab lists all of the orders that the customer has previously placed. This is useful if the customer would like to duplicate a prior order.
Select the Order History Tab and the customer’s previous orders will display below
Click Repeat next to the order that the customer would like to duplicate. The dropdown arrow to the right of Repeat will also give you the option to cancel an order, if the ready time for the order has not been met and the order has not been sent to the store’s POS or accepted by the restaurant
You will be returned to the Search Tab with the chosen location’s address auto-populated
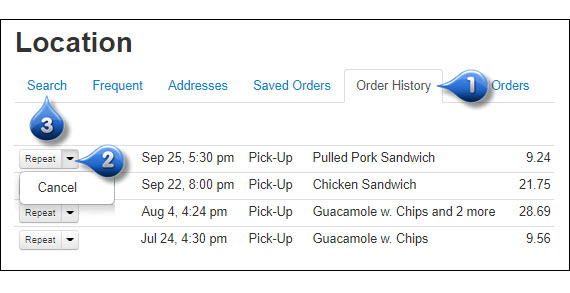
Click Place Order next to the desired location. You will be taken to the menu, with the items from the order that was repeated already added to the cart, including any and all customizations from that previous order

Note
If you select to repeat a previous order and that location does not have one or more of the items from your previous order available, after clicking Place Order you will get a pop-up notifying you that the item is not available. Click Continue and you will be taken to the screen to place the order with all the items in the cart from the previous order, excluding the unavailable items
Open Orders
The Open Orders Tab shows any orders that the customer started but did not complete. Useful if the customer wishes to continue the order where they last left off
Select the Open Orders Tab and any orders that were started by the customer, but were not finished, will display below
Click Resume next to the order that the customer wishes to complete
You will be returned to the Search Tab with the chosen location’s address auto-populated as well as any others nearby
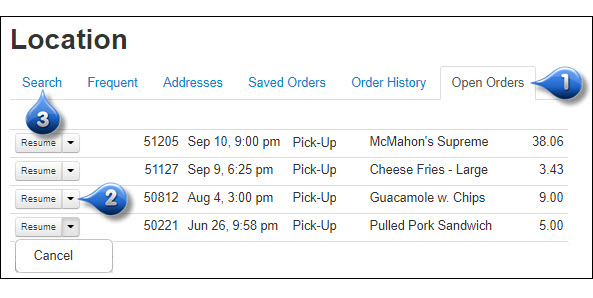
Click “Place Order” next to the chosen location to start where the customer left off
Note
If an open order that was never checked out and has no payments is cancelled, the order is deleted and doesn’t show in customer’s order history, and no notifications are sent. Deleted orders should show in Order Detail tab with a status of Deleted.
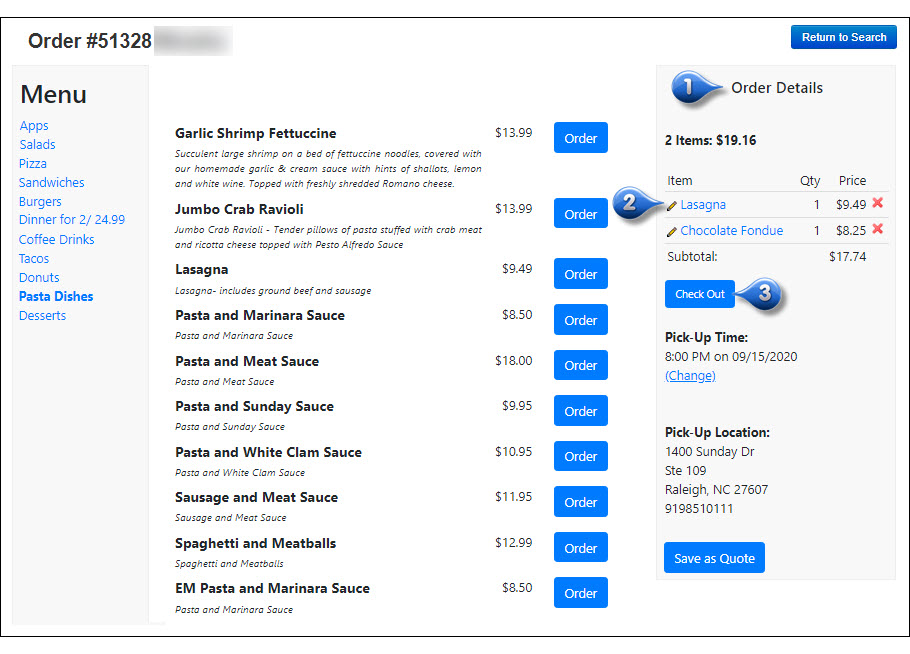
Place the Order
Now that you have located the store, entered the desired order time and date and selected the order type, the menu should be displayed and you may now begin placing the customer’s order. An order number will be assigned to the order and will be displayed at the top of the screen, along with the customer’s name.
Add all of the customer’s requested items to the cart. The cart will show on the right hand side of the page under Order Details
Edit anything in the cart by clicking the pencil icon next to the item
Click Check Out and you will be taken to the next screen where you can review the order, add coupons, and enter payment information
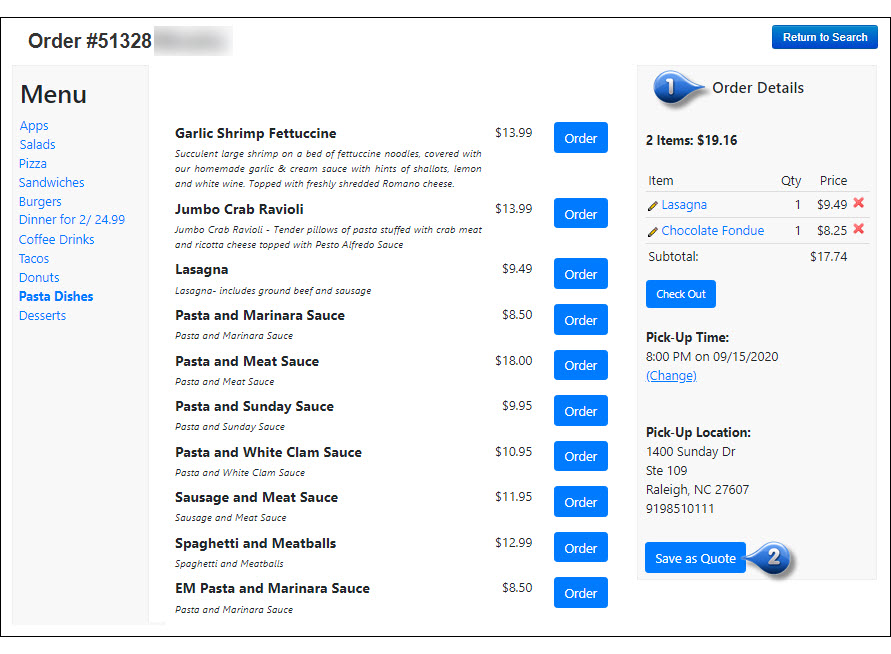
Save the Order as a Quote
You have the ability to save an order as a quote. If a customer calls and needs pricing for a catering event, you can enter the order for pricing and save it as a quote in order to email a copy to the customer. When the customer calls back to place the actual order, it can be pulled up by the quote number previously given, edited as needed and submitted.
Add all of the items to the cart that the customer wants to include on their order. The cart will show on the right hand side of the page under Order Details
Click Save as Quote
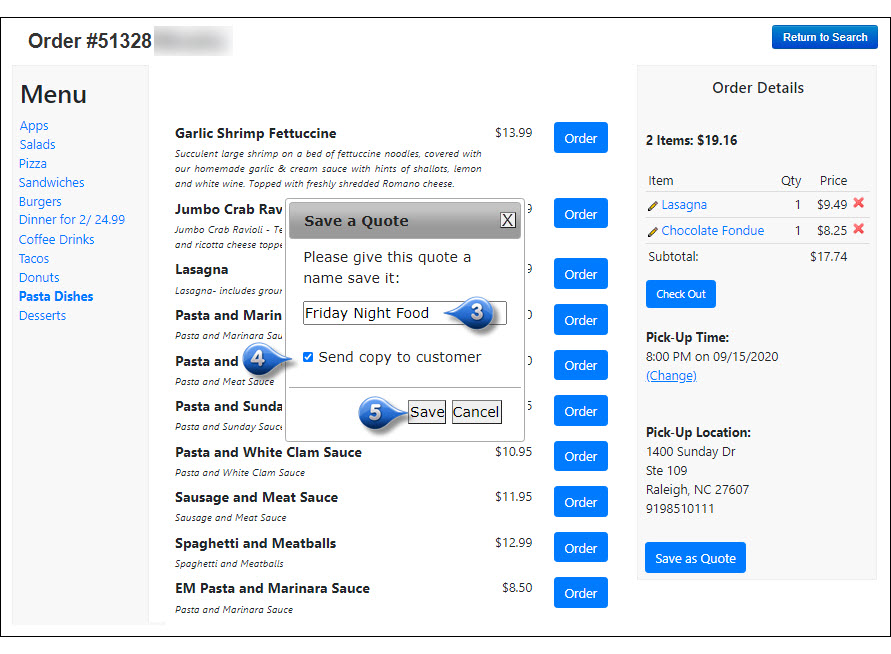
The Save a Quote box will display and you will need to enter a unique quote name that will easily identify the order
Enable the Send copy to customer checkbox if you wish to send a copy of quote to the customer
Click Save and the quote will be emailed to the guest’s email address. The quote email will contain a link that allows the guest to proceed with the order and complete payment
Review Order/Enter Coupon Codes
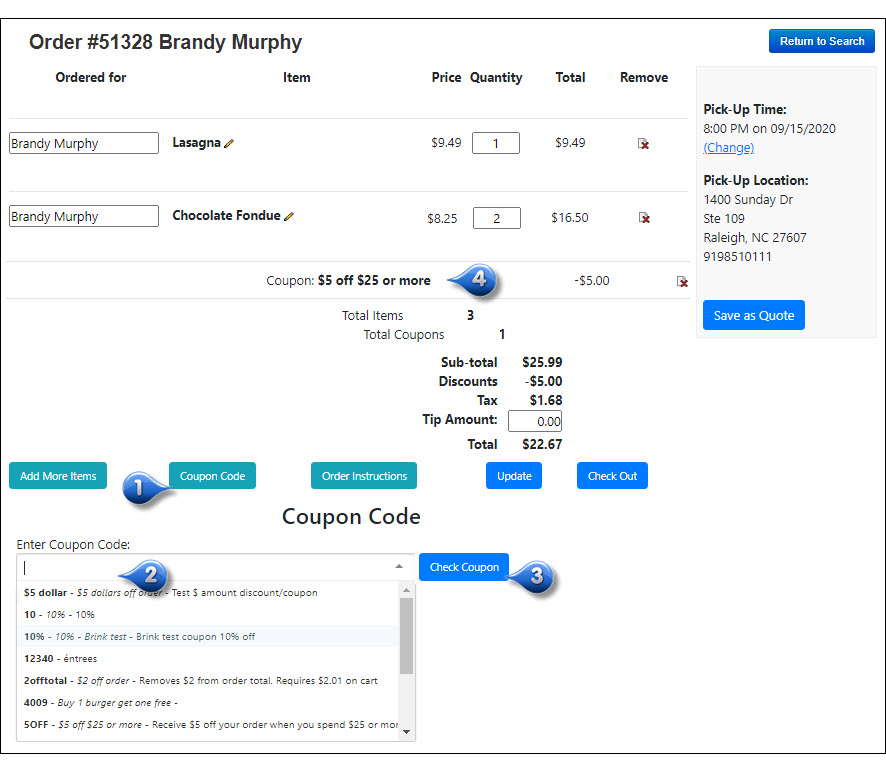
After entering the customer’s order, you are taken to the Review Order screen to verify the order and enter any promo codes, if applicable. If any changes need to be made, please see below for instructions.
To make changes to a particular item, click the pencil icon to the right of the item name
To change the quantity of an item, enter a new value in the Quantity entry box
Delete an item by clicking the red X to completely remove it from the order
To change the order ready time and/or date, click the Change link
If the customer has any specific instructions that need to go along with the order, click the Order Instructions button and enter any notes in the box that populates below
Once the order is correct, click Check Out to be taken to the Payment Screen

Apply Coupon Codes
To enter a promo/coupon code:
Click the Coupon Code button
Choose the appropriate code provided by the customer from the drop down
Click Check Coupon
If the order meets the coupon code requirements, the coupon will be applied to the order
Process the Order
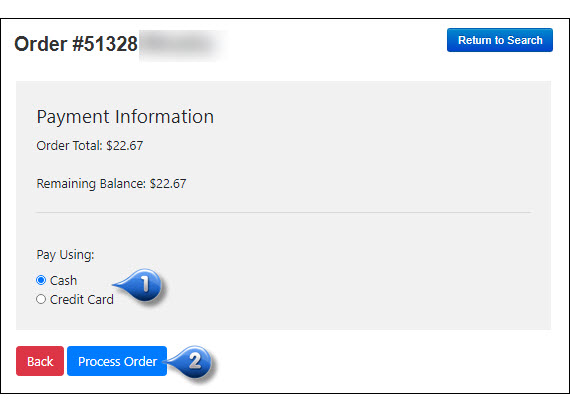
After reviewing the order, you will be taken to the Payment Screen. The order total will appear at the top, along with a selection of payment methods accepted by the store. If a payment method is not listed, the store does not accept that form of payment via online ordering.
- Select the Payment Method that the customer would like to use. Many locations do not offer all payment methods listed below. If a payment method is not listed, the store does not accept that form of payment via online ordering.
- Cash: Pay cash in store upon pick-up or delivery (not available at all locations)
- Credit Card: Enter new card information or select a saved credit card on file by choosing it from the drop-down. If choosing a card already on file, you will need the last 4 digits of the card number to ensure you have selected the correct one. You will also be required to enter the CVV number from the back of the card in order to process the order
- Pay at Store: Pay cash or use credit card upon pick-up
Click Process Order
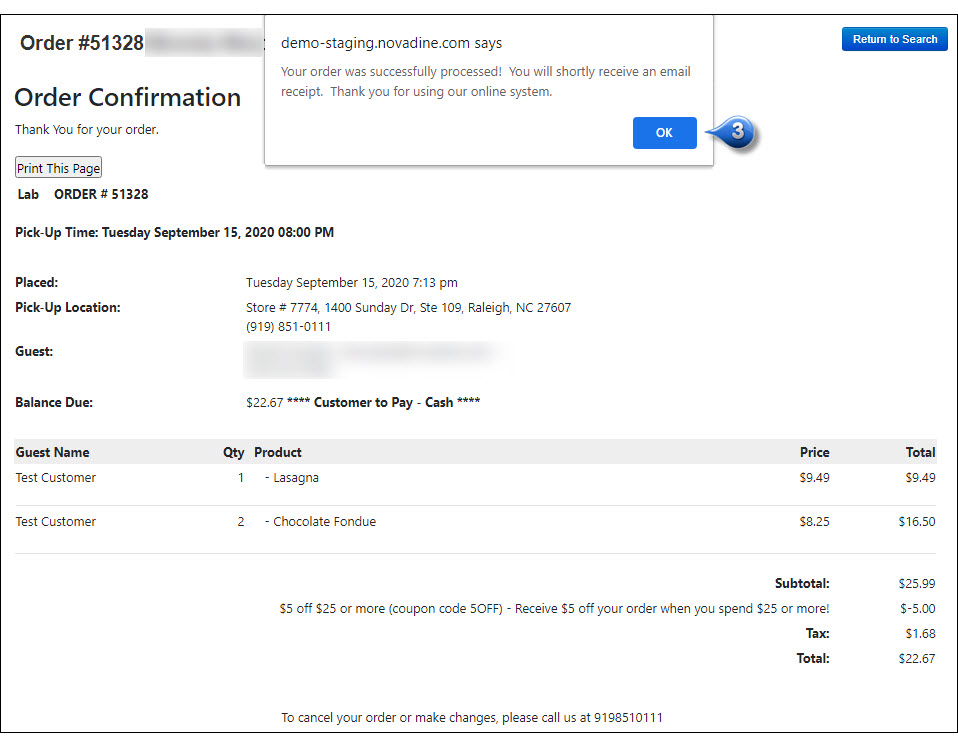
After the order is placed, you will receive a pop-up message stating that it was successfully processed. Click OK to view the receipt. If you get an error message and DO NOT get the message box that states that the order was processed successfully, then the order was NOT placed.
Check Order Status
A customer may call in and decide that they need to make a change to an order that they placed. Through the Call Center Module, you can check order status and, depending upon order status, make changes to an online order.
Customer Lookup
- Lookup the customer by entering any of the following information:
- Phone Number
- Email Address
- First Name
- Last Name
- Company Name
Click Search
Locate the customer and click History next to their name

A new screen with a list of all the past orders that the customer has placed will display
Note
If data is entered into the Order ID field, all other fields are ignored
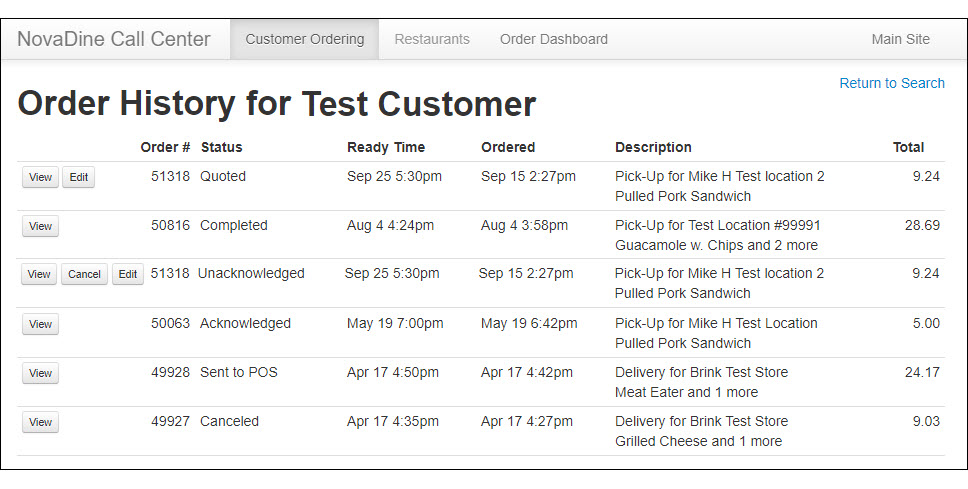
Order Status
The Order History page for the customer will list all previous orders placed on the site for/by the customer. It will include the Order #, status of the order, when the order was/is to be ready, when the order was placed, a description of the order and the order total. There are five statuses that you may find an order in:
Click Edit to change any order details (Edit is only an option if the order is in either Held or Unacknowledged Status)
Click View to view a copy of the order receipt
Click Cancel to cancel an order that has not yet been sent to the store’s POS or accepted by the restaurant
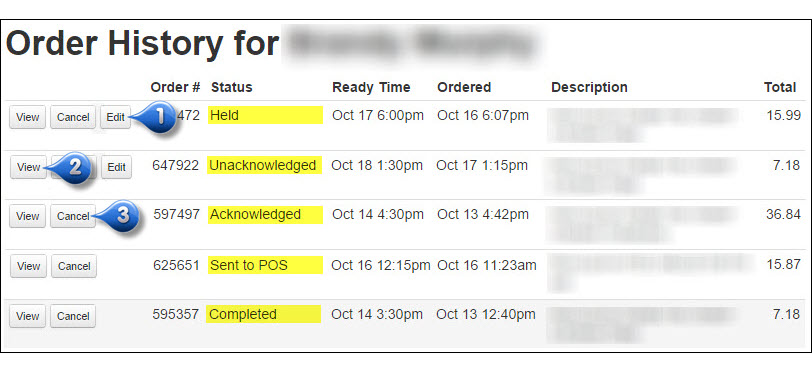
- Held: means the order was placed and sent to the NovaDine Agent. The NovaDine Agent is holding the order until the calculated prep time is met and the order has not yet been sent to the POS. You are able to cancel the order in the Call Center system at this point
- Unacknowledged: means the order was placed, sent to the NovaDine Agent but has not been accepted by the Agent. You are able to cancel the order in the Call Center system at this point
- Acknowledged: means the order was placed, sent to the NovaDine Agent but was manually accepted on the NovaDine Agent prior to sending to the POS. In this case, also, the order has not been tendered yet. In order to effectively cancel the order, you will need to call the location directly
- Sent to POS: means the order was placed, sent to the NovaDine Agent, and sent to the POS. In this status, the order has not been tendered yet. To cancel an order with this status, you will need to call the location directly (This status would only been seen for POS locations)
- Completed: means the order has been tendered in the POS. This order has been processed and is unable to be canceled
Note
If you do not find an order under History for customer, it could be that the customer never fully checked out. The History button on the initial search result page doesn’t show incomplete or partially paid orders. If you don’t initially find an order for a customer, try clicking Start Order, and then Open Orders. If you see the order there and the button says Resume, you know it’s not fully checked out.
Cancel or Delete Orders
A customer may call in and decide that they need to cancel an order that they placed.
Cancel Order through History Button
The first way to cancel an order through Call Center is through the customer’s order history
- Lookup the customer by entering any of the following information:
- Phone Number
- Email Address
- First Name
- Last Name
- Company Name
- Click Search
- Locate the customer and click History next to their name
- Click Cancel to cancel the order in the Call Center
Note
If you do not find an order under History for customer, it could be that the customer never fully checked out. The History button on the initial search result page doesn’t show incomplete or partially paid orders. If you don’t initially find an order for a customer, try clicking Start Order, and then Open Orders. If you see the order there and the button says ‘Resume’, you know it’s not fully checked out.
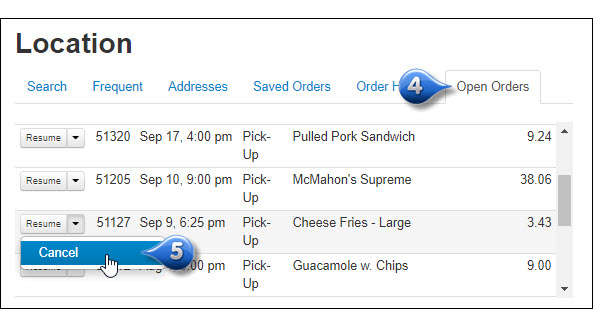
Cancel Open Orders
You have the ability to cancel an open order through Call Center using the ‘Start Order’ button. Once an open order is canceled, the order is deleted and doesn’t show in customer’s order history, and no notifications are sent to the customer or the store. The canceled orders can still be viewed through Management under the Order Detail Tab
- Lookup the customer by entering any of the following information:
- Phone Number
- Email Address
- First Name
- Last Name
- Company Name
- Click Search
- Click Start Order next to the appropriate customer’s name

- Under the Location section, select the Open Orders Tab and the system will populate a list of orders that the customer never completed
- Select Cancel from the drop-down beside the appropriate order
Note
If orders are in Acknowledged or Sent to POS Status, you must call the location directly to confirm that it is possible to cancel
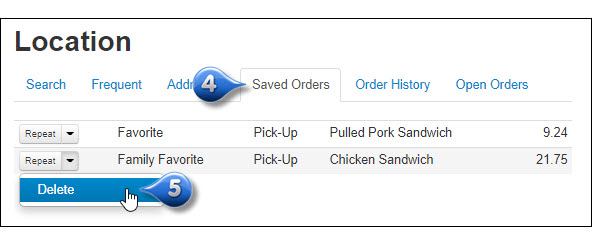
Delete Saved Orders
If you need to delete an order that have been previously saved as quote:
- Lookup the customer by entering any of the following information:
- Phone Number
- Email Address
- First Name
- Last Name
- Company Name
- Click Search
- Click Start Order next to the appropriate customer’s name
- Under the Location section, select the Saved Orders Tab and the system will populate a list of orders that have been previously saved as Quotes
- Select Delete from the drop-down beside the appropriate order
Set Customer Tax Exempt
You will need to start from the Customer Ordering Tab to edit the customer to be tax exempt
Warning
You must have approval from the restaurant/chain that they have received the customer’s tax exempt form before setting their exemption status.
Customer Lookup
- See if the customer is already registered in the system. You can lookup the customer by entering any of the following information:
- Phone Number
- Email Address
- Fax Number
- Previous Order ID
- First Name
- Last Name
- Company Name
Click Search
Determine if the customer is already registered in the system
If the customer is already registered:
- Their information will display below
- Click Edit next to their name to display the Register Customer box and begin adding the tax exempt details

If the customer is not registered:
- Enter their information into the appropriate fields
- Click Register to display the Register Customer box and begin adding the tax exempt details
Check/Enable the Tax-exempt checkbox
Enter the customer’s Tax Exempt ID #
Enter the expiration date of the customer’s Tax Exempt Certificate
If there is a copy of the Tax Exempt Certificate already on file, you can proceed to the next step. If not, click Choose File, find the file saved on your computer, and select it
Click Save Changes

Note
If the customer’s Tax Exempt Certificate Expiration Date has expired, they will be automatically charged tax. A new certificate will need to be provided and the expiration date will need to be updated so that the system will know to exclude tax from that particular customer’s orders
Order Dashboard Tab
The Order Dashboard Tab is where you can view orders for all restaurants or a single store and have the ability to filter by Order Status

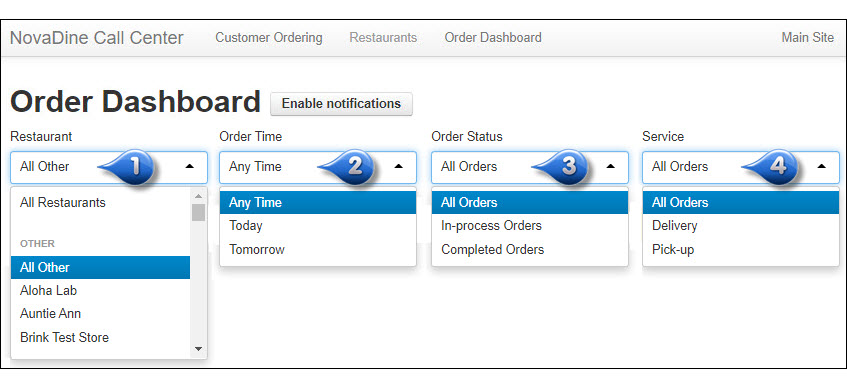
Order Dashboard Overview
You can filter orders based on the following:
Restaurant: view orders for a single restaurant location, a region or all stores. All Restaurants is selected by default
Order Time: view orders for a specific date (today, tomorrow, any time, or choose a specific date from the calendar). Any Time is selected by default
Order Status: view orders by order status (in-process, completed, or all orders). All Orders is selected by default
Service: view orders by service type (regular menu, catering menu, or all orders). All Orders is selected by default
Order Status
On the Dashboard, you may find orders in the following statuses:
- Canceled: Order has been canceled and you are only able to view a copy of the receipt
- Completed: Order has been marked complete and you are able to view a copy of the order receipt
- Held: Order is usually for a future time/date and will fire to the POS once the lead time is met. In Held status, you are able to view a copy of the receipt, cancel the order because it has not yet been sent to the POS, or manually fire the order to the POS
- Refunded: Order has been refunded and you are only able to view a copy of the receipt
- Unacknowledged: Order was placed, sent to the NovaDine Agent but has not been accepted by the Agent. You are able to view a copy of the order, cancel the order, edit the order, or manually accept the order (not recommended)
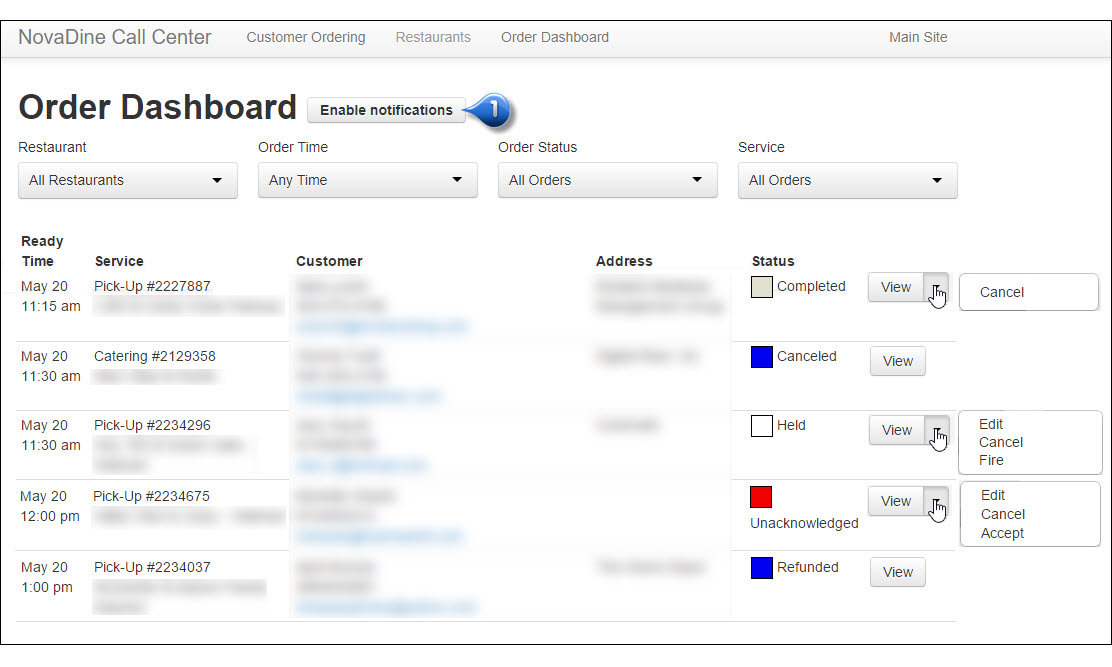
You can click the Enable Notifications button to enable desktop notifications for new orders