Delivery Driver Management
Contents: This guide will show you how to access the Delivery Driver Management System, where you have the ability to manage drivers, orders, delivery maps, and driver reports.
Delivery Driver Management Overview
For operations that provide delivery service to their customers, NovaDine provides a comprehensive integrated Delivery Management System. By using Delivery Driver Management, you have the ability to:
- Manage driver information
- Manage incoming orders
- Clock drivers in and out
- Assign and un-assign orders to drivers
- Dispatch drivers
- Display/Print multi-point driving directions
- Display/Print packing list (pick list)
- Add tips
- Manage incoming/outgoing cash
- Record delivery dispatch results
- Track driver performance
- View/Print reports
- Cash out Drivers
Driver Management Screen
The Driver Management Screen can be accessed in the Management area by clicking the Driver Management Tab (requires Store Manager security access). The Driver Management screen is divided into three sections:
Driver Management Section
When a driver clocks in, the driver is automatically added to the Driver Management section. The following information is displayed for each driver when clocked in:
- Driver: driver name
- Last Event: last action taken by driver (status)
- Time: time of last action
- Phone Number: driver’s phone number
The following actions are available in the Driver Management section:
- Clock in: add a driver to the shift
- Check out: dispatch a driver
- Check in: return a driver
- Cash in: record a driver cash drop
- Route map: view route reflecting a driver’s current assigned orders
- Clock out: cash a driver out, clock out, and remove from shift
Order List Section
When an online order is received, the system will notify you with a sound and the order will be displayed as the first order in the list. All orders for the current business day are displayed in this section. The following information is displayed for all orders:
- Order #: order number
- Promise Time: delivery or Pickup time; assigned driver (when applicable)
- Pickup or Delivery: displays the delivery address or the text ‘Pick Up’
- TTD/DEL: time to delivery (countdown) or actual time delivered
- Assign: assign a driver or view the name of the driver assigned
- Total: order total
Orders are color coded to show status. The colors and statuses are as follows:
- Red: unassigned
- Teal: assigned, but not yet out for delivery
- Light Green: out for delivery
- Dark Blue: delivered
- Tan/Grey: complete/Cashed out
- Orange: future order
Order Details Section
To view additional details about a specific order, simply click on the order in the Order List Section. This will give you the option to view more details about the order, a delivery map with directions, a copy of the order receipt, and the pack list. The following information is available in this section:
Order Tab
- Assign: display assigned driver or assign a driver
- Order #: order number
- Promise Time: delivery or Pickup time
- TTD/DEL: time to delivery (countdown) or actual time delivered
- Address: delivery Address
- Zone: delivery Zone (if applicable)
- Name: customer Name
- Contact: customer’s email address and phone number
Map Tab
- View Map of delivery route
- View step-by-step driving directions
- Print a copy of the directions for the driver
Receipt Tab
- View a copy of the order receipt
- Print a copy of the order receipt
Pack List Tab
- View a copy of the order pack list
- Print a copy of the order pack list
Order Management Screen Overview
The image below shows an overview of the Order Management screen and its functions:
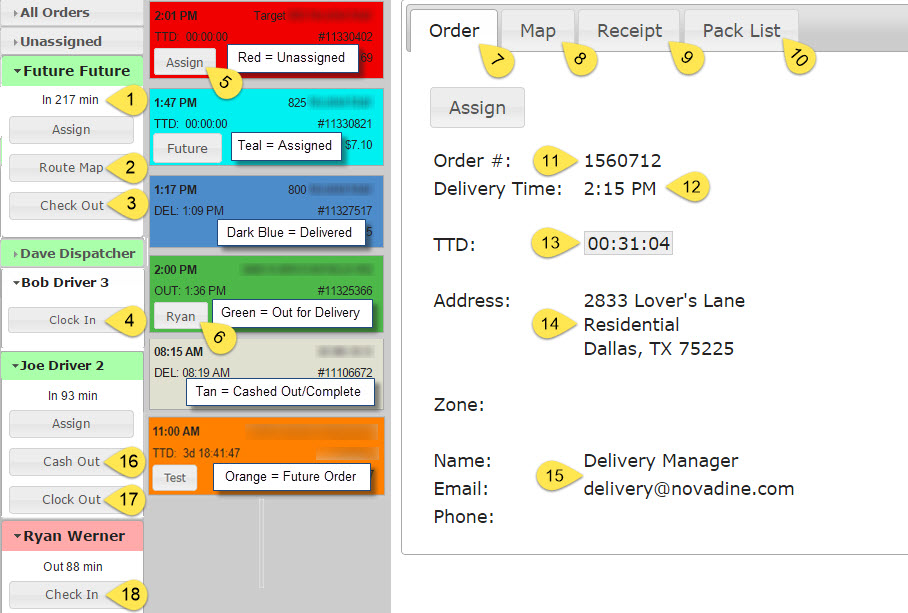
Key:
- Displays the current status of a driver
- View driver’s current route
- Dispatch driver
- Add a driver and bank to this shift
- Assign order to driver
- Displays driver assigned to that order
- View order details
- View map and directions
- View a copy of order/customer receipt
- View/print a copy of Packing List
- Order #
- Promise time
- Time to delivery
- Delivery address
- Customer information
- Adjust a tip and settle bank, if needed
- Removes the driver from this shift
- Return/check-in a driver from delivery
Order Notifications and Alerts
Notification alerts will sound up to twice, 30 seconds apart, when there are unacknowledged orders (red). If all the unacknowledged orders are acknowledged (assigned, etc.), the alert is reset and will sound again (up to two times) when new orders come in. Refreshing the page resets the alert so it will sound again if there are unacknowledged orders.
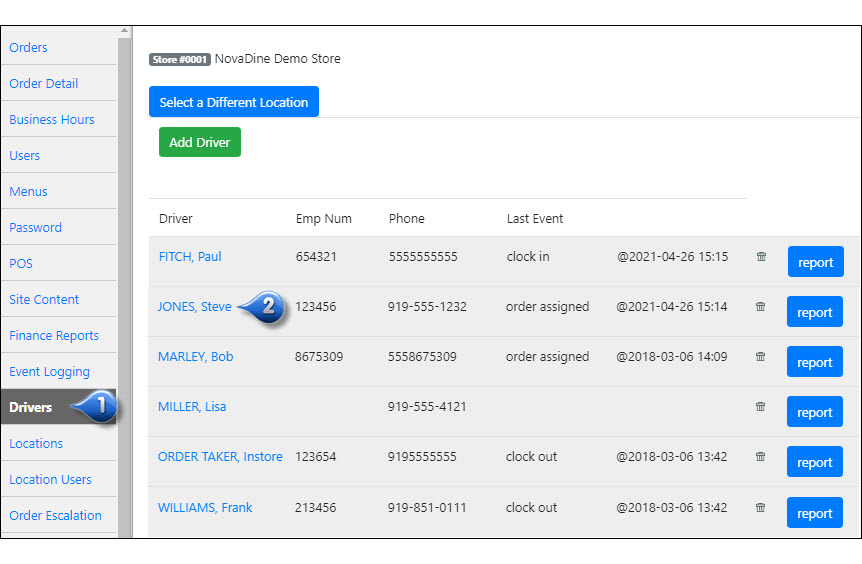
Driver Information Management
You can view a list of your drivers in the Drivers Tab of the Management section
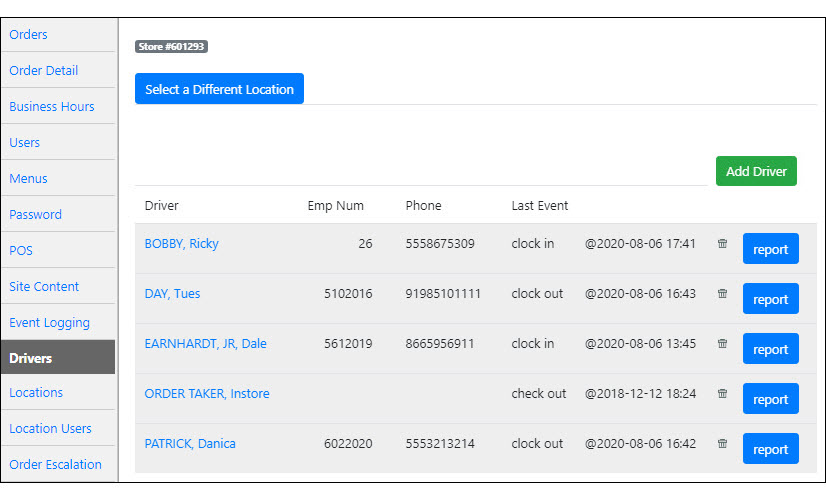
Viewing Delivery Driver Information
The Drivers Tab will display information about your drivers including date of hire, driver’s license information and insurance.
Add a Driver
To add a driver:
From the management site of your store, proceed to the Drivers Tab
Click Add Driver
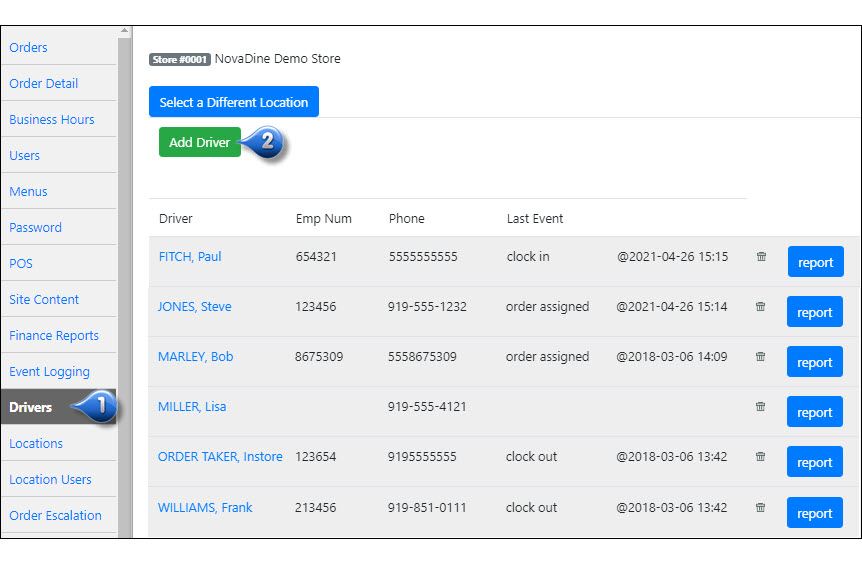
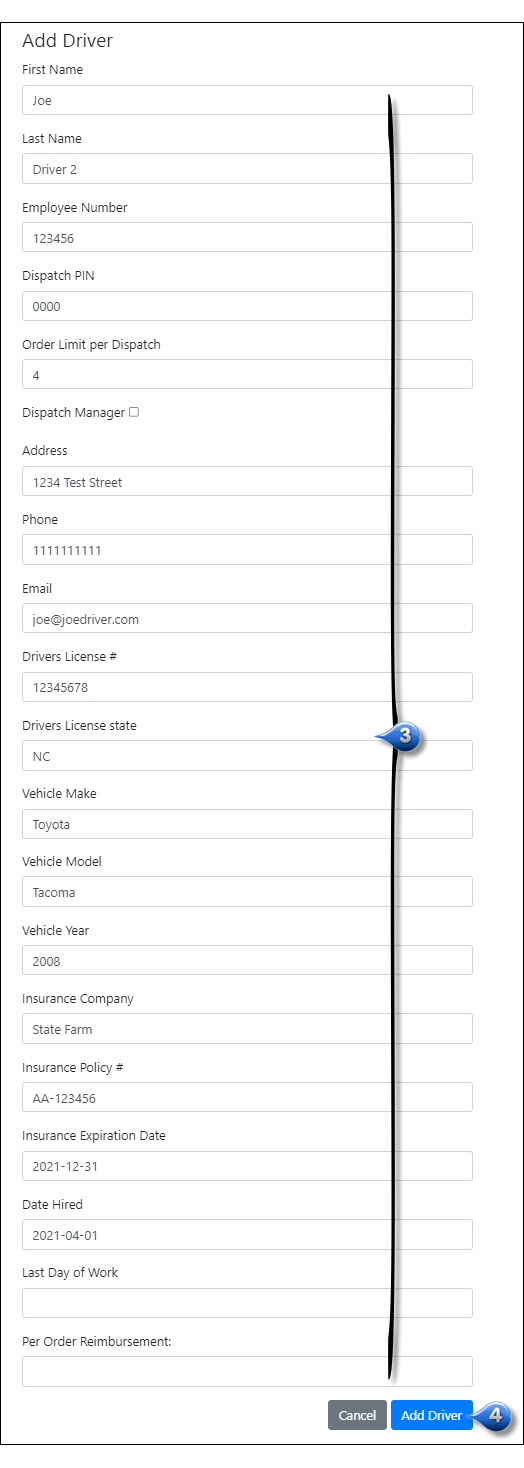
Add your driver’s information
Click Add Driver
Edit an Existing Driver
To edit an existing driver:
Click Drivers Tab
Click on the Driver’s name that you wish to edit
Update information, as needed
Click Save Changes, or, if you would like to leave this form without saving your changes, click Cancel
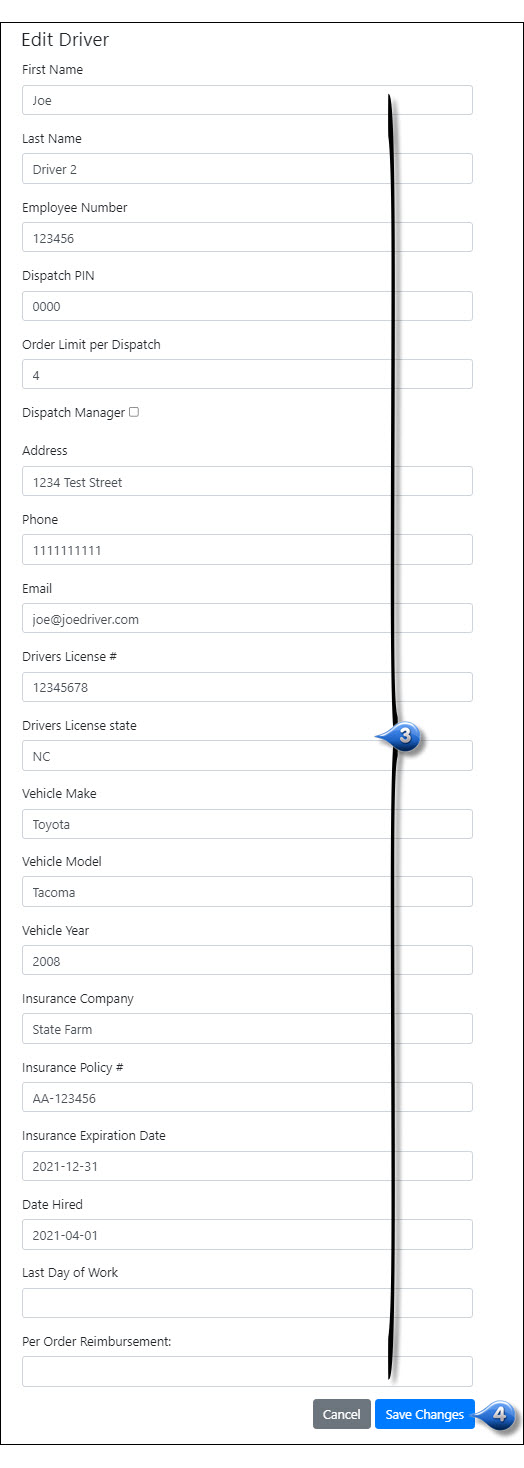
Note
If drivers are compensated a fixed amount per order delivered, enter the amount in the ‘Per Order Reimbursement’ field and this amount will be automatically calculated per shift and included in the driver’s Cash Out process
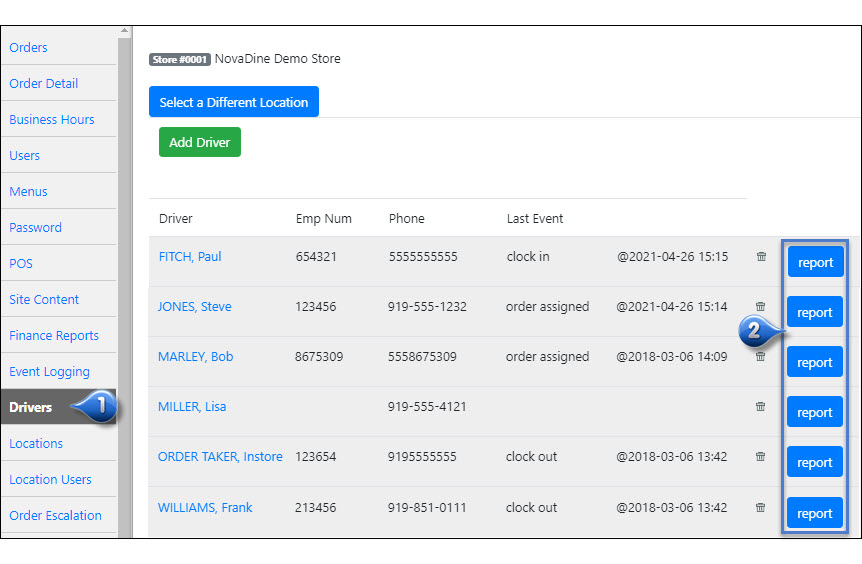
Delivery Driver Reports
To run a report for a specific driver:
Click Drivers Tab
Click the Reports link to the right of the delivery driver you wish to obtain information about
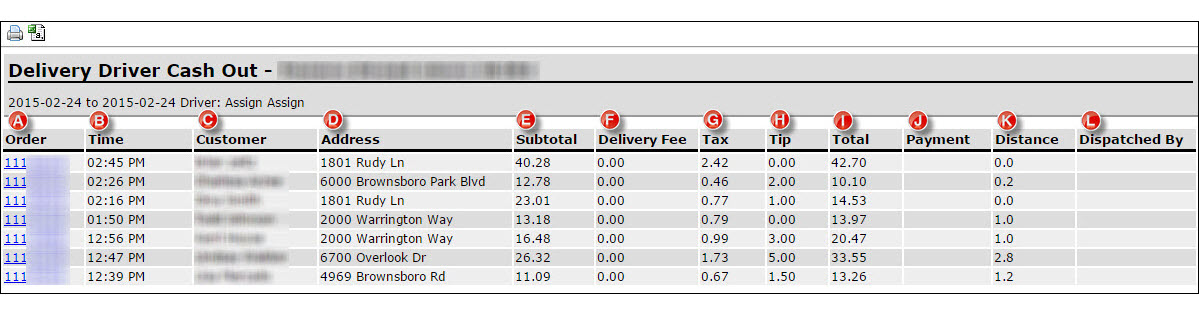
This report will include:
- Order number
- Time
- Customer Name
- Address
- Subtotal
- Tax
- Delivery Fee
- Tip
- Total
- Payment Type
- Distance
- Dispatched By
Driver Dispatch
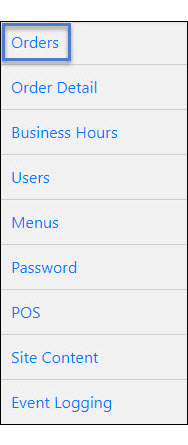
Driver dispatch is performed in the Orders Tab in Management (requires Store Manager or higher security access)
Adding a Driver to the Dispatch Pool
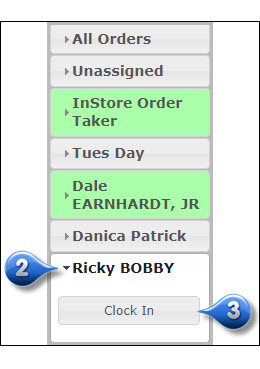
To add a driver to the shift/driver list:
Click Orders Tab
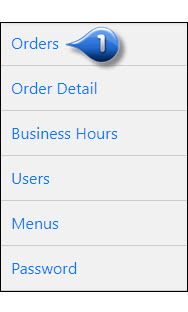
Click the Driver’s Name
Click Clock In
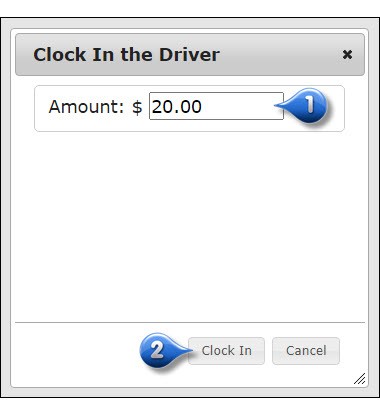
Enter Bank Amount
A bank is the amount of cash you are providing the driver with at the beginning of their shift for the purpose of making change for customers. The amount of the bank(s) will be calculated and included in the driver’s Cash Out process.
To complete the driver clock in:
Enter amount of bank
Click Clock In
Once clocked in, the driver’s name is highlighted in green, indicating the driver is ready for dispatch
Note
If you will not be providing a bank to the driver, leave at 0.00
Dispatching Drivers
To dispatch a driver, assign them to one or more orders and Check Out. There are two ways to assign drivers:
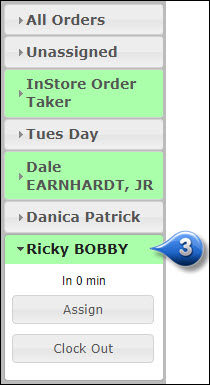
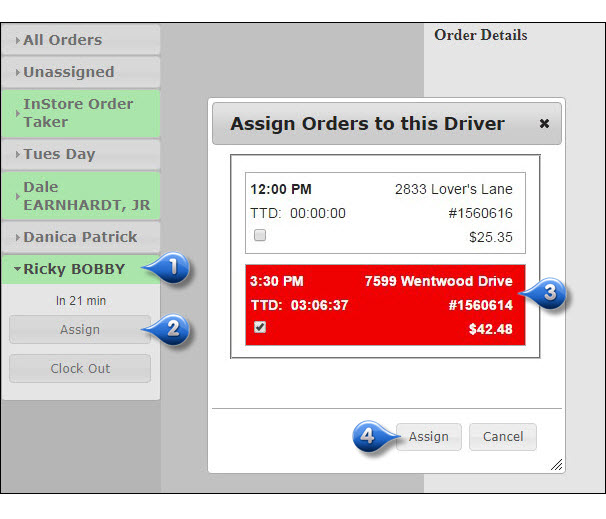
Assign an Order to a Driver
Click the driver’s name
Choose Assign (only drivers that are IN (green) are available for assignment)
Select the orders to be assigned
Click Assign
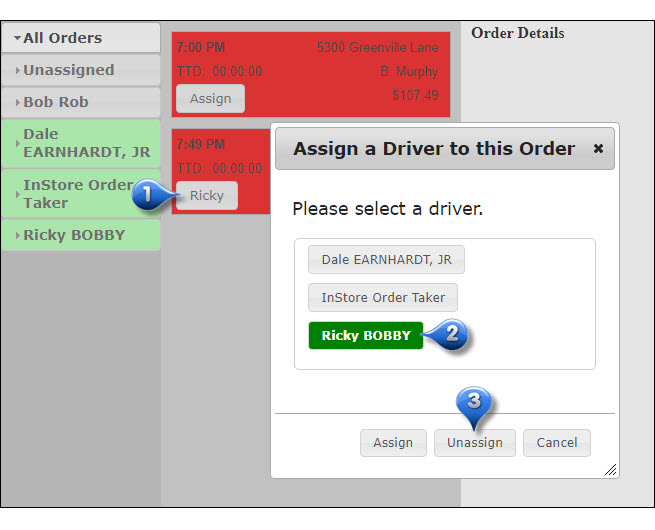
Assign a Driver to an Order
Click Assign on the order to assign a driver
Select an available driver from the list
Click Assign

Unassign a Driver from an Order
In some situations, you may need to unassign an order from a driver. This could be due to a number of reasons, including the wrong order being assigned.
To unassign an order from a driver:
Click the driver’s name on the appropriate order
Select the driver’s name
Click Unassign and the order will then become available for assignment again
Note
For security reasons all ‘Un-assign’ actions are logged in Event Notification and included in the End of Day report
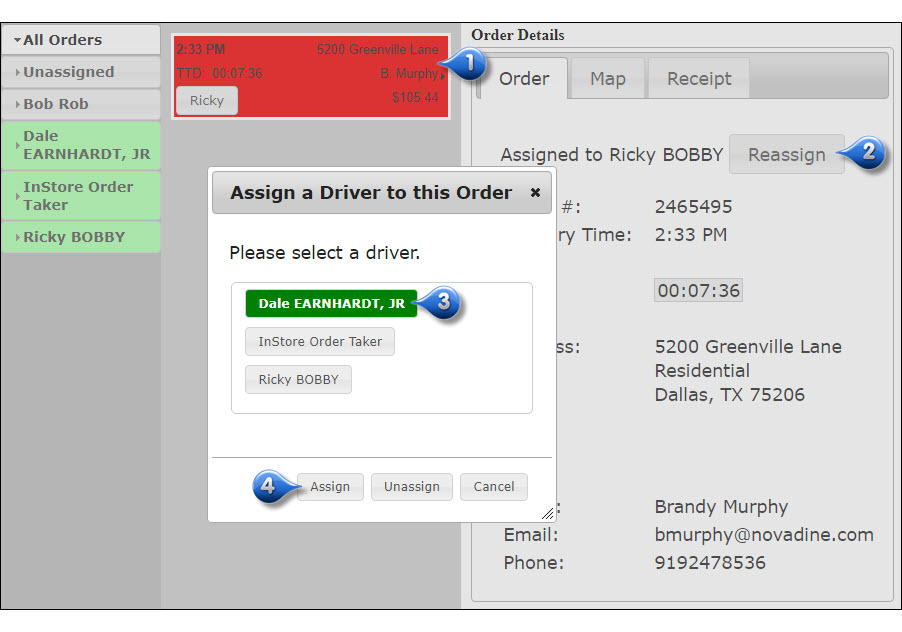
Reassign an Order to Another Driver
To reassign an order to another driver:
Click on the order that you wish to reassign to another driver
Click the Reassign button on the Order page
Select the name of the new driver for reassignment
Click Assign
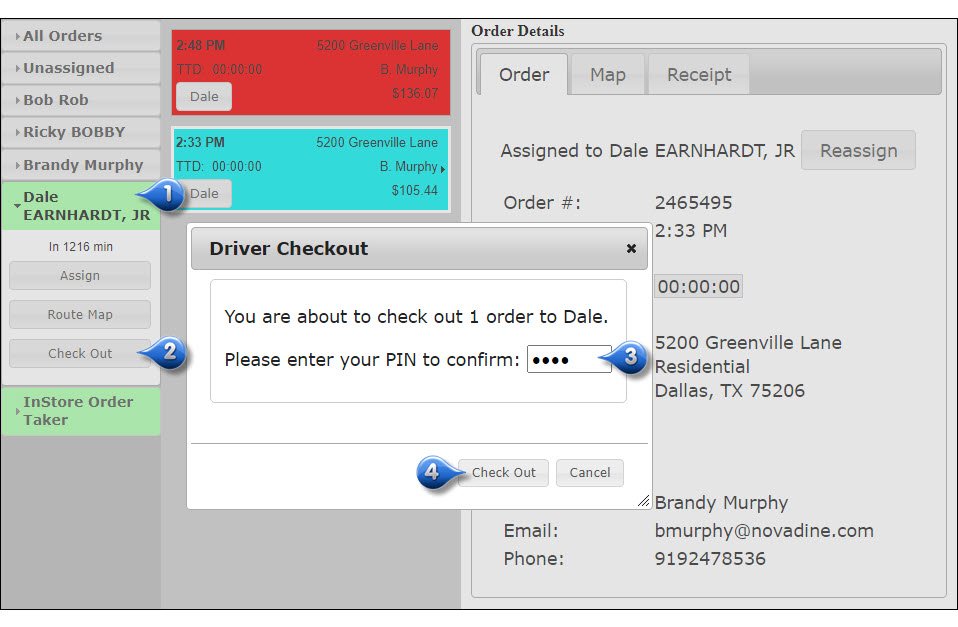
Driver Check Out
When the driver is ready to leave with the assigned orders:
Click the driver’s name
Choose Check Out under the driver’s name
Enter the dispatch PIN, if required
Click Check Out
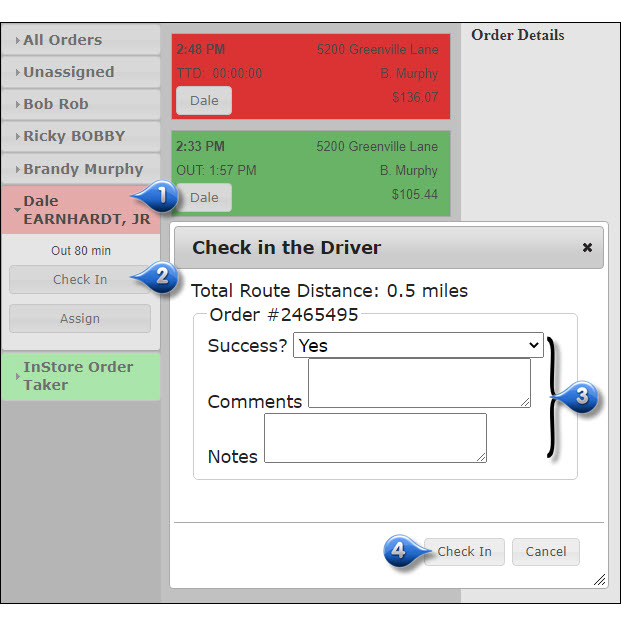
Driver Check In
When a driver returns from a delivery, the driver must check in and report the results from delivery.
To Check in a Driver after a delivery:
Click the Driver’s Name
Click Check In
Enter the delivery information:
- Success?: Select Yes, No, or Order not assigned to me from the drop down.
- Comments: Enter any comments related to the order. This step is optional, but is required if No is selected under Success?
- Notes: Enter notes about the customer. All notes entered will be visible in the OMS for this customer’s future orders.
- Tip: This button is used when the customer adds a tip or adds more to the current tip. This feature is useful in cases where the customer chooses to pay online with a credit card and then wishes to add or change his tip amount when the order is delivered.
Click Check In
Note
If your merchant account is not set up to allow capturing an amount greater than the pre-authorized amount, or if the amount of the tip is greater than the allowed capture amount, the tip will be charged to the customer’s credit card as a separate transaction.
Closing and Reports
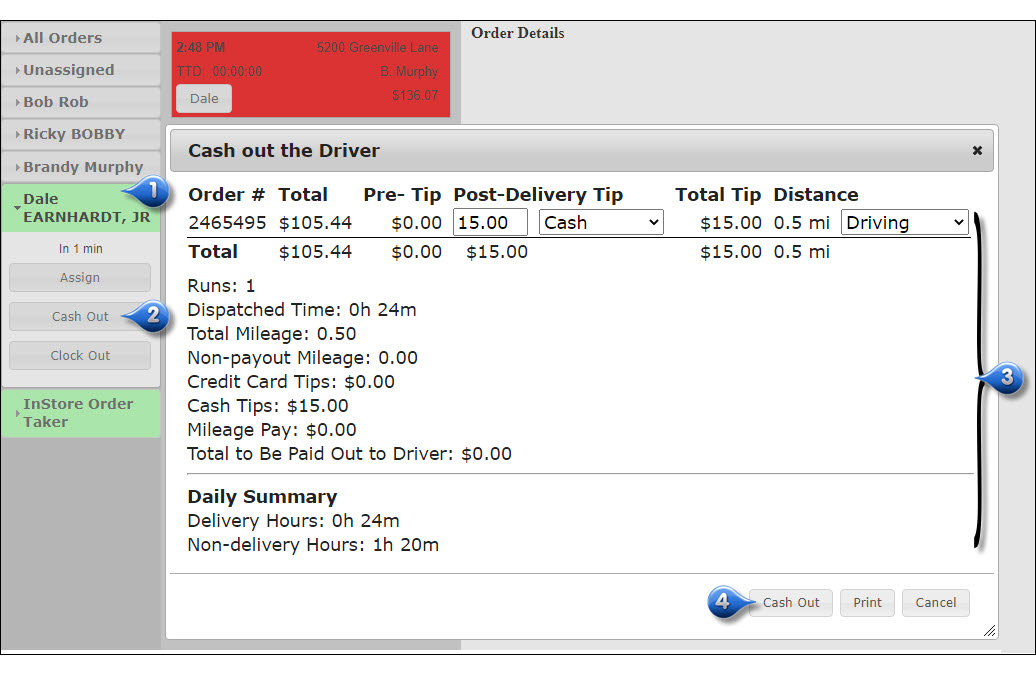
Cashing Out a Driver
Once a driver returns, it will be necessary at some point to account for the money collected by the driver for each ticket. It is not necessary to cash out a driver after each run but it is manadatory to cash out a driver before the driver account can be closed. There is no limit to the amount of tickets that can be processed in one transaction (requires Store Manager access)
To begin cashing out a driver:
Select the appropriate driver
Click Cash Out
Verify information, enter tips, verify driver information
Click Cash Out
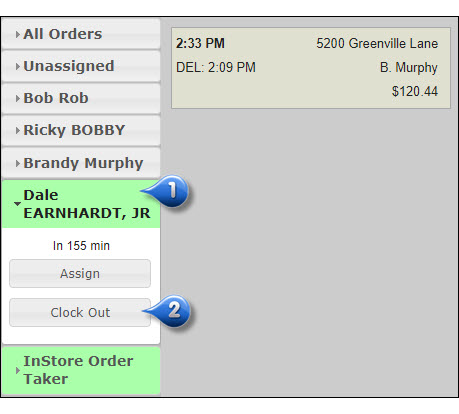
Closing Out a Driver
Once all of the driver’s tickets have been cashed out and any outstanding Driver Banks have been returned, you are ready to close the driver’s account
To close out a driver:
Select the appropriate driver
Click Clock Out
Delivery Driver Report
The Delivery Driver Report will be available on the Drivers Tab. To run a report for a specific driver:
Click Drivers Tab
Click the Reports link to the right of the delivery driver you wish to obtain information about
The Delivery Driver Report will contain the following information:
- Order number
- Time
- Customer Name
- Address
- Subtotal
- Tax
- Delivery Fee
- Tip
- Total
- Payment Type
- Distance
- Dispatched By
Delivery Orders Report
The Delivery Orders Report is available on the Reports Tab with the following information by date range:
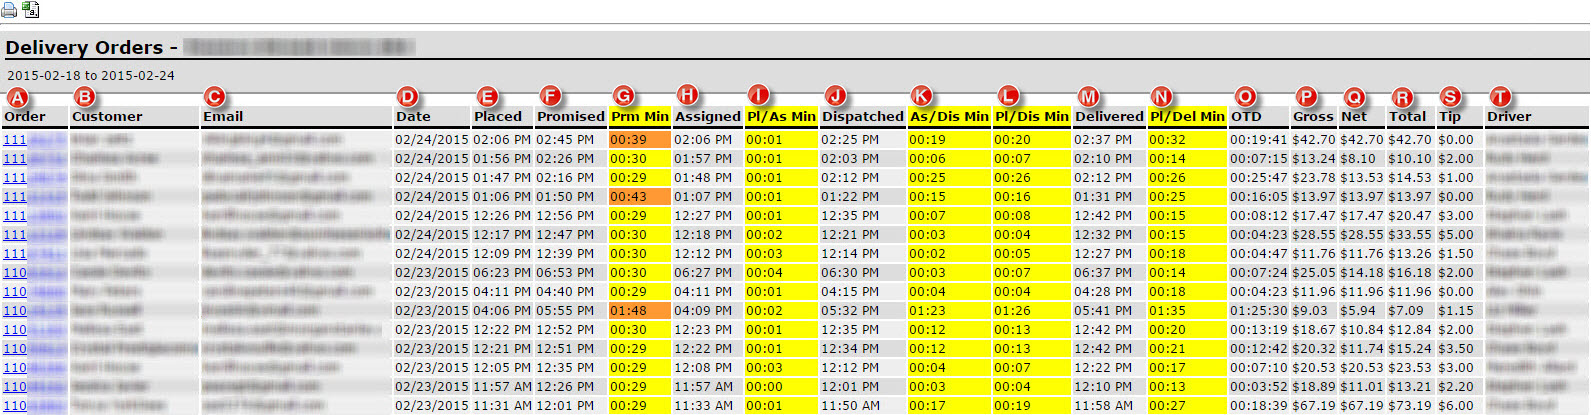
- Order (Order number)
- Customer (Customer’s name)
- Email (Customer’s email address)
- Date (Date of order)
- Placed (Time order was placed)
- Promised (Order promised time)
- Prm Min (Minutes from order placement to promised time)
- Assigned (Time order was assigned to driver)
- Pl/As Min (Minutes between order placement and driver assignment)
- Dispatched (Time order was dispatched)
- As/Dis Min (Minutes between driver assignment and dispatch)
- Pl/Dis Min (Minutes between order placement and driver dispatch)
- Delivered (Actual time of delivery)
- Pl/Del Min (Minutes between order placement and actual delivery)
- OTD (Out the Door Time – time between order placement and dispatch)
- Gross (Gross order total)
- Net (Net order total)
- Total (Order total, including tip)
- Tip (Tip amount)
- Driver (Delivery driver)
Delivery Daily Trend Report
The Delivery Daily Trend Report is available on the Reports Tab with the following information by date range:
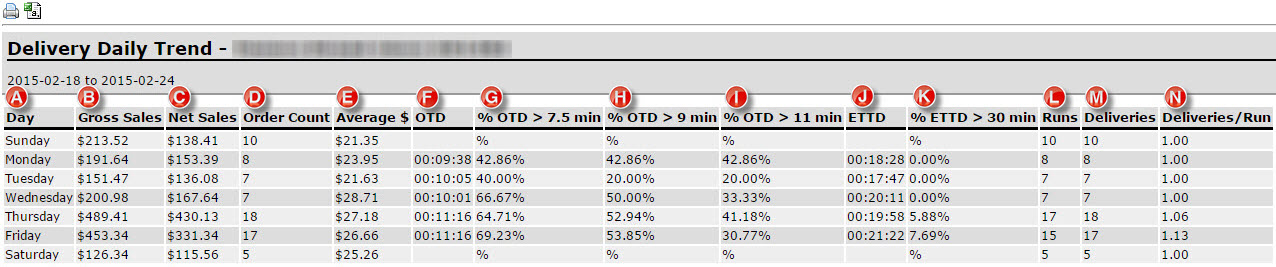
- Day (Day of the week)
- Gross Sales (Gross sales $)
- Net Sales (Net sales $)
- Order Count (# of orders that day)
- Average $ (Average order $ amount)
- OTD (Out the door average time)
- % OTD > 7.5 min (% of orders out the door in 7.5 minutes or more)
- % OTD > 9 min (% of orders out the door in 9 minutes or more)
- % OTD > 11 min (% of orders out the door in 11 minutes or more)
- ETTD (Average estimated time to delivery)
- % ETTD > 30 minutes (% of orders with more than 30 minutes to delivery time)
- Runs (Number of delivery runs)
- Deliveries (Number of deliveries made)
- Deliveries/Run (Number of deliveries per run)
Delivery Dispatch Status Report
The Delivery Dispatch Status Report is available on the Reports Tab with the following information by date range:
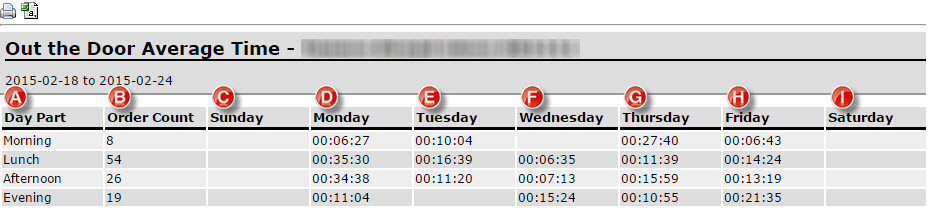
- Day Part (Time of day)
- Order Count (# of Orders for that Day Part)
- Sunday (Average OTD time)
- Monday (Average OTD time)
- Tuesday (Average OTD time)
- Wednesday (Average OTD time)
- Thursday (Average OTD time)
- Friday (Average OTD time)
- Saturday (Average OTD time)
Troubleshooting
- When a driver has several orders and the manager is trying to check the driver out, sometimes it will give an error stating manager pin required, but none of the pins work. Is there a separate pin that needs to be used or a way to override this?
- Please refer to Check-Out section
- Increase the minimum amount of orders assigned to drivers before manager pin is required. Refer to Edit Driver section
- When a customer places an online delivery order and does not add tip, receipts do not have a spot to add tip or a signature line. Is this by design? Receipts only show tip and signature lines if they were paid for directly by a credit card. If they were paid for only using a gift card or by ApplePay, then the signature and tip lines do not show, as you cannot add additional tips to be charged back to those payment types.