NorthStar POS
Contents: This guide will show you how to setup NovaDine and NorthStar to communicate for online ordering
Overview
You will need to complete the below steps to configure and allow NorthStar to communicate with NovaDine:
- Send Site ID to NovaDine
- Create Access Token
- Enable restaurant for Online Ordering
- Create Areas for Online Ordering
- Create Locations for Online Ordering Area
- Enable Online Ordering in NorthStar
- Create Alternate Payment Types for Online Ordering
- Create ‘Comment Item’
- Create ‘Open Item’
- Deploy updates
- Coupon Setup (Optional)
Warning
Please be aware that any changes made in NorthStar ECM will require a deploy and then a reboot of the onsite server before they will take effect in NovaDine. Please see Deploy Site Updates for additional information.
After setup, please refer to the Troubleshooting sections for additional assistance:
NorthStar Setup
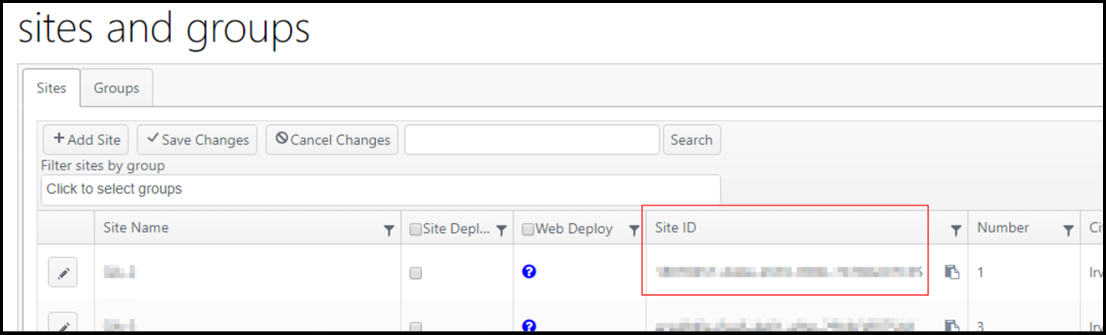
Site ID
To locate your Site ID in NorthStar:
Log in to ECM
Go to Sites > Sites and Groups
Copy the Site ID for the applicable site
Send the copied code to NovaDine labeled as Site ID
Access Token
To create an Access Token in NorthStar:
Log in to ECM
From the top navigation menu, navigate to Admin > Access Tokens
Click Add New Token
Add a Token Label for your token. This can be the name of the company that will use this token (NovaDine).
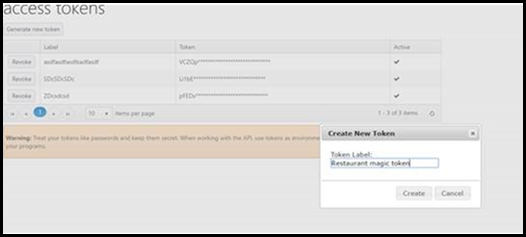
Click Create
- A token–which looks like a random series of letters, numbers, and symbols–will be generated and the following message will display:
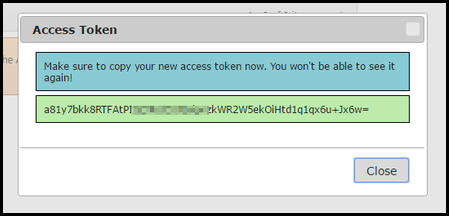
Copy the Access Token and send to NovaDine to provide access to your data labeled as Access Token
Click Close to dismiss the window
- The new access token will appear masked in the access tokens grid
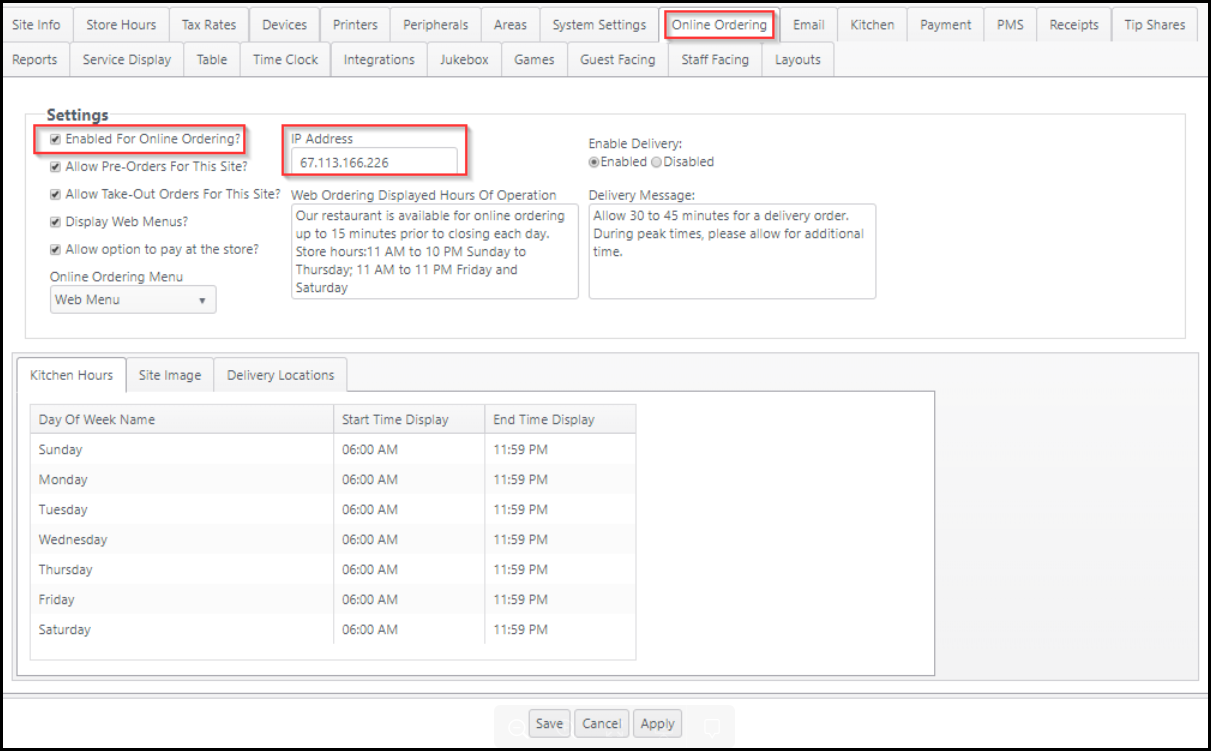
Enable Online Ordering
To enable your restaurant for Online Ordering in NorthStar:
Log in to ECM
Go to Sites > Sites and Groups
Edit Site by clicking the pencil icon
Click Online Ordering Tab
Select “Enabled for Online Ordering?”
Enter the site’s public IP address under IP Address
- This is the public IP address of the local server, usually at the restaurant
- Using the public IP address requires that the site have port 8081 open on their NorthStar Order Entry server
Click Apply to save the configuration
Create Online Ordering Areas
You will need to create an Area in NorthStar for each Service Type that you plan to offer online. These could include Online Ordering Pick-up, Online Ordering Catering Pick-up, Online Ordering Delivery, Online Ordering GrubHub, etc.
To create an Area for Online Ordering in NorthStar:
Log in to ECM
Go to Sites > Sites and Groups
Edit Site by clicking the pencil icon
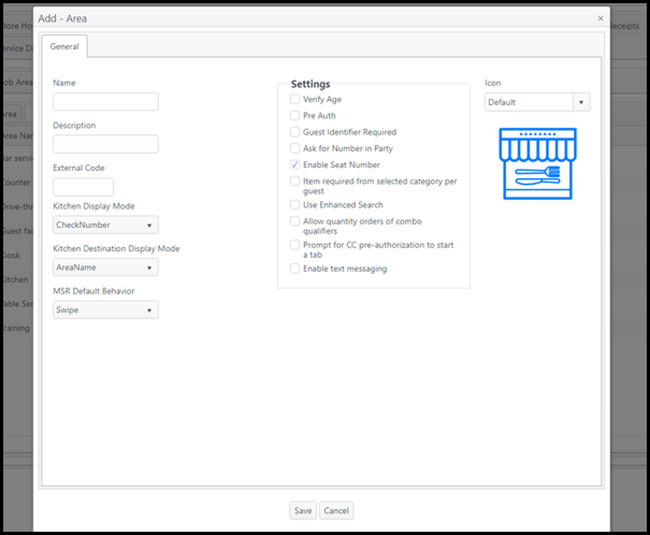
Click Areas Tab, then click Add Area, which opens the Add - Area page
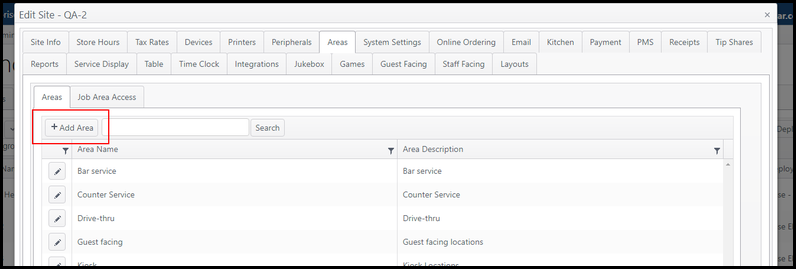
Enter a name and description for the area, but the External Code field should be left empty (a number will auto-populate the field)
Click Save to save the configuration and close the window
Repeat the above steps to create an Online Ordering Area for each Service Type that you will be offering online
Click the pencil icon beside the Areas that you just created and copy the External Codes that were auto-populated
Send the copied codes to NovaDine labeled with the appropriate service type
Create Locations for Online Ordering Areas
To create Locations for an Online Ordering Area in NorthStar:
Log in to ECM
Go to Sites > Sites and Groups
Edit Site by clicking the pencil icon
Click Areas Tab, then click the pencil icon beside the Online Ordering Area
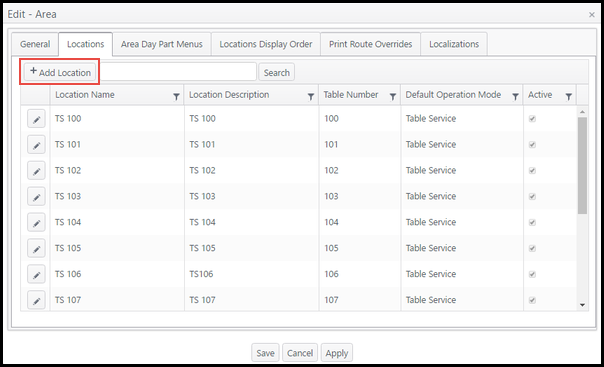
Select the Locations Tab, then click Add Location, which opens the Add - Location page
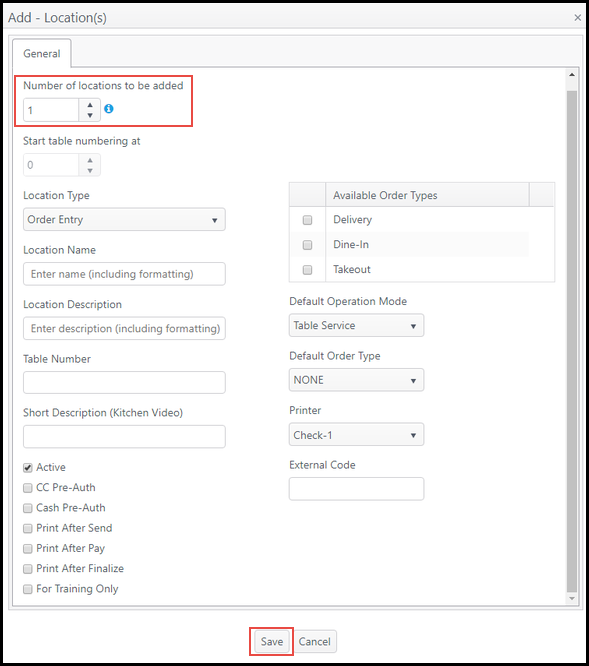
Enter the number of locations to be added (enter at least enough to accomodate the number of orders you expect to receive in one day), along with any other required fields
Click Save to save the configuration and close the window
Create Alternate Payment Types to be accepted for Online Ordering
You can create an Alternate Payment Type in NorthStar for each Payment Type that you wish to differentiate for online ordering for reporting purposes. These could include Gift Cards, Grubhub, DoorDash, etc.
To create Alternate Payment Types in NorthStar:
Log in to ECM
Go to Financial > Alternate Payments
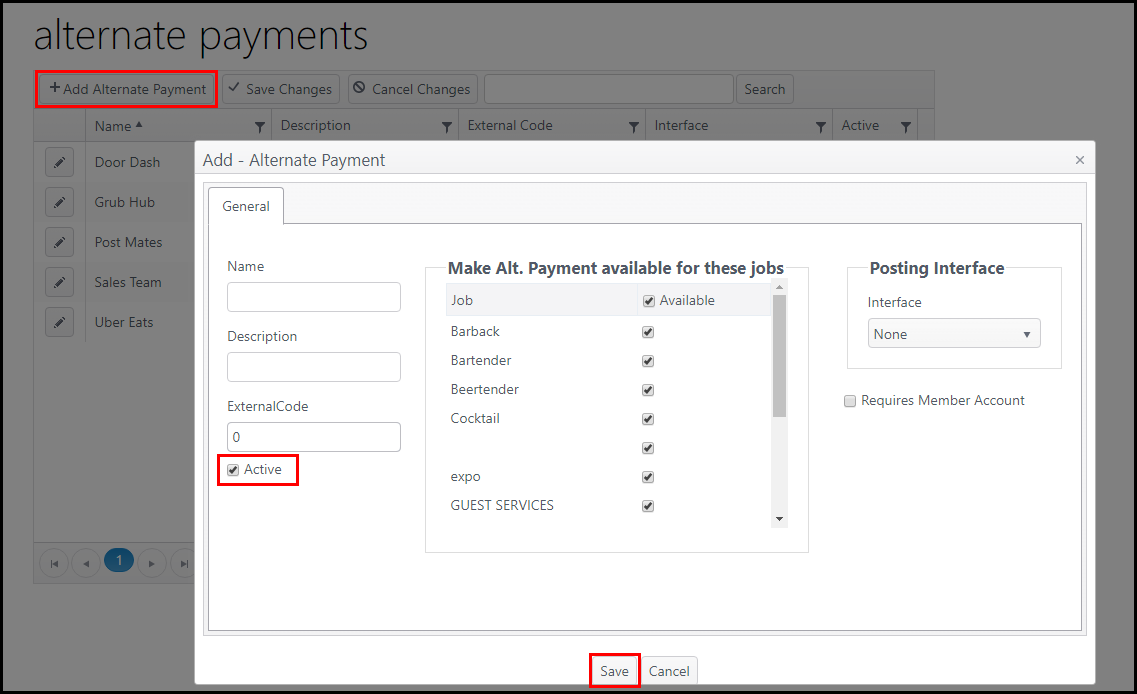
Click Add Alternate Payment button and enter the name and description to identify what the payment type will be used for (Gift Cards, Grubhub, DoorDash, etc.)
Enter any other required information, but the External Code field should be left empty (a number will auto-populate the field)
Click Active to make the alternate payment active
Click Save to save the new payment type and close the window
Repeat the above steps for each Alternate Payment option that will need to be available for online ordering
Copy and paste the list of the new Alternate Payments created and the corresponding External Codes and send to NovaDine
Creating a Dine-In Area
In order for NorthStar to properly display the table # in use for the customer’s order, you will need to create an Area in ECM with a unique location setup. For directions, please refer to the below:
Login to ECM
Go to Sites > Sites and Groups
Edit Site by clicking the pencil icon
Click Areas Tab, then click Add Area, which opens the Add - Area page
Enter a name and description for the area, but the External Code field should be left empty (a number will auto-populate the field)
Click Save to save the configuration and close the window
Edit the newly created area by clicking the pencil icon.
Select the Locations Tab, then select Add Location(s)
Specify the number of locations to create
Confirm relevant Order Types are selected under Available Order Types
Select Save
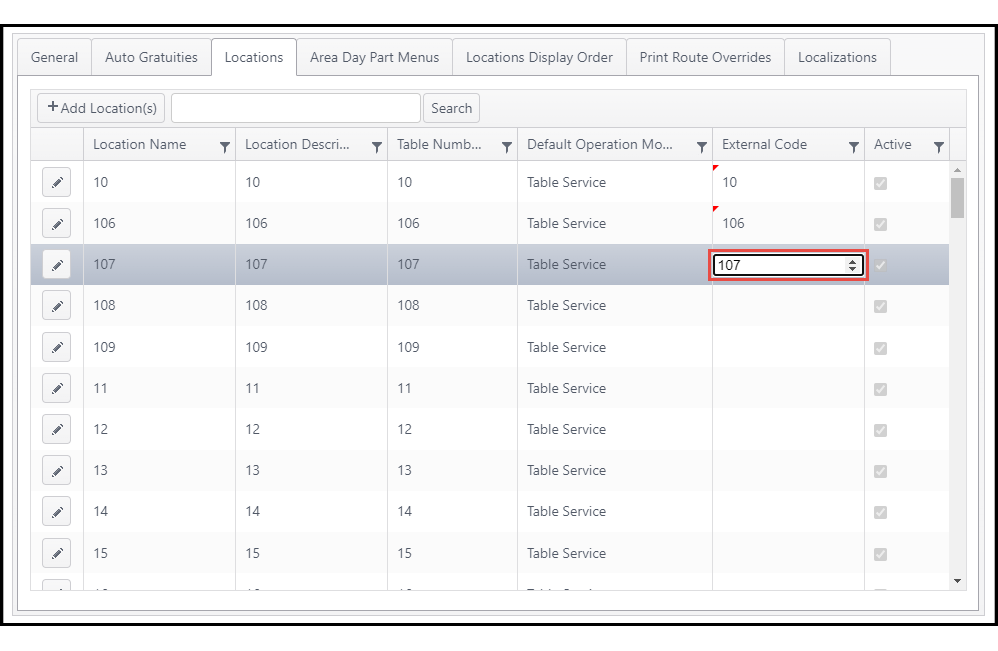
After locations are created, update the External Code for each to match the specified Table Number
- This will allow for NovaDine to transmit the table # directly to NorthStar and be displayed on the in-store printout
Note
Please ensure that you make this new area Available for the site’s Web Ordering Areas. For directions, please see Enabling Integration for the Site
Enabling Integration for the Site
To make Online Ordering available in Web Ordering API on Northstar:
Log in to ECM
Go to Sites > Sites and Groups
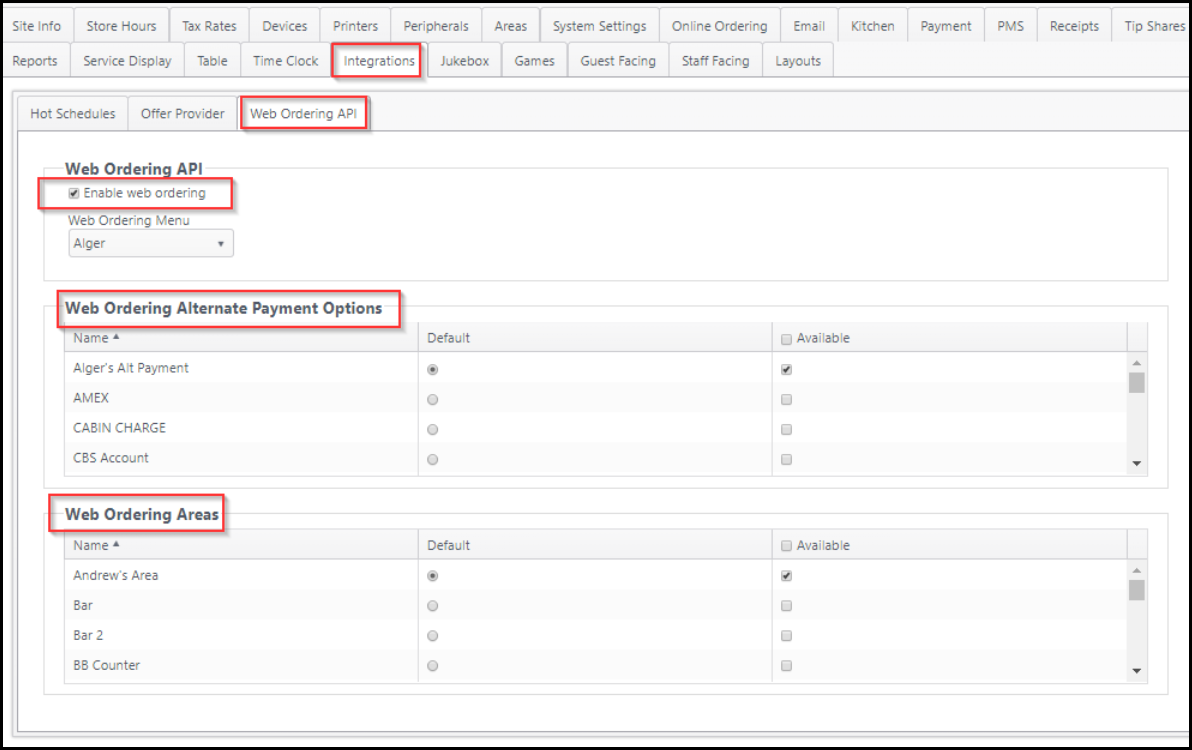
Click Integrations Tab
Click Web Ordering API tab
Select Enable Web Ordering
Mark any Web Ordering Alternate Payment Options and Web Ordering Areas that will be used for online ordering as Available on this tab. At least one Web Ordering Alternate Payment Options and Web Ordering Areas will need to be selected as the Default
Click Save to save the configuration and close the window
Create ‘Comment’ Item for Special Instructions at the Item Level
If you wish to allow special instructions or comments at the item level with your online ordering, you’ll need to create a zero-priced item in NorthStar and assign it to the menu that will be used for online ordering. To create a ‘Comment’ item:
Log in to ECM
Go to Products > Menu Items
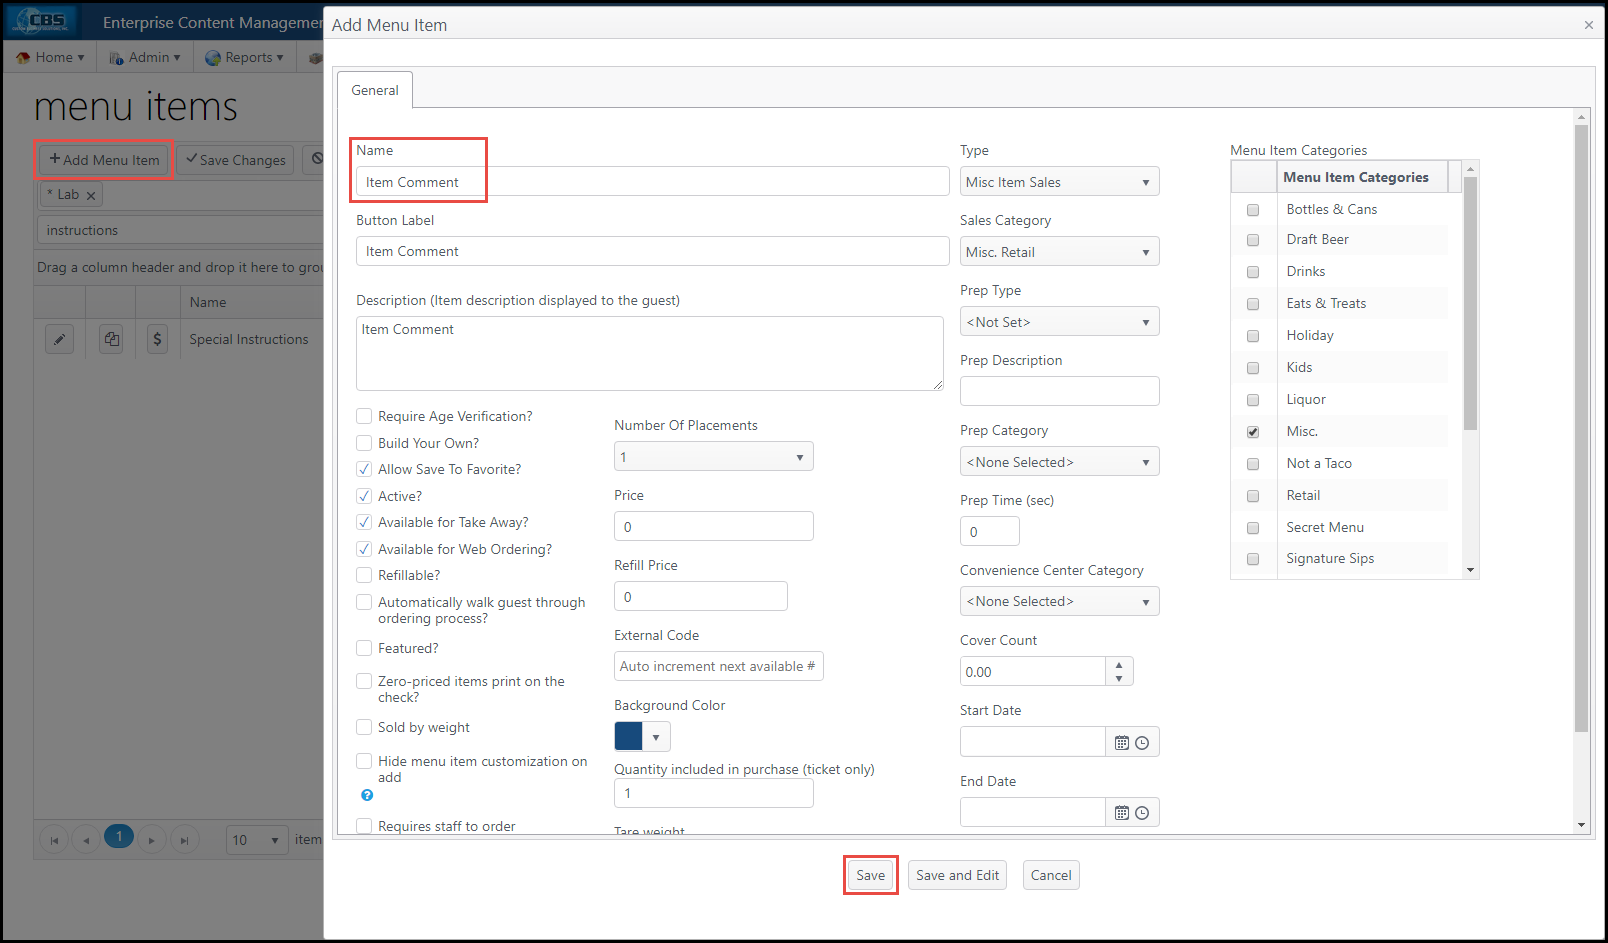
Click + Add Menu Item button and select the Item Type from the drop-down (Ex: Misc. Items)
Enter Item Comment as the item name and any additional information that you want
Click Save
Note
For Curbside Check-in, a notification of customer arrival will be sent to the POS as an order comment item and print in the kitchen. In order for the notification to print, print routing must be configured for the order comment item.
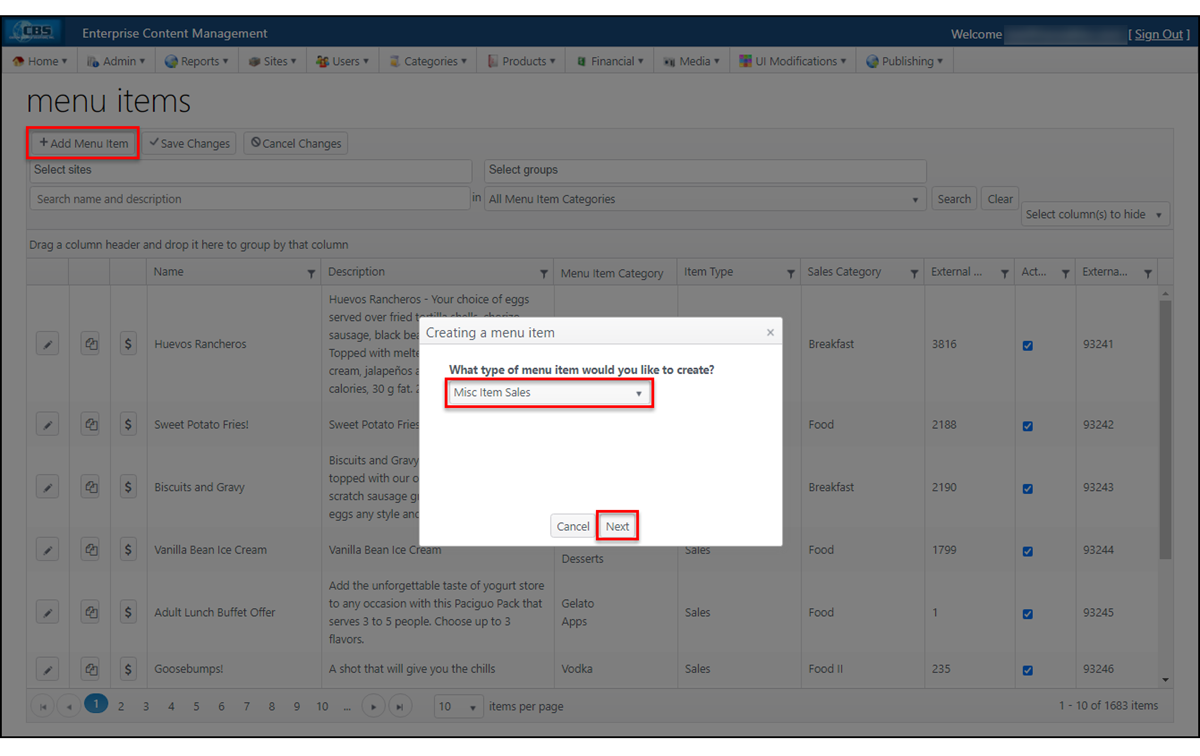
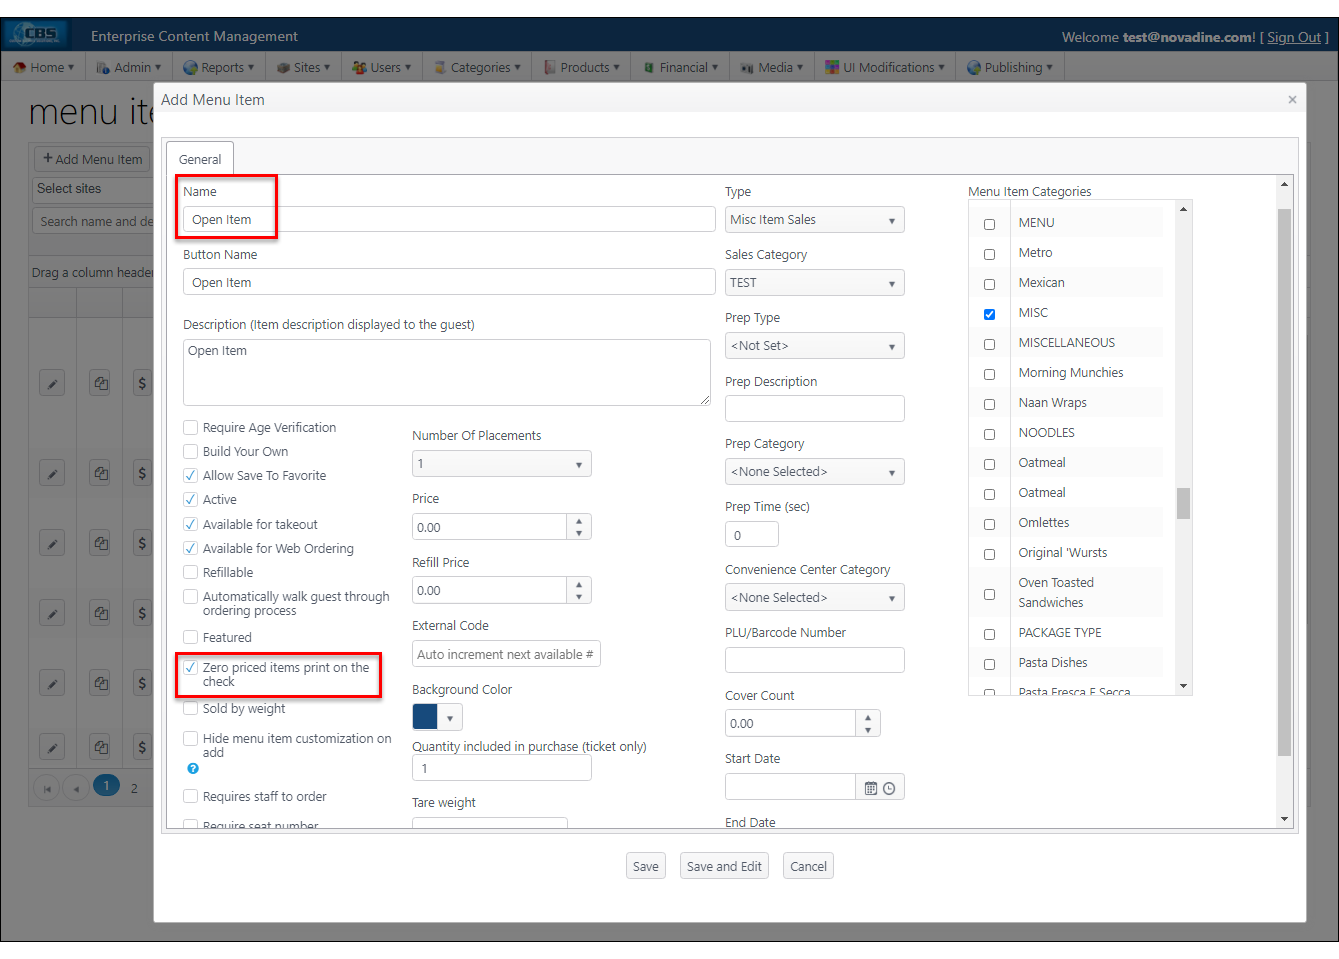
Create ‘Open Item’ for Sending Unavailable Items to the POS
A miscellaneous, zero-priced item should be created in NorthStar called ‘Open Item’ to allow orders to push to the POS, even when an item error occurs (Ex: item is marked as unavailable in the POS while customer is placing an order online. Open item allows order to send through to the POS successfully). To create an ‘Open Item’:
Log in to ECM
Go to Products > Menu Items
Click + Add Menu Item button and select ‘Misc Item Sales’ from the drop-down
Enter Open Item as the item name and any additional information that you want. Be sure to select Print Zero Priced Item, so that any zero priced items will still print in the kitchen
Click Save
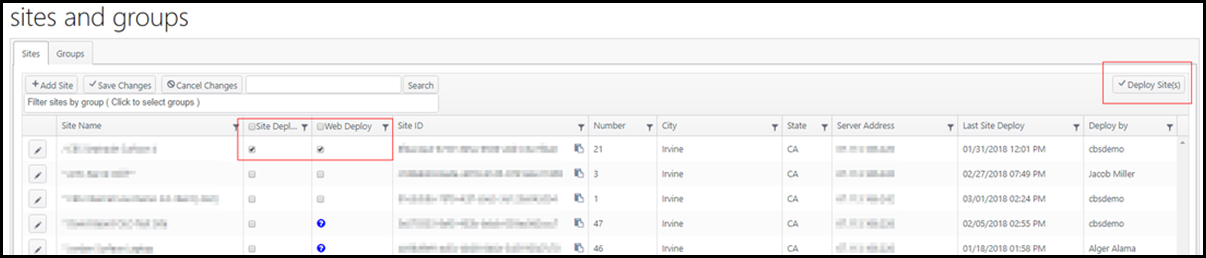
Deploy Site Updates
To deploy the updates that you just made in NorthStar to the site:
Run a site deploy to the site - no need to do any web deploy. That is only for online ordering through Northstar. Since you are doing online ordering through NovaDine, you will just need to do the normal site deploy.
Once you have deployed the site updates, please restart your onsite server for all changes to take effect.
Optional Features
Coupon Setup
In order for NovaDine to successfully send discounts/coupons to NorthStar, you will need to add an adjustment reason for each discount type you plan to offer.
To setup an Adjustment Reason in Northstar:
Log in to ECM
Go to Financial > Adjustment Reasons
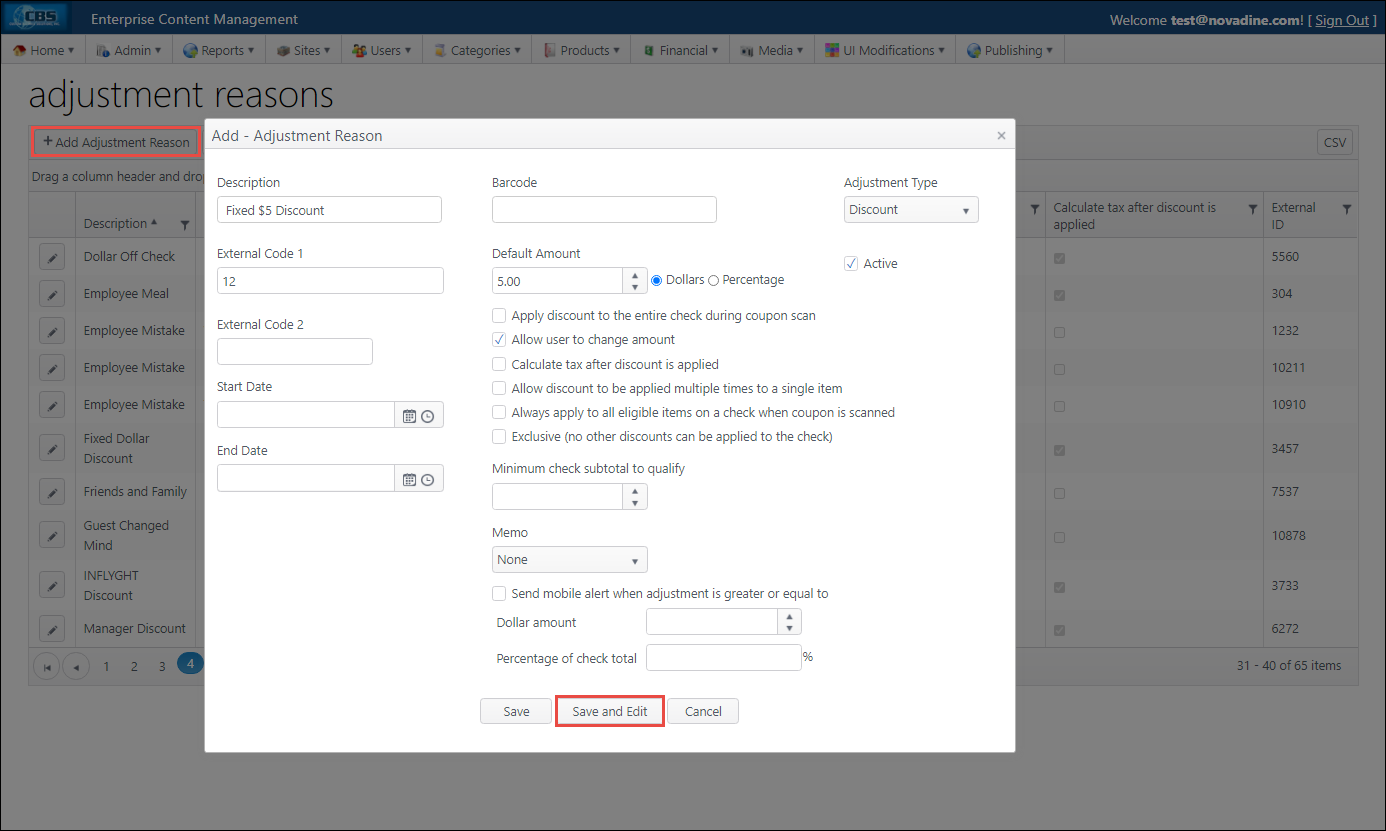
Click Add Adjustment Reason
Enter the following information, specific to your coupon:
- Description
- Select Discount from the Adjustment Type drop-down
- Enter a Default Amount and specify by Dollars. This must be set to ‘Dollar’ to allow proper total calculations of orders when sent to the POS
- Enable the Active checkbox
- Enable the Allow user to change amount checkbox
Click Save and Edit
Under the Sites sub-tab, make the Adjustment Reason Active for the appropriate Sites (Locations) where this coupon/adjustment will be used
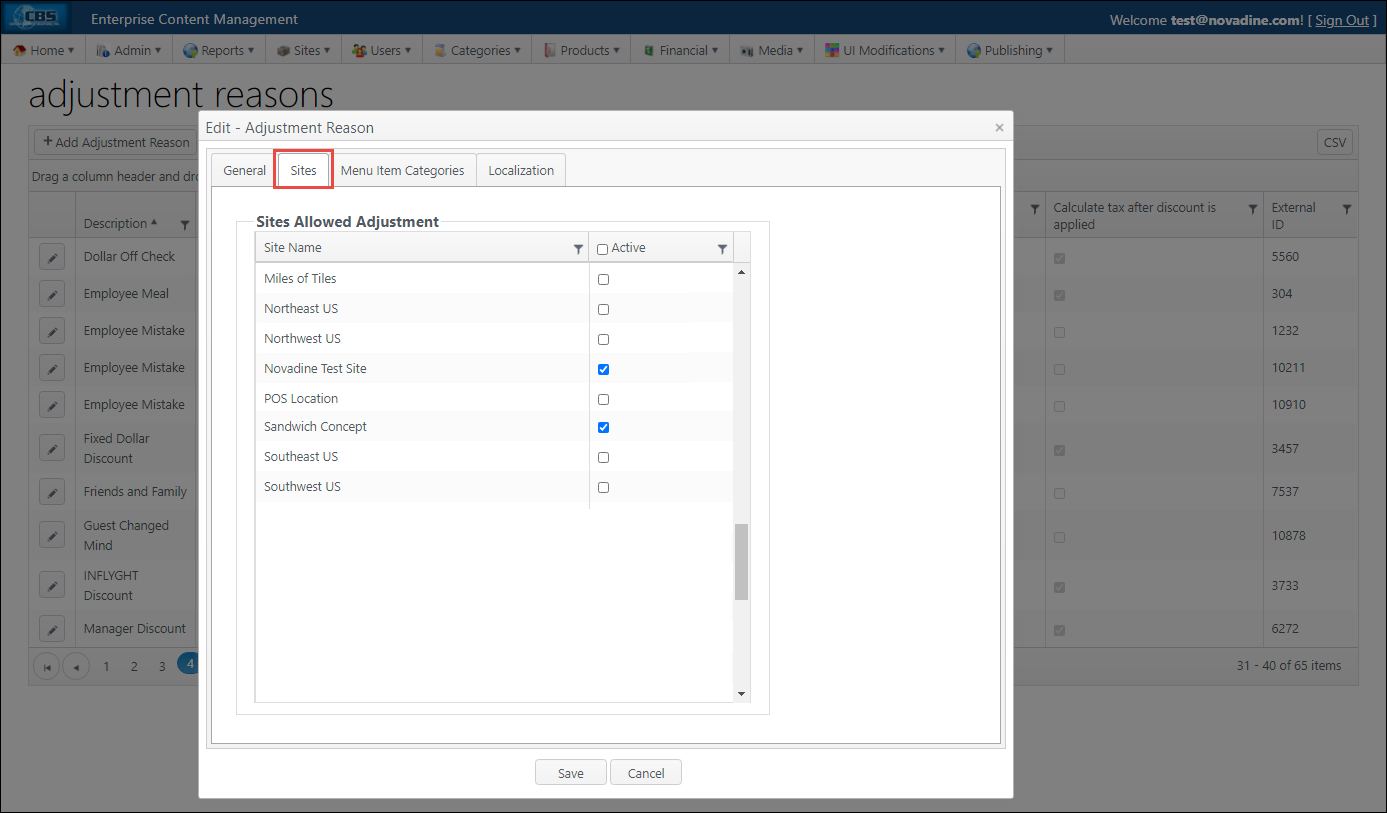
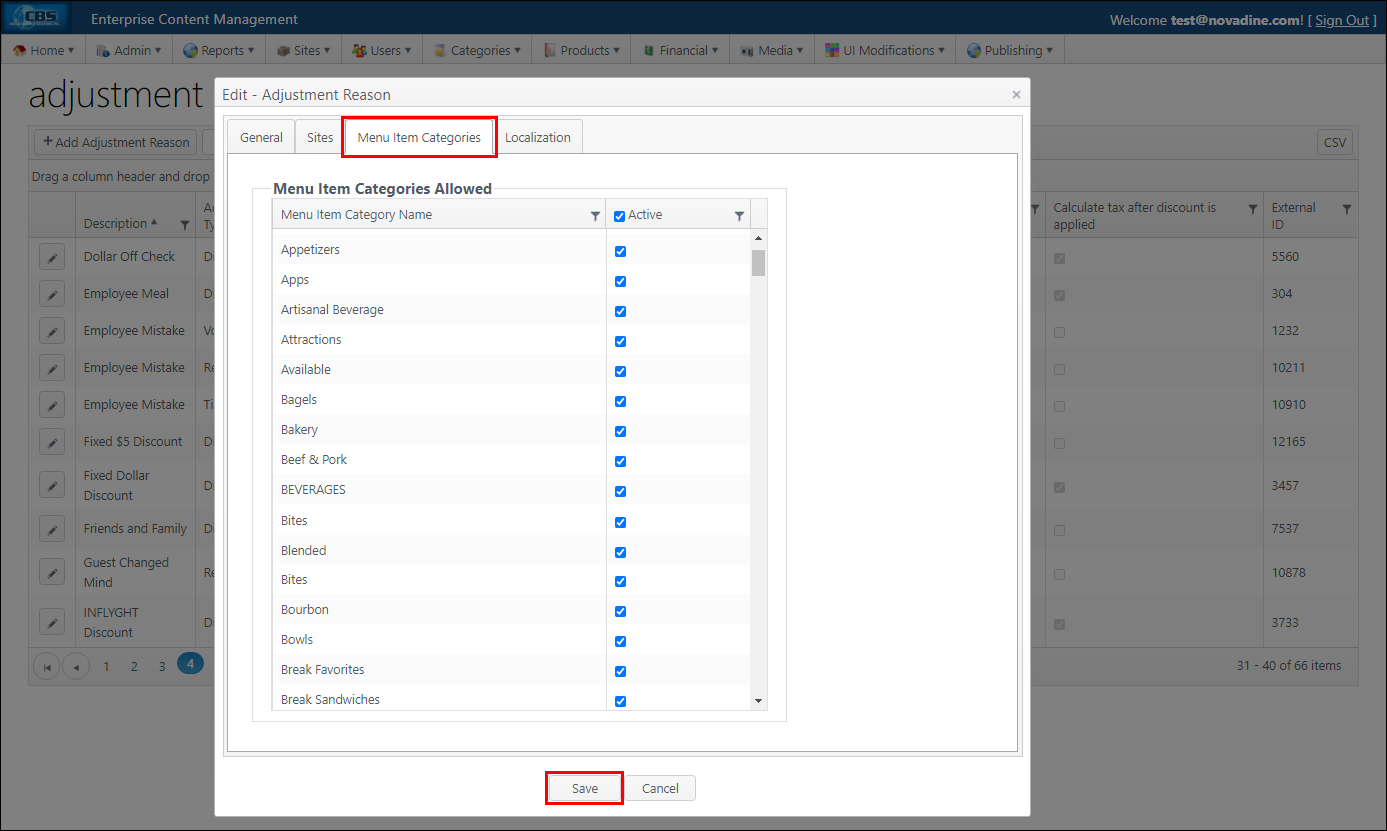
Click the Menu Item Categories sub-tab and select the categories that this coupon/adjustment should apply to
Click Save
Delivery Fee Configuration (for Self-delivery or DaaS)
In order for NovaDine to pass down a Delivery Fee to your POS, you must create a Delivery Surcharge in Brink or the order will have an order total mismatch. For NorthStar to accept the delivery fee, it needs to be setup as a gratuity.
To create a Delivery Fee/Gratuity in NorthStar:
Log in to ECM
Go to Financial > Gratuities
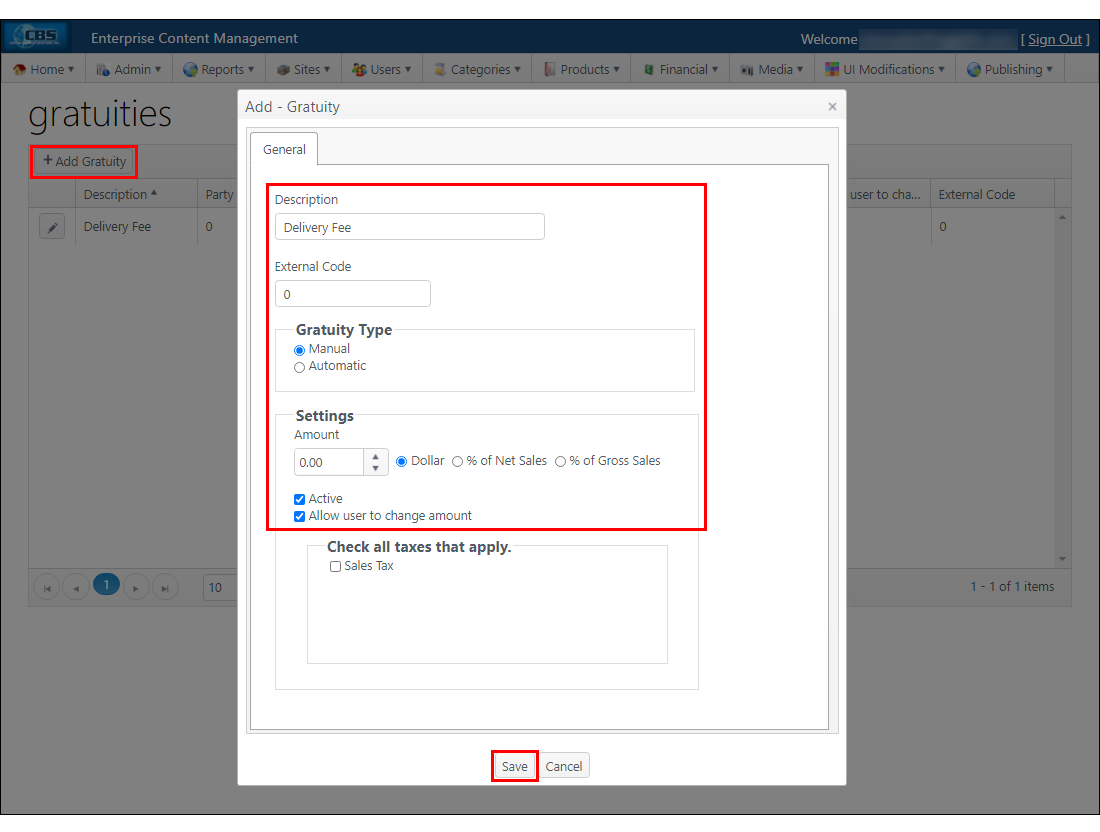
Choose Add Gratuity and ensure the settings below are in place for this gratuity:
- Description
- Gratuity Type: Manual
- Settings:
- Amount = 0.00
- Dollar = Selected
- Enable the Active checkbox
- Enable the Allow user to change amount checkbox
Select Save
Navigate to the Sites drop-down, select Sites and Groups and deploy the changes
Troubleshooting
- Why aren’t the changes that I made in ECM displaying in NovaDine? Please confirm that you deployed the changes that you made in ECM to the store(s). For more information on Site Deploy, please see the Northstar Documentation.
- Why are my orders stuck in *Sent to POS* status? Please confirm with your NovaDine rep that webhooks have been registered with Northstar.
Error Messages
- POS Error: This event is logged on the Event Logging Tab in management when NovaDine encounters an error communicating with the POS. These errors will begin with ‘Exception while sending order to POS: HandlingFailedError: Unexpected result submitting NorthStar order:’ followed by the specific error from NorthStar.
Order Errors
invalid_area: The area is invalid for web ordering. Please confirm the following:
- The Online Ordering Area has been created in NorthStar
- The Online Ordering Area has been enabled in NorthStar
invalid_location: Location does not exist for the site. Please confirm the following:
- Locations have been created for the Online Ordering Area in NorthStar
invalid_order_type: Un-supported order type (valid order types are TakeOut = 1, Delivery = 2).
invalid_payment_option: The payment is invalid for web ordering. Please confirm the following:
- Confirm the payment is created and Active in ECM (This would affect all locations). See Create Alternate Payment Types for Online Ordering for more information
- Confirm the payment is Available for “Web Ordering Alternate Payment Options” in the site’s ECM (This would only affect specific locations). See Enable Online Ordering in NorthStar for more information
invalid_pickup_time: Pick up time is null or does not include the kitchen volume time. (Kitchen volume time is a setting in NorthStar ECM used to forecast the time it takes to prepare an order. You can retrieve the volume time using the sites get end point.) This error typically occurs when the order is sent to the POS without enough time to prepare.
no_locations_available_for_area: All locations for an area are currently assigned. (choose a different area or increase the number of locations for the area). Please confirm the following:
- Locations have been created for the Online Ordering Area in NorthStar
- Confirm that the area’s locations are Active
- All past tickets have been closed out of the area
Coupon/Loyalty Issues
invalid_adjustment_reason: The order’s coupon (discount) is not being recognized as valid in the store’s POS. Please confirm the following:
- Confirm the Adjustment Reason is set to Active in ECM.
- Confirm the Adjustment Reason is set to Discount for ‘Adjustment Type’
There are no eligible items for the selected adjustment: **AdjustmentReasonName*:* The items on the order are not available for the discount in ECM, or the discount is excluded from the item in ECM. Confirm the following:
- All appropriate menu item categories are set to Active for the Adjustment Reason in ECM. See Coupon Setup (Optional) for additional information.
- The order’s items are not excluded from the coupon (Adjustment Reason). To do this, access your ECM’s Menu Items tab, edit the item in question, select the Adjustment Exclusions subtab and confirm the Adjustment Reason is not excluded for the items on this order.
Orders containing coupons are returning total calculation errors. Confirm the following:
- Confirm the Adjustment Reason is configured as a Dollar Amount to allow proper total calculations when the orders are submitted
- Confirm the Adjustment Reason has Allow user to change amount enabled