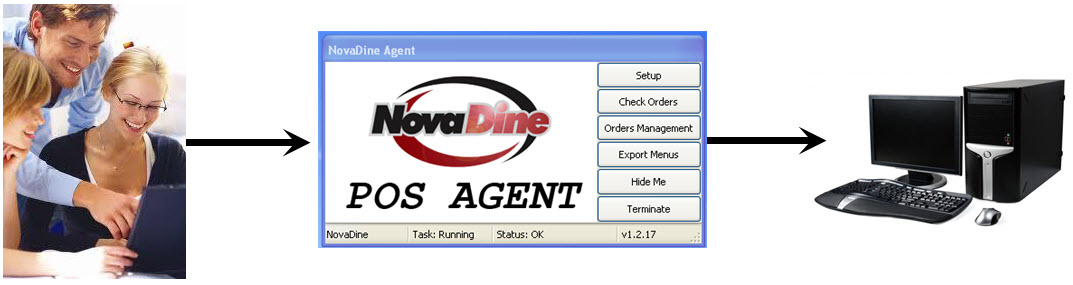
NovaDine Agent
Contents: This guide will explain what the NovaDine Agent is and how it works with your online ordering.
Order Processing Overview
A customer will place an online order using the restaurant’s online ordering website. The NovaDine Agent will then automatically send the online order to a designated computer or the restaurant’s POS (POS locations only)
Agent to Computer (Non-POS locations only)
The NovaDine Agent is the software used to manage online orders received. It will need to be installed prior to activation
The NovaDine Agent checks for orders every 60 seconds using a unique username and pulls them down
Once the Agent has an order it will send it to the designated PC at the location when the prep time has been met
- Prep time is set by service type, item total, or order value total
Receiving Orders (Non-POS locations only)
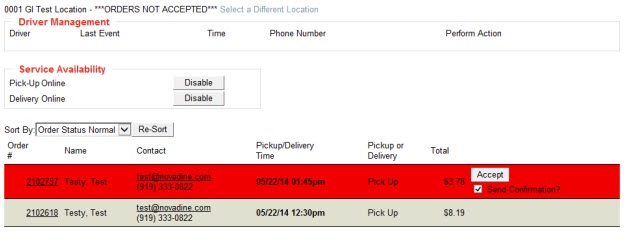
- When the online order is handed off to the ND Agent, an alert will pop-up indicating there is a new order along with the chime of a cymbal

- The Order Management screen will open up and the order will appear RED. A copy of the receipt will automatically print to the designated printer and you will hear a sound resembling a telephone ring
Agent to POS (POS locations only)
The NovaDine Agent is the software used to manage online orders received. It will need to be installed prior to activation
The NovaDine Agent checks for orders every 60 seconds using a unique username and pulls them down
Once the Agent has an order it will pass it to the POS Web Service, which will then send the order to the designated POS station when the prep time has been met
- Prep time is set by service type, item total, or order value total
Note
It is important that you do NOT accept any online orders directly on the NovaDine Agent. The POS will accept the order when the Agent hands it off. If you manually accept the order, the order will not send to the POS
Receiving Orders via Fax (Non-POS locations only)
If the location does not have a computer, or the internet is down, there is an option to receive orders via Fax. If location is setup to receive orders via fax, a NovaDine Technical Support Agent will call the location and verify that the order was received
NovDine Agent Installation
Installation Preparation (Non-POS locations only)
Before installing the NovaDine Agent, it is important to make sure that your computer is up to date
Verify Windows Updates (Non-POS locations only)
Before installing the NovaDine Agent, ensure that all Windows updates have been run. To do so, follow the below steps:
- Open Internet Explorer
- Click on Tools in the Menu Bar
- Select Windows Updates from the menu
- Follow the prompts to run updates
- Once updates are complete, please restart your computer
Verify Printer (Non-POS locations only)
Please also check to ensure your computer has a printer installed. To do so, follow the below steps:
- Open the Control Panel on your computer
- Double-click the Printers and Faxes icon or View devices and printers, depending upon your version of Windows
- Confirm that the correct printer is marked as the default (default printer will have a checkmark)
- If you need to set your printer to the default, right click and choose “Set as default printer”
NovaDine Agent Download and Install
- Go to the ND Agent URL: http://yoursite.com/files/NDAgent.msi
- Choose Run and follow all of the additional prompts. Agree to any security alerts that may appear on your screen
- Go to your computer desktop and double click on the
 icon to launch the NovaDine Agent. You can also access the program from your programs list from the Start button
To install the NovaDine Agent from the command-line or script, use:
- For unattended installs, use “msiexec /i NDAgent.msi /quiet /qn”
- Use “msiexec /i NDAgent.msi /passive” if someone will be monitoring the install
NovaDine Agent Configuration
Agent Configuration Using YML File
The Agent’s configuration can be set initially, or can be updated by placing the desired configuration in a file named config_update.yml in the Agent’s folder and restarting the Agent. The Agent’s folder location varies depending on the version of Windows it is running.
- On XP it can be found at:
C:\Documents and Settings\All Users\ApplicationData\NovaDine\NDAgent- On Windows 7, 8, or 10 it can be found at:
C:\ProgramData\NovaDine\NDAgentNote
Files and folders may be hidden depending on your operating system and settings
If the Agent has already run, the config_update.yml file is renamed to NDAgent.yml and an NDAgent.log file is created in the folder. The config_update.yml can be used at any time to update the configuration. The yml files are only read at startup, so if you create one for an existing Agent it will not take effect until the Agent is restarted
- The configuration files (NDAgent.yml for saved configuration and config_update.yml for updates) are in YAML format and contain indented “key: value” lines grouped in sections
- To update a running Agent, place a config_update.yml containing the updated configuration in the Agent’s installation folder. The updated file will be read, merged into any existing configuration, and then deleted
Note
Each location has a unique username, password, and restid for the Agent. You can request a CSV file of all Agent usernames and passwords from NovaDine
Guided Agent Configuration
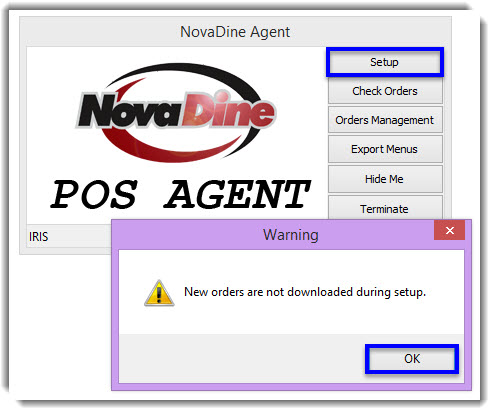
Setup Tab
You will now need to enter setup information into the Agent to link it to the appropriate store.
- Click on the Windows Start button
- Type ND Agent into the programs and files search box
- In the NovaDine Agent, click Setup
- Click OK on the standard warning that new orders will not be downloaded during setup
Find NovaDine Agent Username and Password
- Click the
 icon in the top right corner of your site
 - Login with your management account credentials
- Click the
 icon in the top right corner that displays after successful login, which will open your Backend Management site in a new tab
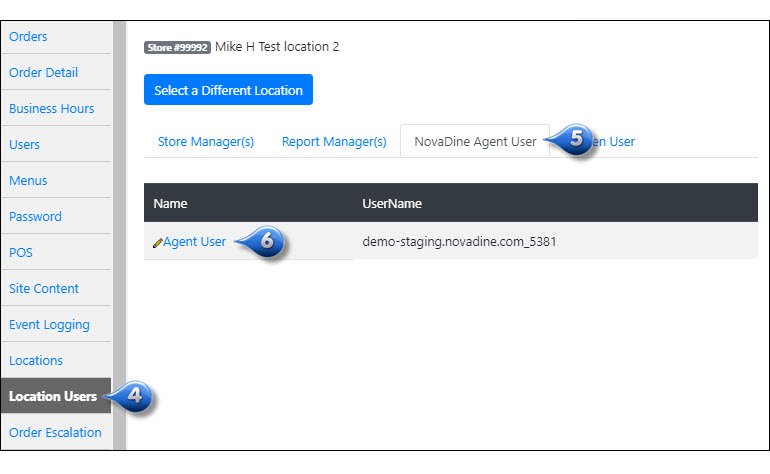
 - Select the Location Users tab
- Click the NovaDine Agent User subtab
- Click the pencil icon next to Agent User to find the Username and Password
General Tab
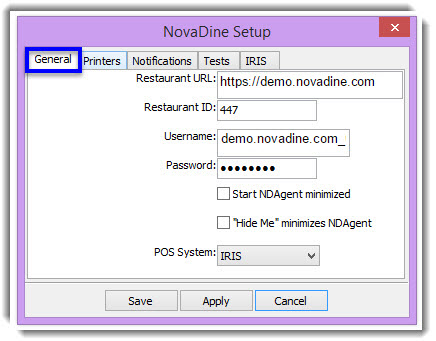
On the General tab of the NovaDine Agent:
Delete any default information from the Username and Password fields
Paste the Username and Password copied from the store’s website
In the Restaurant URL, enter your chain’s website
The Restaurant URL is “https://” plus the beginning characters of the Username up through .com. Example: If Username is demo.novadine.com_0015, Restaurant URL would be https://demo.novadine.com
Enter your Restaurant ID
The numbers listed at the end of your Agent Username is your Restaurant ID Example: If Username is demo.novadine.com_0015, your Restaurant ID would be 15
Choose your POS System from the dropdown (select ‘NovaDine’ if you will be using the Agent as a standalone system/non-POS)
Click Apply
Note
For security purposes, please ensure your Restaurant URL in the Agent begins with “https://“
Printers Tab
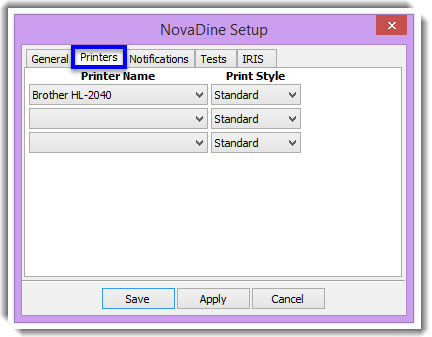
On the Printers tab, you can configure your printer:
- Click the first dropdown field under Printer Name and choose the printer you selected prior to installing the Agent
- Select Standard from the first dropdown field under Print Style
- Click Apply
Notifications Tab
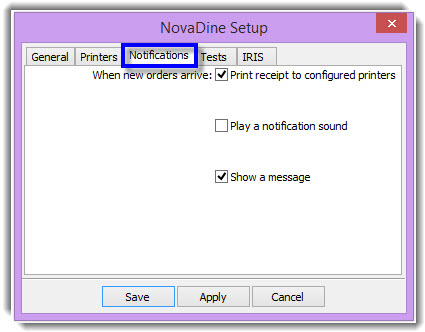
The Notifications tab is where you can choose how you prefer to be alerted when new orders arrive:
- Click checkboxes next to any of your preferred notification methods
- Click Apply
Tests Tab
On the Tests tab, you can verify that your login, popups, printing, and sounds are all configured and working correctly:
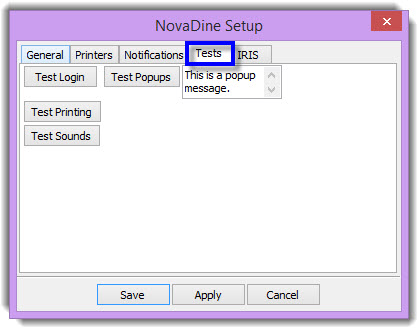
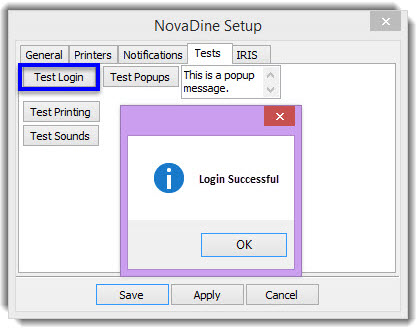
Test Login
- Click Test Login
- You will receive a pop-up message stating whether or not the login was successful
- If login was successful, click OK. If not, repeat the General Tab section
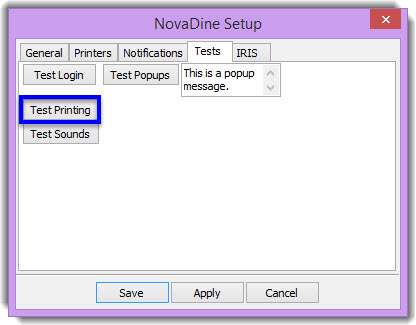
Test Printing
- Click Test Printing
- A test page will be sent to your printer
- If the test page printed successfully, continue to next step. If not, repeat the Printers Tab section
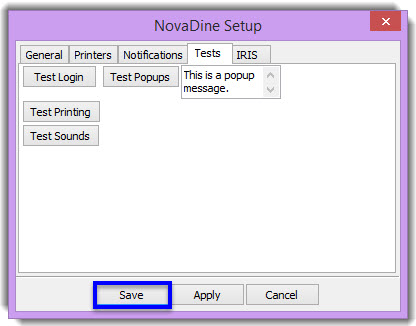
Complete Agent Install
Once you have completed the above sections:
- Click Save
- Your Agent installation is now complete
Navigating the NovaDine Agent

Orders Management Tab
By clicking the Orders Management Tab, you will bring up the Order Management Screen that displays open orders and any future orders

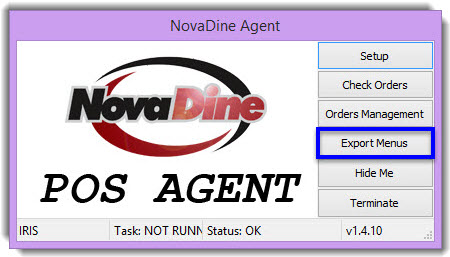
Export Menus Tab
Click the Export Menus Tab to manually export a copy of your location’s menu to NovaDine’s System
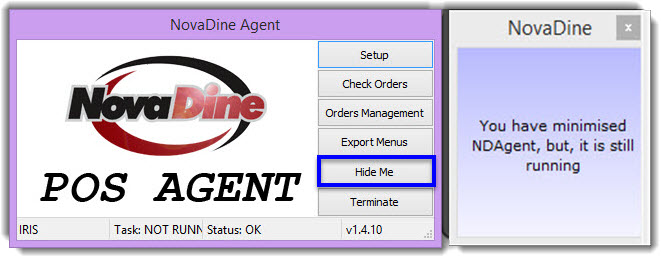
Hide Me Tab
By clicking the Hide Me Tab, you will minimize the Agent to the your computer’s taskbar. The Agent will still be running, but minimized. An alert box will pop-up letting you know that the Agent is still running.
Terminating the Agent
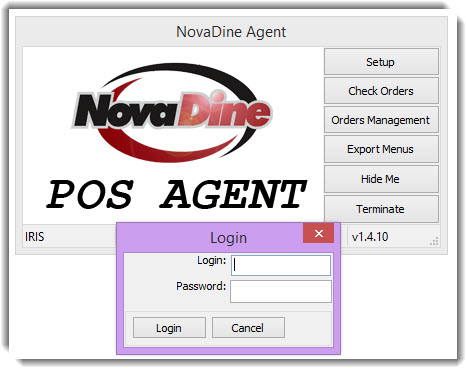
By clicking the Terminate Tab, you are saying that you want to fully shut down the Agent on your computer. This is not advised unless it’s during off hours, when you would not be receiving orders
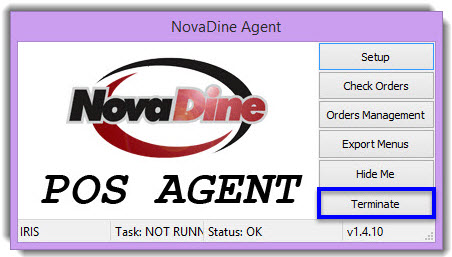
Once you click the Terminate Tab, you will be asked to enter your AGENT username and password as a security precaution before the Agent will fully shutdown
Note
You can terminate the NovaDine Agent through the Task Manager on your computer, but using the Terminate Tab is the suggested method
Accepting and Completing Orders (Non-POS Locations Only)
Accepting Orders through the Agent
- Click the Accept button to acknowledge the order
- You can elect to send the customer a confirmation email that states that the location has received their online order by checking the box Send Confirmation prior to accepting the order

- After accepting the order, the status color will change to TEAL, which indicates the order is currently in progress

Completing Orders through the Agent
- Click the Complete button once the order has been picked up. This final process will also capture the credit card pre-authorization.

- After completing the order, the status color will change to GRAY

Agent Troubleshooting
I am unable to download the .msi program. What should I do? When you go to download the NovaDine Agent, you will click on the installation link which will first download the file. After you try to run or open the downloaded file in order to install the agent, the agent should install. If a pop up comes up that asks which “program would you like to use to open the file”, that means the standard .msi file extension is missing. To correct this, go here and download/install the proper file. Once this is done, go on to complete the ND Agent installation. This is uncommon and may occur because of a bad virus.
Received a ‘login failed’ error message: Verify that you entered the correct AGENT username and password
Agent will not start: Verify yml file settings
I installed the Agent but the Setup button is not displaying. What do I do? Check the configuration/.yml file to see if hide_setup: is set to true. If it is set to true, and you would like for the Setup button to be displayed on the Agent toolbar, then you would need to change to ‘hide_setup: false’
The Order Management Screen is displaying a completely white screen. What should I do?
- Verify that internet is working properly
- Check content advisor has been disabled
- Verify Anti-virus is not blocking the NovaDine Agent (see Support General Support Guides/McAfee issues)
- Verify the URL is correct within the ND Agent (see General Tab)
The NovaDine Agent is not “ringing” when an order is received at the location Verify the following:
- Check physical speakers to be sure that the speakers are turned on and the volume is turned up
- Verify that volume on the computer is turned up and not muted, verify audio driver is installed.
- Check that NovaDine Agent Notifications are checked to Play a notification sound (see Notifications Tab)
Why is the Agent not notifying the location when new orders arrive? Verify the following:
- Check that proper NovaDine Agent Notifications are checked (see Notifications Tab)
- Verify internet is working properly
- Reboot computer
Agent won’t shut down: Please see Terminating the Agent
No Agent Check-In: The NovaDine Agent installed at each store checks for new orders every minute. If an Agent doesn’t check-in for a period of one hour, this event is logged and email alerts sent. This can be caused by multiple issues, mainly a loss of internet connectivity at the store or an unsecure Restaurant URL assigned in the Agent. Requested action from chain would be:
- Verify the Restaurant URL listed in the NovaDine Agent, for security purposes, begins with “https://“
- Correct any internet issues as quickly as possible so the store can receive orders
Orders aren’t going to our printers. What do I do? Verify the following:
- Verify that the correct printer is setup in the Agent
- Export the menu for the store so the prices are synced
NovaDine Agent Task Status ‘Not Running’: Verify the following:
- Test Login in Tests tab. If it fails, correct URL and/or username and password in General tab
- The correct POS is selected as the POS type in the General tab
- Settings in Agent POS (IRIS, Maitre’D) tab are correct, including installation directory for POS
NovaDine agent is not picking up orders and sending it to the POS: Verify the following:
- Check order on the ND Agent
- General Setting & POS Setting in the ND Agent
- Host computer is connected to the internet
Note
For Troubleshooting the NovaDine Agent with POS, please see IRIS Troubleshooting or Maitre’D Troubleshooting