Frequently Asked Questions
Payments
Why is a customer receiving an Authorization Error when trying to process their order?
An Authorization Error means that there is a problem verifying your merchant account. You will need to contact your merchant provider to get this resolved.
How do I issue a refund to a customer for an online order?
For step-by-step refund instructions, please see Issuing Refunds
Coupons
How can I exclude specific items from being used with coupons?
There are some items in our menu that are already discounted, like the Meal Deals, for which we wouldn’t want customers being able to apply more discounts. The way these meal deals are set in POS doesn’t allow cashiers to apply more discounts to these offers/items. We would like to have same setting for the online menu. At this point, if a customer tries to discount any of these items online, the order doesn’t go through due to this functionality difference.
Errors
Error 10: Error from IRIS submitting order: Item not found. [Error 10]: Requested action from chain would be to add the missing item to the POS, make it available in the Online Order destination, verify the kitchen messages setup and/or, if it was a delivery order, verify the IRIS delivery fee item number is setup in the Agent. Order cannot be sent to POS until this is fixed, and credit card/sales reconciliation will be off unless it’s fixed same day.
Error 19: Error from IRIS submitting order: Discount has no available qty [Error 19]: Requested action from chain would be to add the missing discount to the POS, or make it available in the Online Order destination. Order cannot be sent to POS until this is fixed, and credit card/sales reconciliation will be off unless it’s fixed same day.
Error 21: Error from IRIS submitting order: Discount conflicting with an exisiting one [Error 21] This occurs when 2 coupons discount the same items on an order.
Error 22: Error from IRIS submitting order: General error with discounts! [Error 22]
Error 23: Error from IRIS submitting order: No amount on paytype [Error 23]: This is caused when an order is attempting to be sent to the PoS without a total payment ($0). Have guest cancel the order and place again using the correct payment.
Error 59: IdentifyCustomer failed: ReturnCode: -1, ExtReturnCode: 0, Message: [Error 59]: This is caused by the POS attempting to redeem the same loyalty offer that has been previously redeemed online
Error 60: Error from IRIS submitting order: RedeemPoints failed. [Error 60]: This is a loyalty error that needs to be moved out of the POS.
Error 100: Error from IRIS: Timed out waiting for response [Error 100]: The requested action from chain would be to start/fix the xsPOSServer service at the store
Error 10053: Error communicating with IRIS: [Errno 10053] An established connection was aborted by the software in your host machine: The requested action from chain would be to start/fix the xsPOSServer service at the store
Error 10055: Error connecting to NovaDine: [Errno 10055] An operation on a socket could not be performed because the system lacked sufficient buffer space or because a queue was full
Error 10060: Error connecting to NovaDine: [Errno 10060] A connection attempt failed because the connected party did not properly respond after a period of time, or established connection failed because connected host has failed to respond. This error is typically caused by a program or firewall blocking or delaying the connection to NovaDine.
Error 10061: Error communicating with IRIS: [Errno 10061] No connection could be made because the target machine actively refused it: The requested action from chain would be to start/fix the xsPOSServer service at the store
Error 11001: DNS error at Agent connecting to NovaDine: [Errno 11001] getaddrinfo failed (NON-POS Error)
Error 11004: DNS error at Agent connecting to NovaDine: [Errno 11004] getaddrinfo failed (NON-POS Error)
Technical Questions
Has NovaDine upgraded to SHA-2 based certificates?
Yes, NovaDine supports SHA-2/SHA-256 certificates
Miscellaneous
My store did not receive an email copy of an order receipt. How can I check that it was sent?
To verify that an order receipt was sent to a specific store:
- Login to management on your site
- Proceed to the Order Detail Tab
- Enter the online order number or other order identifier and click Find Order
- Under the Email History section, you will see when and to whom an email receipt was sent
- If status shows sent without an error, you will need to check with your email provider to see if any errors were reported
Note
Please see Order Detail Tab for additional information
I ran out of an item. How do I temporarily disable the item online? (Store Manager Access)
To temporarily disable or reenable an item on the menu for your location:
- Login to your site with your store manager login
- Click Setup in the top right corner of the page
- Click
 to the left of the store number for which you want to disable the item
 - Edit item availability by clicking the
 button to deactivate the item, turning it red/disabled (will not display on front end for ordering), or by clicking the
  button to activate the item, turning it green/enabled (making it available for online ordering at this location)
Note
Please see Enable or Disable a Local Item for additional information
How do I place a Test Order?
When you want to run transactions in test mode:
- Login to your site as the below user:
- Username: test@novadine.com
- Password: test
Select the location for the test order
Add items to your cart and proceed to checkout as a customer would
When you get to the checkout screen, you will need to use a test credit card number, which your online merchant provider should supply. No matter what the number, always enter CVV code of 123
Note
When logged in as the test user, our system will automatically run the transactions in test mode. It will also automatically insert a comment on the order instructing the location not to make the food
How do I disable service for my location?
There are three possible ways to disable service for your location. Which option you use depends on what you wish to accomplish:
Disable a Specific Service Type for the Remainder of the Current Day
To disable a specific service type for the remainder of the current day:
From Management, proceed to the Orders Tab OR from the NovaDine Agent, proceed to the Order Management screen
Select the Service Availability sub-tab
Click Disable to the right of the Service Type that you wish to disable
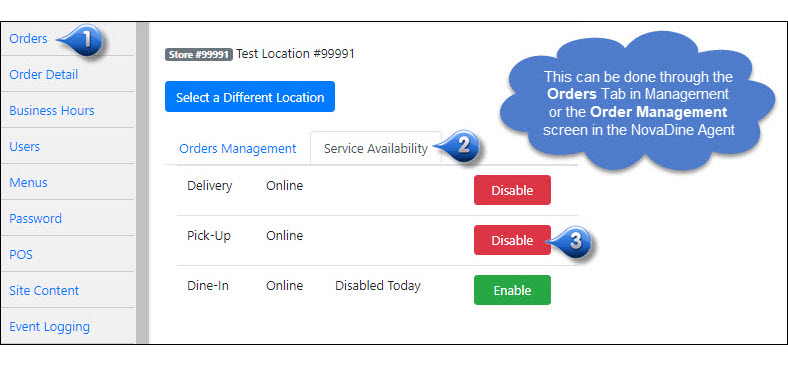
| Example: | There is a large snowstorm in your area and you are unable to deliver orders for the rest of the day. You would disable the Delivery Service Type on the Orders Tab in Management or in the Order Management screen of the NovaDine Agent |
|---|
Disable a Specific Service Type for a Specific Date
To disable a specific Service Type for a specific date:
From Management, proceed to the Orders Tab OR from the NovaDine Agent, proceed to the Order Management screen
Select the sub-tab of the Service Type that you wish to disable
Click Add Hours to the right of the Service Type that you wish to disable

Select the Specific Date radio button to display the calendar icon
Choose the date that you need the Service Type disabled in the Effective Date calendar drop-down
Click Add Schedule
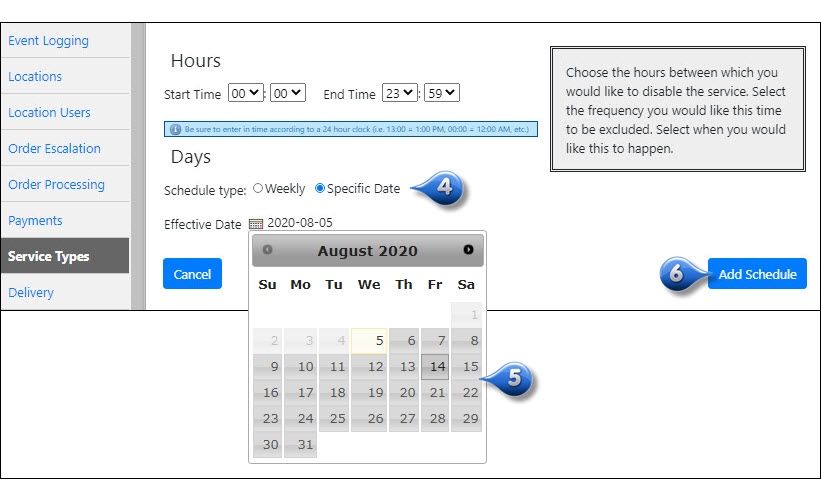
| Example: | Your delivery driver’s car is in the shop and will not be able to deliver orders for your location tomorrow. You would disable the Delivery Service Type for tomorrow’s date under the Service Types Tab in Management. |
|---|
Disable Online Service for Location on a Specific Date or Time
To disable online service for a location on a specific date or time:
From Management, proceed to the Business Hours Tab
Select the Override Hours for this Location sub-tab
Select the date that the store will be closed or that the hours will differ from the normal hours from the calendar drop-down
- If the store will be closed for the entire day, check the Closed for the entire day box and select the appropriate date
- If the store is closing early, select the Normal radio button beside Start Time and choose the time the store will close under End Time
- If the store is opening late, select the time that the store will open beside Start Time and select the Normal radio button beside End Time
Click Set
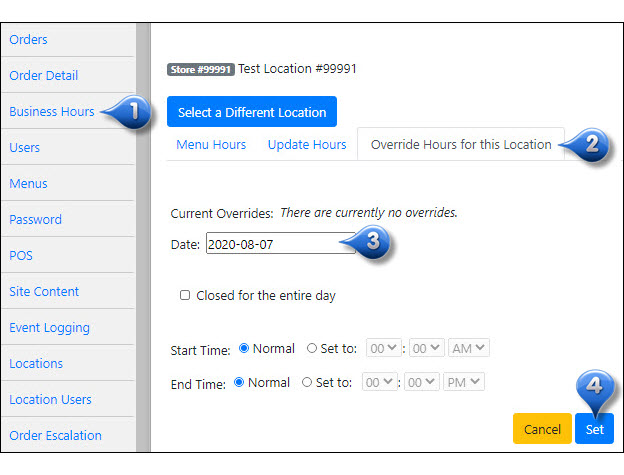
| Example: | July 4th is coming up in two weeks and my store will be closed that day. You would disable service under the Menus Tab in Management for the holiday. |
|---|