IRIS POS
Contents: This guide will show you how to add the NovaDine Agent to run with IRIS
Getting Started
The IRIS server should have the Parallel Ordering Interface installed, configured and running
Gather Required Information
You will need to have the below information for the install:
Login Information
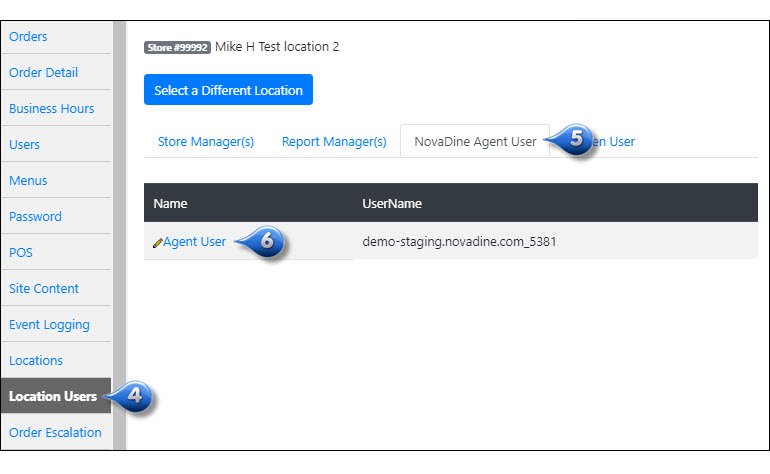
You will need the NovaDine Agent username and password to install the Agent. This information can be found using the steps below:
- Click the
 icon in the top right corner of your site
 - Login with your management account credentials
- Click the
 icon in the top right corner that displays after successful login, which will open your Backend Management site in a new tab
 - Select the Location Users tab
- Click the NovaDine Agent User subtab
- Click the pencil icon next to Agent User to find the Username and Password
IRIS
To process NovaDine online orders through your POS, IRIS has to be provisioned to accept external orders; and a mapping created for the NovaDine order components like customer info, items, modifiers, taxes, etc. In these steps you will gather information for your IRIS server to successfully accept NovaDine online orders. This information should be gathered prior to the NovaDine Agent Installation.
Note
A Manager login is required to gather the information from the IRIS server
IRIS Software Directory
- The IRIS software directory is the location where the IRIS POS software was installed (usually
C:\IRIS) - If you do not know where your IRIS POS software was installed, contact your Xenial representative
Warning
The NovaDine POS Agent must have read access to the IRIS software directory to utilize menu export
- The IRIS software directory is the location where the IRIS POS software was installed (usually
IRIS Server Address
- The IRIS server IP is the internal IP address of the IRIS back office server
- If the agent is running on the back office server, you can use 127.0.0.1
IRIS Server Port
- The IRIS server port is the port on which the IRIS back office server listens (usually 7650)
- If you do not know the IRIS back office server port, contact your Xenial representative
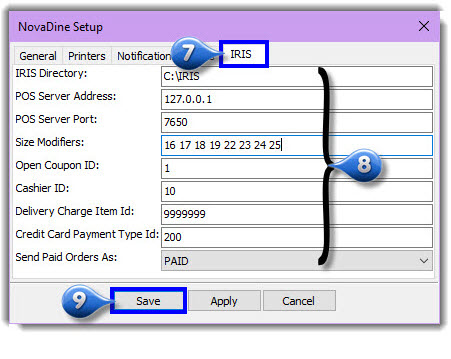
Size Pre-Modifier ID
The size pre-modifier ID is a space-separated list of pre-modifiers which indicate sizes for items
To find this, edit an item and look in the “Pre-Modifiers” tab
- Open the “Utilities” application of the IRIS back office, and select the “Item Master” module
- Highlight an item and click “Select”
- Select the “Pre-Modifiers” tab
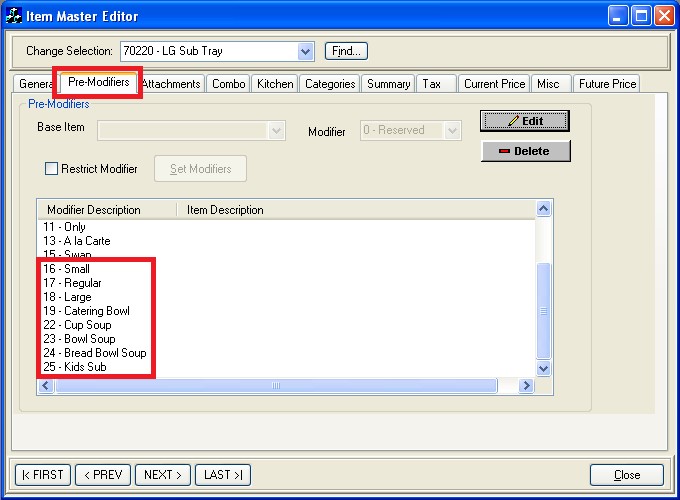
Note
This tab should list a number of pre-modifiers for items. Among them may be pre-modifiers which affect an item’s options (such as “No”, “Only”, “Light”, etc); these pre-modifiers should be ignored for the purpose of setting sizes in the NovaDine POS Agent. Locate all pre-modifiers which affect an item’s size (such as “Large”, “Small”, “Medium”, etc). Our list should contain all of the ID’s representing sizes separated by a space. For example, in the image above, our list would be: 16 17 18 19 22 23 24 25
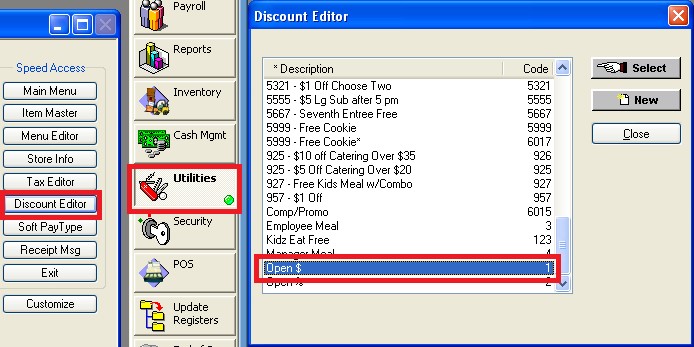
Open Coupon ID
The Open Coupon ID is the ID of the coupon which will be used for all coupons defined in NovaDine which are not exported from the POS, as well as combos
This can be found in the “Discount Editor” module of the “Utilities” back office application
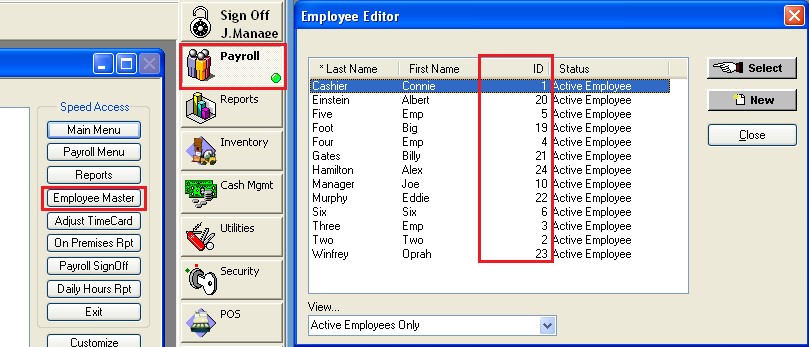
Cashier ID
The Cashier ID is the ID of the employee who will accept incoming web orders from the NovaDine Agent
This can be found in the “Employee Master” module of the “Payroll” back office application
Delivery Charge Item ID
The delivery charge item ID is the ID of the item which will represent the delivery charge
This can be found in the “Item Master” module of the “Utilities” back office application
If more than one delivery charge will be used, the delivery charge item should be configured as an open price item
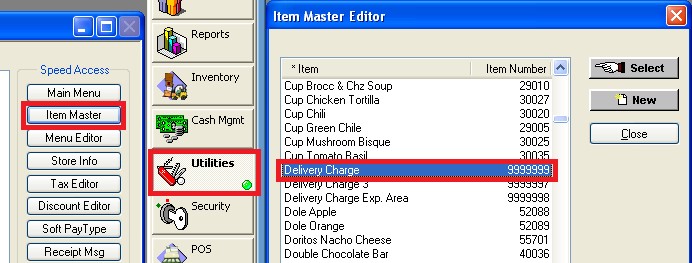
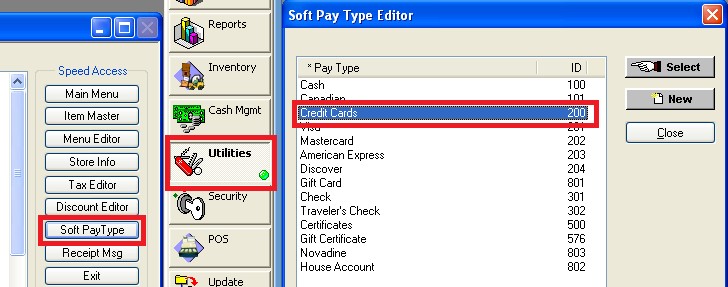
Credit Card Payment Type ID
The credit card payment type ID is the ID which identifies the submitted payment from NovaDine as a credit card payment
This can be found in the “Soft Pay Type Editor” module from the “Utilities” back office application
Installation
In order to accept NovaDine Online Orders and keep your online prices updated, you need to install and configure the NovaDine Agent on your IRIS Server. The NovaDine Agent is the program used to receive online orders. The average time required to complete the steps in this guide is 20 minutes.
Installation Overview
Below is an overview of the installation process:
- Pre-Installation
Verify pre-installation requirements
- Installation
Download and install the NovaDine Agent
- Configuration
Configure the NovaDine Agent. Configuration can be done from the NovaDine Agent program itself or by creating/editing its yml file. This section includes information on the yml file and an explanation of its components. Configuration must be completed properly to ensure that orders are sent to your POS from the NovaDine Agent
- Verify Functionality
Verify Agent connectivity to IRIS and its functionality
- Export Your Menu
Export your menu from IRIS to the NovaDine Agent. This will become your template for your online menu
- Optional NovaDine Agent Features
Enable Printing and Notification features
Pre-Installation
The NovaDine Agent requires Windows XP Service Pack 2 or better to be installed with the latest updates applied. The NovaDine Agent uses Windows Internet Explorer/Edge to display its Order Management dashboard, therefore Internet Explorer 7 or higher/Edge is also required. To ensure the NovaDine Agent functions properly, the latest Windows updates should be applied and maintained.
NovaDine Agent Requirements:
- Install the Agent using the same profile (user account) as IRIS.
- The Agent requires full control permissions in its installation folder so it is able to create and write to its configuration and log files. By installing the Agent under the proper user account, the required permissions will be set automatically.
- The Agent checks for orders and exports the menu unattended in the background. It should be excluded or ‘white listed’ in all Anti-Virus programs and Firewall programs running on the server, including the Windows Firewall. No special ports are required as the Agent uses standard SSL port 443.
- If you actively block or filter outgoing web traffic, you’ll need to allow the URL of your NovaDine online ordering site so that the Agent can connect to the NovaDine servers.
Installation
The NovaDine Agent delivers incoming web orders to your IRIS server and keeps your NovaDine prices in sync with IRIS. The NovaDine Agent will act as the means of communication between the NovaDine servers and the IRIS server.
- Go to the ND Agent URL: http://yoursite.com/files/NDAgent.msi
- Choose “Run” and follow all of the additional prompts. Agree to any security alerts that may appear on your screen
- Go to your computer desktop and double click on the
 icon to launch the NovaDine Agent. You can also access the program from your programs list from the Start button
To install the NovaDine Agent from the command-line or script, use:
- For unattended installs, use “msiexec /i NDAgent.msi /quiet /qn”
- Use “msiexec /i NDAgent.msi /passive” if someone will be monitoring the install
Configuration
Agent Configuration
Configure the NovaDine Agent for your specific location so that it is able to communicate online orders placed for this location from the NovaDine servers to the IRIS servers
Guided Agent Configuration
To install the NovaDine Agent, simply follow the below steps:
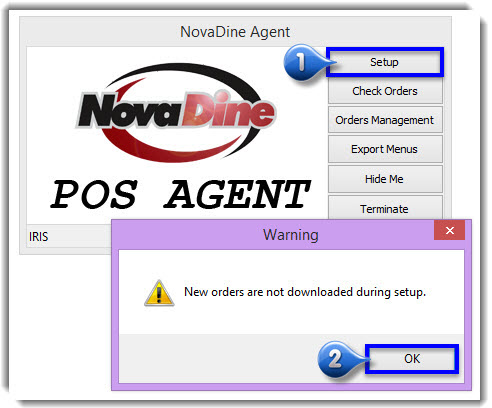
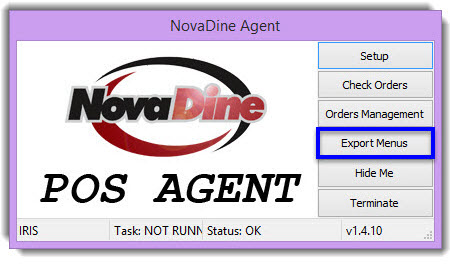
Click ‘Setup’ from the NovaDine Agent
Click ‘OK’ on the pop-up box that appears
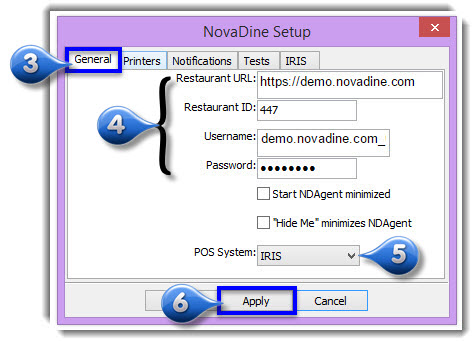
Select the ‘General’ Tab
Enter the restaurant URL and the NovaDine Agent username and password
Select IRIS in the POS System dropdown
Click ‘Apply’
Click the ‘IRIS’ tab
Complete all fields with the information gathered prior to install (found here)
Click ‘Save’
If you are using IRIS Version 4, please add the following to
C:\IRIS\Ini\Adoopt.ini: [xsPosServer Provider] POSCFG=PROVIDER=SQLite;Data Source=..\Data\xsPosCfg.sqliteReboot your machine
Click ‘Update Registers’ from the IRIS toolbar
Warning
The username and password used in the initial pop-up box for installation (Store Manager Login) and the ones found under Setup in the Agent (NovaDine Agent Login) are different. You MUST enter the correct Agent username and password on the Agent “Setup” screen or orders won’t download automatically, even if login is successful
Agent Configuration Using YML File
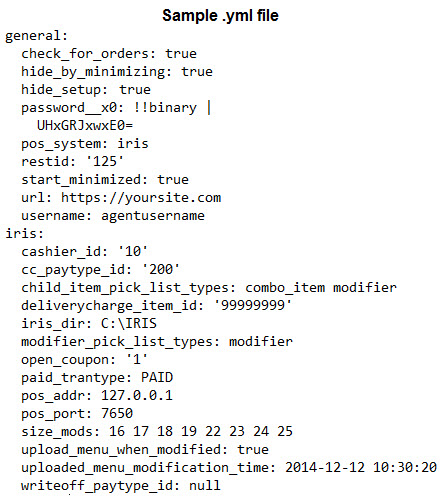
The Agent’s configuration can be set initially, or can be updated by placing the desired configuration in a file named “config_update.yml” in the Agent’s folder and restarting the Agent. The Agent’s folder location varies depending on the version of Windows it is running.
- On XP it can be found at:
C:\Documents and Settings\All Users\ApplicationData\NovaDine\NDAgent- On Windows 7, 8, or 10 it can be found at:
C:\ProgramData\NovaDine\NDAgentNote
Files and folders may be hidden depending on your operating system and settings
If the Agent has already run, the “config_update.yml” file is renamed to “NDAgent.yml” and an “NDAgent.log” file is created in the folder. The “config_update.yml” can be used at any time to update the configuration. The yml files are only read at startup, so if you create one for an existing Agent it will not take effect until the Agent is restarted
- The configuration files (“NDAgent.yml” for saved configuration and “config_update.yml” for updates) are in YAML format and contain indented “key: value” lines grouped in sections
- To update a running Agent, place a “config_update.yml” containing the updated configuration in the Agent’s installation folder. The updated file will be read, merged into any existing configuration, and then deleted
Note
Each location has a unique username, password, and restid for the Agent. You can request a CSV file of all Agent usernames and passwords from NovaDine
IRIS Configuration
Adding the NovaDine Agent to the IRIS Toolbar
After configuration, add the NovaDine Agent Program to the IRIS toolbar to ensure that the agent is running when IRIS is running.
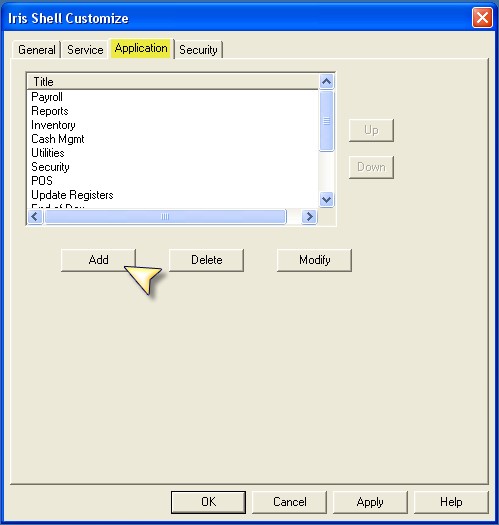
Open IRIS and login
Click on “System Status” on the toolbar
Click “Customize”
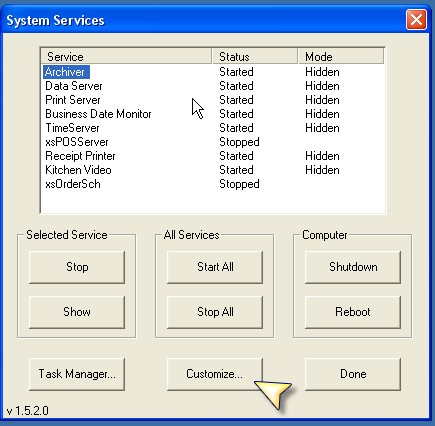
Click on the “Application” Tab
Click “Add”
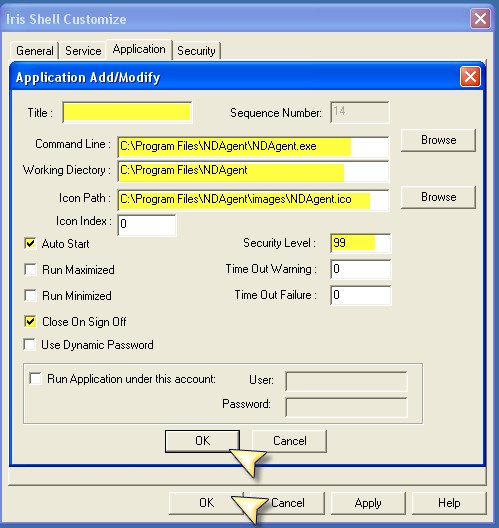
Enter information into the following fields:
- Title: enter “ND Agent”
- Command Line: click “Browse” and locate the NDAgent.exe file. Select the file and click “OK”
- Working Directory: copy and paste the same information from the previous Command Line step - then delete the last folder
"\NDAgent.exe"(This is the NDAgent home folder) - Icon Path: click “Browse” and locate the NDAgent.ico file (can be found in the “images” folder of the NDAgent home folder). Select the file and click “OK”
- Security Level: enter “99”
- Enable the checkboxes for Auto Start and Close On Sign-Off
Once you have entered all of the above information, click “OK” on the Application Add Screen
Click “OK” on the Customize Screen
Click “OK” on the warning box that pops up. This warning states that IRIS will need to be restarted for the changes made to take place
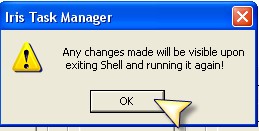
Click “Done” on the Settings screen
Restart the IRIS service in order to display the changes you made
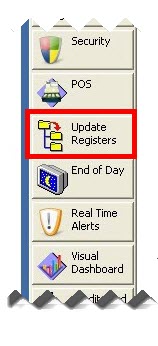
Note
Once you restart IRIS, you will see the NovaDine Agent added to the bottom of the IRIS toolbar as a program. The NovaDine Agent will be running and is accessible from there
Verify Functionality
Verify that the Agent has connected to the IRIS server by checking the status bar of the Agent for IRIS, Task: Running, and Status: OK
Note
These values will change if an order is being received
- Click “Setup” on the NovaDine Agent
- Click the “Tests” tab
- Click “Test Login”
- Click “OK” on the Login Successful message
Note
If you do not receive the “Login Successful” message, check your username, password, and restaurant URL
Export Your Menu
The NovaDine Agent must have read access to the IRIS software directory to utilize menu export. To export your menu data to NovaDine:
Warning
Important Step: If you have version 4 of IRIS, please complete the following before exporting your menu: Add the following to C:\IRIS\Ini\Adoopt.ini: [xsPosServer Provider] POSCFG=PROVIDER=SQLite;Data Source=..\Data\xsPosCfg.sqlite
Click “Update Registers” from the IRIS toolbar to prepare the export file
Click “Export Menus” on the NovaDine POS Agent when the file is ready
Select a Menu:
- Select “New” when exporting your menu for the first time or when exporting a menu with new items
- If this is a location that already has an existing menu and you would like to update that menu’s pricing and availability, select “Existing” and choose the proper menu from the dropdown
- Click “OK”
- Type in your Revenue Center for the menu
- Click “OK”
Verify Menu Export
Last Agent check-in date (which occurs every minute and updates in real time) and the date of the last menu export are available on your store’s website under the Locations Tab when you login. This feature can be used to confirm that your menu is exporting or to verify that an update has occurred.
Log into your store’s website
Click “Manage” at top right of screen
Click the Locations Tab
Verify that the menu exported and the Agent checked-in (see image below)

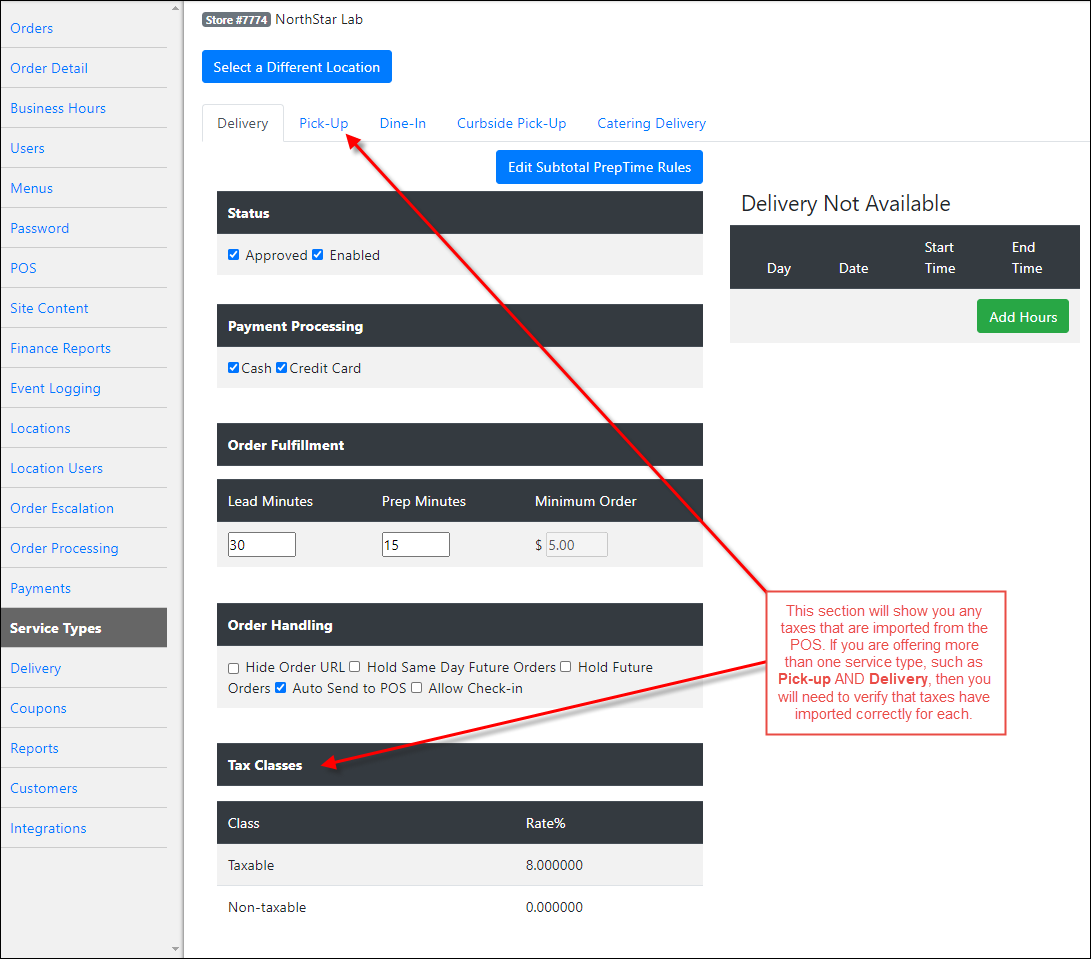
While still on your store’s website, you will need to verify that the tax information was correctly imported:
Click the Service Types Tab
Verify that the tax information is correct for each service type offered (see below)
Optional NovaDine Agent Features
You can connect the NovaDine Agent to printers so that additional receipts may print along with what prints at the POS and in the kitchen. You can also setup the program to receive Order Notifications. Order notification is a bell-like sound that will go off on the computer when an order is received
- Click the “Notifications” tab
- Enable the checkboxes next to “Print receipt to configured printers” and “Play a notification sound”
- Click the “Printers” Tab.
- Select the printer using the Printer Name dropdown. You can select up to three printers
- Click “Save”.
Note
This is independent and in addition to your IRIS printer
Testing
Once the Agent has been installed and setup to run with IRIS, it is best to place a test order to ensure that the Agent is receiving orders and sending them to the POS properly. To place a test order, you will go to your website and place an order as one of your customers would at your location. It is also possible to have a specific test location set up by NovaDine, if preferred.
When placing a test order, you can use the login test@novadine.com with password: “test”. This will automatically include a comment reading, “TEST ORDER, DO NOT MAKE.” You can also create a customer login and password to place a test order, but will need to remember to notate that it is a test in the comments section
Note
You are not able to place a test order under a Manager’s login
Troubleshooting
Troubleshooting the Agent
I am unable to download the .msi program. What should I do? When you go to download the NovaDine Agent, you will click on the installation link which will first download the file. After you try to run or open the downloaded file in order to install the agent, the agent should install. If a pop up comes up that asks which “program would you like to use to open the file”, that means the standard .msi file extension is missing. To correct this, go here and download/install the proper file. Once this is done, go on to complete the ND Agent installation. This is uncommon and may occur because of a bad virus.
I installed the Agent but the Setup button is not displaying. What do I do? Check the configuration/.yml file to see if ‘hide_setup:’ is set to true. If it is set to true, and you would like for the Setup button to be displayed on the Agent toolbar, then you would need to change to ‘hide_setup: false’
Received a ‘login failed’ error message: Verify that you entered the correct AGENT username and password.
No Agent Check-In: The NovaDine Agent installed at each store checks for new orders every minute. If an Agent doesn’t check-in for a period of one hour, this event is logged and email alerts sent. This can be caused by multiple issues, mainly a loss of internet connectivity at the store or an unsecure Restaurant URL assigned in the Agent. Requested action from chain would be:
- Verify the Restaurant URL listed in the NovaDine Agent, for security purposes, begins with “https://“
- Correct any internet issues as quickly as possible so the store can receive orders
The Order Management Screen is displaying a completely white screen. What should I do?
- Verify that internet is working properly
- Check “content advisor” has been disabled
- Verify Anti-virus is not blocking the NovaDine Agent (see Support General Support Guides/McAfee issues)
- Verify the URL is correct within the ND Agent (see General Tab)
NovaDine Agent Task Status ‘Not Running’: Verify the following:
- Test Login in ‘Tests’ tab. If it fails, correct URL and/or username and password in General tab
- The correct POS is selected as the POS type in the ‘General’ tab
- Settings in Agent POS (IRIS, Maitre’D) tab are correct, including installation directory for POS
Orders are not firing to the POS automatically: Verify the following:
- Ensure that “auto-send to POS” is checked for the applicable service types under the Service Types Tab in Management.
- Verify that you entered the correct AGENT username and password.
Agent sends a held order to the POS at the wrong time: Follow the below steps:
- Ensure that the correct time zone is set in the Locations Tab of Management. To update: edit the location and click Save
- Verify the prep time set for service types and items.
Troubleshooting IRIS
Items showing as Inactive or Hidden: Export the menu to the Agent. Each item’s status is collected from column “Active” in “tabletbl_ItemMaster” in IRIS. To better manage this process, it is suggested that you use EDM to set the flag to active.
Menu changes are not automatically exporting after installation: If you have just installed IRIS, please verify the YML file is set to “upload_menu_when_modified: true” in the IRIS section.
Menu pricing is incorrect on NovaDine:
- Ensure that the price is updated in the POS and select ‘Update Registers’. This will update the data files “xsPOSCfg.mdb” or “POSCfg.mdb” in the irisdata folder and allow NovaDine to ingest the updated pricing.
- The agent exports 10 minutes after the time stamp on the xsPOSCfg.mdb changes IF upload_menu_when_modified is set to true in the yml file. There doesn’t have to be an actual menu change. In a typical set up with our chain customers, all the stores export every morning when Iris reboots and regenerates the xsPOSCfg.mdb, which specifies the destination directory of menu data. Check that the timestamp changed and if it didn’t export, make sure the syntax is correct in the file xsPOSCfg.mdb
- If using IRIS Version 4, confirm the following is added:
C:\IRIS\Ini\Adoopt.ini: [xsPosServer Provider] POSCFG=PROVIDER=SQLite;Data Source=..\Data\xsPosCfg.sqlite`
Orders come through but no items display: Verify the following:
- Check IRIS to ensure that the KITCHEN_MESSAGE item number, specified in the [Special Items] section of the IRISiniorderent.ini file, exists as an item in the IRIS database and is available in the configured Destination.
- The NovaDine system defaults the KITCHEN_MESSAGE value to 999999. If the value is different in IRIS, you will need to replace the current value in the Agent to match the value in IRIS’s YML file.
- Check the back office machine to verify that the IRIS data folder contains file xsPOSCfg.mdb. If not, manually create the file.
Order showing red in Order Management and therefore not sending to POS: Follow the below steps:
- Check the Events Tab in Management for possible issues.
- Check the internet connection.
- Ensure that the Agent is checking in.
- Ensure the xsPOSServer Service is running on the port configured in the YML file.
- Restart the xsPOSServer Service.
Orders are sending to the wrong destination: Verify that the IRIS destination is set correctly for service types.
Multiple orders are stuck in a status of ‘Sent to POS’: Review the ND Agent YML Setting ‘paid_trantype:’. Default value of this setting is ‘PAID’. Can be set as “paid_trantype: SAVEDFORTIP” to send orders as unpaid. This will rely on the store’s POS to complete the orders. When the order status is complete in the POS, the agent will automatically identify that and update on ND’s side. If “paid_trantype:” is set as null (presented as paid_trantype: “), the orders will be sent as paid and will automatically complete, without the need to check POS status. This field being null will use the default value of ‘PAID’.
Credit card payments for online orders are not making it to the POS for processing: Follow the below steps:
- Verify that the xsPaymentSvc.exe.config file is updated to include the NovaDine order point.
- Check settings against another location that is processing payments properly.
Note
This only applies to stores using Xenial Payment Processing.
Online orders print at workstations but don’t go to the kitchen: Verify that the sockets.ini file on the back office machine is configured properly.
Can I send orders to different destinations in IRIS based on certain criteria? We can send a different destination per Service Type. Send NovaDine the IRIS destinations and we enter them for you. Destinations setup in NovaDine will be visible on the Service Types Tab.
Tax imported incorrectly or not at all: Manually export the menu. Contact NovaDine if the issue persists.
We have upgraded our locations to IRIS 4.0 and since then they have not exported menu. The agent still checks in every day. What file is it looking to read?
- Version 3: The agent exports 10 minutes after the time stamp on the xsPOSCfg.mdb changes IF upload_menu_when_modified is set to true in the yml file. There doesn’t have to be an actual menu change. In a typical set up with our chain customers, all the stores export every morning when Iris reboots and regenerates the xsPOSCfg.mdb, which specifies the destination directory of menu data. So, if the timestamp changed and it didn’t export, make sure the syntax is correct in the file xsPOSCfg.mdb
- Version 4: Add the following to
C:\IRIS\Ini\Adoopt.ini: [xsPosServer Provider] POSCFG=PROVIDER=SQLite;Data Source=..\Data\xsPosCfg.sqlite
Error Messages
- POS Error: This event is logged when the NovaDine Agent encounters an error communicating with the POS:
Error 10: Agent cannot send order to POS because of missing item in the POS, incorrect kitchen message setup or missing delivery fee number, if the order was for delivery. The email would be Error from IRIS submitting order: Item not found. [Error 10] and would include the missing item number, if available. If there is an item missing, the item number would be included in the original notification email. If the notification did not state what item was missing, it most likely means that it’s not actually an item missing, but either kitchen messages set up is incorrect, the item is not available in the destination, or the IRIS delivery fee item number is missing from the Agent (delivery orders only). Requested action from chain would be:
Fix the issue in Iris that is causing the error so the order can process successfully. The error email you get from NovaDine will tell you what is causing the issue. You can also look in Event Logging Tab in Management for that location, but that does not contain as much detail as the error emails.
- Add the missing item to the POS, make it available in the Online Order destination, verify the kitchen messages setup, and/or, if it was a delivery order, verify the IRIS delivery fee item number is setup in the Agent.
If you are unable to fix the error in Iris, go into the Orders Tab for the location (or Order Management in the Agent) and Accept, and then Complete the order causing the error, that’ll prevent the Agent from trying to send it to POS again.
Warning
Please be aware that the Complete step is what captures the payment, and if skipped, the credit card pre-authorization will not be captured. This should be your LAST RESORT because when you do this, the sale will not actually post in the POS.
Note
If you updated an item POS ID after receiving an Item not found. [Error 10] email notification and are still receiving daily email alerts, please ask your NovaDine Representative to update the item number on the specific order # listed in the email. By design, Updating the POS item number in the system does not update it in orders that have already been placed.
Error 19: Error from IRIS submitting order: Discount has no available qty [Error 19]: Requested action from chain would be:
- Add the missing discount to the POS, or make it available in the Online Order destination
- Confirm that Available for Line Level Discounts (Available in Order Entry) is enabled for the discount’s availability in IRIS
- Order cannot be sent to POS until this is fixed, and credit card/sales reconciliation will be off unless it’s fixed same day.
- Error 21: Error from IRIS submitting order: Discount conflicting with an exisiting one [Error 21] This occurs when 2 coupons discount the same items on an order.
- Error 22: Error from IRIS submitting order: General error with discounts! [Error 22]
- Error 23: Error from IRIS submitting order: No amount on paytype [Error 23]: This is caused when an order is attempting to be sent to the PoS without a total payment ($0). Have guest cancel the order and place again using the correct payment.
- Error 59: Error from IRIS submitting order: IdentifyCustomer failed: ReturnCode: -1, ExtReturnCode: 0, Message: [Error 59]: Requested action from chain would be to update loyalty settings in the POS.
- Error 60: Error from IRIS submitting order: RedeemPoints failed. [Error 60]: This is a loyalty error that needs to be moved out of the POS.
- Error 100: Error from IRIS: Timed out waiting for response [Error 100]: Sometimes after POS configuration changes xsPOSServer may not come up correctly. These could also be caused by Iris restarting (due to configuration change) while the Agent is trying to submit an order. The requested action from chain would be to start/fix the xsPOSServer service at the store
- Error 10053: Xenial xsPOSServer service has stopped/hung/crashed on the back office server. The alert email would start with: Error communicating with IRIS and then followed by the actual error, which can be [Errno 10061] No connection could be made because the target machine actively refused it, or [Errno 10053] An established connection was aborted by the software in your host machine, or something else. If the error starts with Error communicating with Iris the requested action from chain would be to start/fix the xsPOSServer service at the store.
- Error 10060: Error connecting to NovaDine: [Errno 10060] A connection attempt failed because the connected party did not properly respond after a period of time, or established connection failed because connected host has failed to respond. This error is typically caused by a program or firewall that is blocking or delaying the connection to the ND Agent.
- Error 10061: Xenial xsPOSServer service has stopped/hung/crashed on the back office server. The alert email would start with: Error communicating with IRIS and then followed by the actual error, which can be [Errno 10061] No connection could be made because the target machine actively refused it, or [Errno 10053] An established connection was aborted by the software in your host machine, or something else. If the error starts with Error communicating with Iris, the requested action from chain would be to start/fix the xsPOSServer service at the store.
Why is there an order on Admin Hold? Upon request, NovaDine can stop trying to send an order to the POS after it errors out a certain number of times. For example, a customer may want NovaDine to set it for 10, so if an order errors out going to the POS more than 10 times, we put it in a new status called Admin Hold. The order can be Released from the Admin Hold via the Orders tab or Order Details tab in Management. When an order is released, it is restored back to the status it was when it errored out. This gives the POS team the ability to release the order after they’ve fixed the problem, and the order can then go to POS. If an order continues erroring out over and over, it will cause issues in the POS, especially Xenial.
See also