Item Management
Contents: This guide will give you detailed information on menu items in NovaDine and show you how to set them up inside your menu.
Item Overview
In NovaDine, menu items are the individual items on your menu, typically grouped into categories. Items can also be picklist members and order level trigger items. You can find additional information regarding items in the sections below:
- Create New Items
- Edit Existing Items
- Add Item Image
- Edit Item Image
- Item Classes/Badges
- Item Nutrition
- Add Item to Category
- Item Sizes/Styles
- Condensing Menu Items Using Sizes and Styles
- Item Configurations/POS IDs
- Exclude Specific Items from Being Discounted with Use of Coupons
- Item Overrides
- Item Configuration Overrides
- Override Images for Item Configurations
- Override Prep Time for Item Configurations
- Override Service Type Exclusions for Item Configurations
- Item Pricing/Availabilty
- Activate/Deactivate an Item
Create New Items
There are two ways to create new items in NovaDine and you will need to follow the instructions based on whether your locations are POS integrated. Please select one of the below for further details:
Create New Items (POS Locations)
Upon menu export, any new items setup in the POS since last export will be exported to a New Items category. The New Items category is hidden by default, so it will not display items on the front end. The items will need to be in a category, active, enabled and have pricing before they will show on the front end for customer ordering.
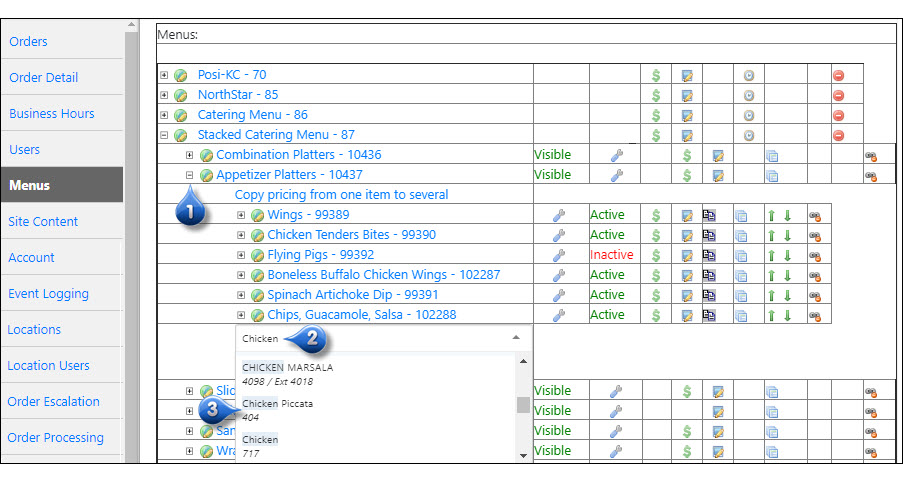
To add an item from New Items Category to your menu:
In the category to which you wish to add the new item, drilldown to item level
In the Add Item box, search for the preferred item by Item name, NovaDine item ID, or External ID and select it from the dropdown
Click on the item to add it to the category
To add or update pricing, see Item Pricing/Availability
To add or update POS IDs and/or item configuration, see Item Configurations/POS IDs
To activate, see Activate/Deactivate an Item
To enable, see Enable/Disable Item at Local Level
Note
Items will stay listed in New Items category until manually removed. It is advised that you delete items from this category once they are assigned elsewhere for easier management
Create New Items (Non-POS Locations)
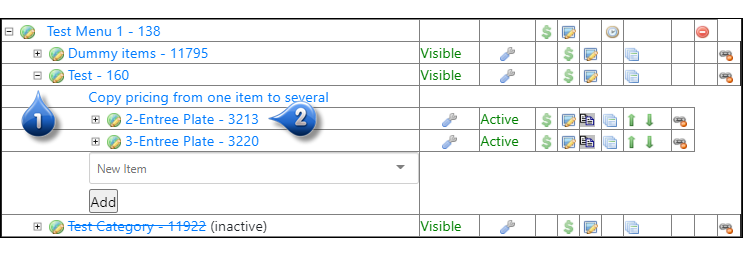
To add an item for a non-POS integrated/PC location:
- Drilldown to item level
- Search and select the New Item from the dropdown
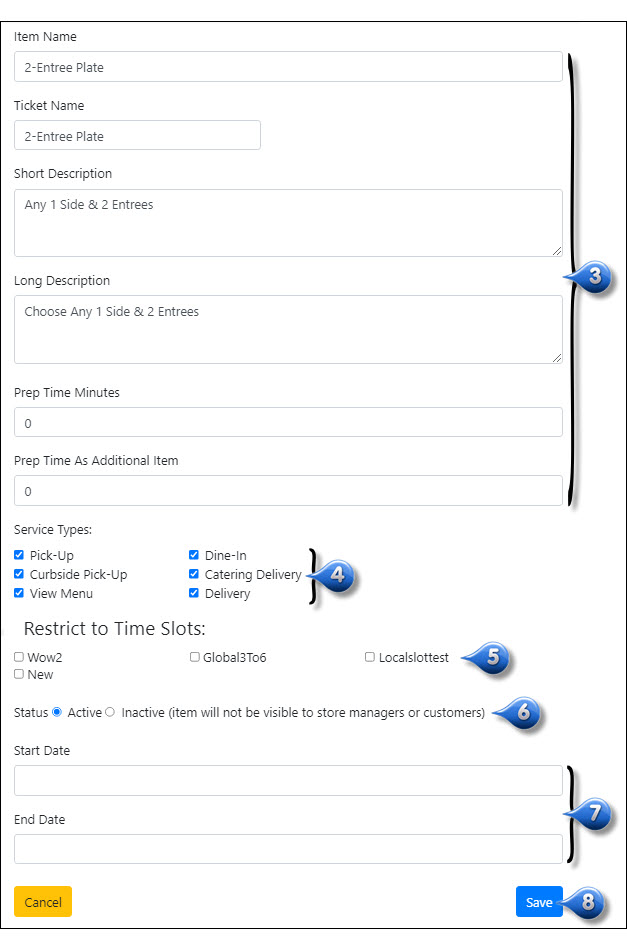
- Enter the item information
- Item Name: this is the name of the new item
- Ticket Name: the item description that will show on the customer’s receipt
- Short Description: a brief description of the item
- Long Description: a detailed description of the item
- Prep Time Minutes: the amount of time it takes to prepare the item
- Prep Time As Additional Item: the additional amount of time it takes to prepare another of the same item
- Check the boxes next to each Service Type in which this item should be available
- Select if this new item should be Active or Inactive
- Enter a Start and/or End Date for the item, if applicable
- Click Create
- Please see Item Pricing/Availability to specify pricing and availability for the new item
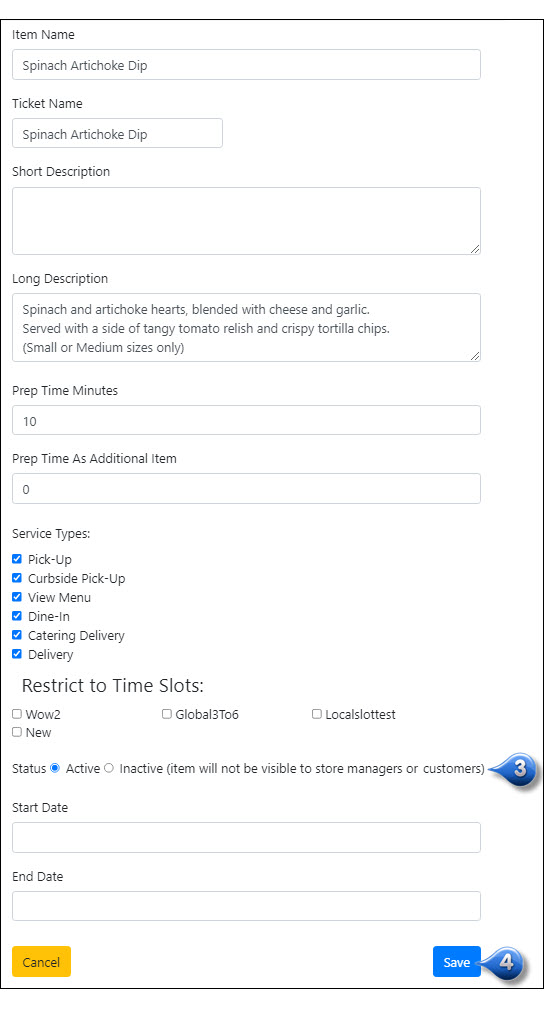
Edit an Existing Item
Drilldown to item level
Click the name of the item that you wish to edit
Edit item information, as needed
- Item Name: this is the name of the new item
- Ticket Name: the item description that will show on the customer’s receipt
- Short Description: a brief description of the item
- Long Description: a detailed description of the item
- Prep Time Minutes: the amount of time it takes to prepare the item
- Prep Time As Additional Item: the additional amount of time it takes to prepare another of the same item
Check the boxes next to each Service Type in which this item should be available
Select time slots to restrict the item to, if applicable
Select if this new category should be Active or Inactive
Enter a Start and/or End Date for the item, if applicable
Click Save
Note
DSPs only pull short descriptions. If you want item descriptions to display on a 3rd party provider, make sure the description is entered in the ‘Short Description’ field
Note
If you are logged into an account with Management Access, you will be able to view the items on the front end outside of the item’s designated Start and End Date. By design, we ignore item date restrictions for users with Management access; that allows you to test items before they become available to all users.
Add Item image
To add an image to an item:
Drilldown to item level
Click
 to the right of the item
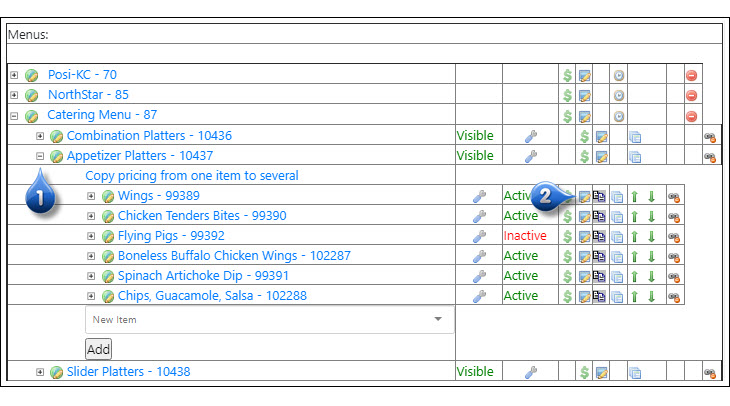
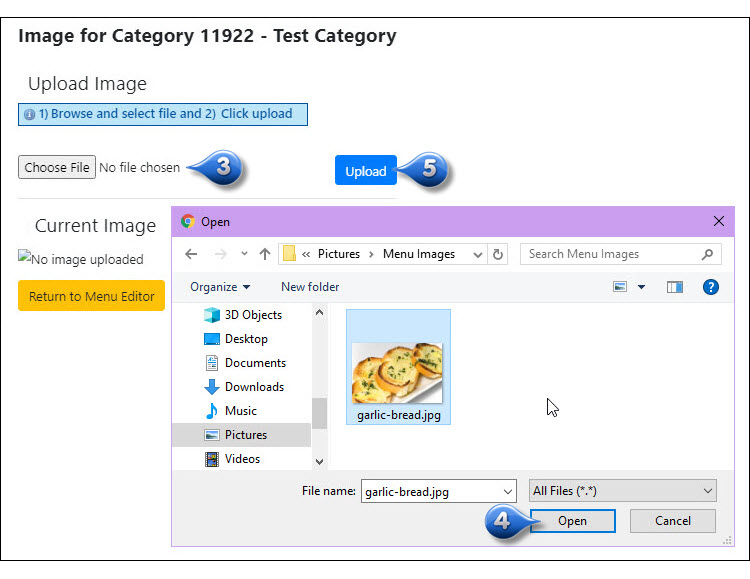
Click Choose File
Select the image file for the item
Click Upload
Warning
When adding images, always check work on front end to be sure it uploaded correctly
Note
Standard menu images need to be 800x600px in png format
Edit Item image
To edit an existing item image:
Drilldown to item level
Click
to the right of the item
Click Choose File
Select the new image for the item
Click Upload
Warning
When updating existing images, you are uploading over the current image and it may cache the old image (try refreshing the page). Always check work on front end to be sure it uploaded correctly
Item Classes/Badges
Item classes and badges are labels that you can assign to certain items. For example, Spicy Chili might have a “Spicy” badge that displays with the item image on the front end when a customer is placing an order
Assign Item Classes/Badges
Assign an item class/badge:
Drilldown to item level
Click on the item name
Select the sub-tab Item Classes
Click the
 to the right of the class/badge that you wish to assign to this item
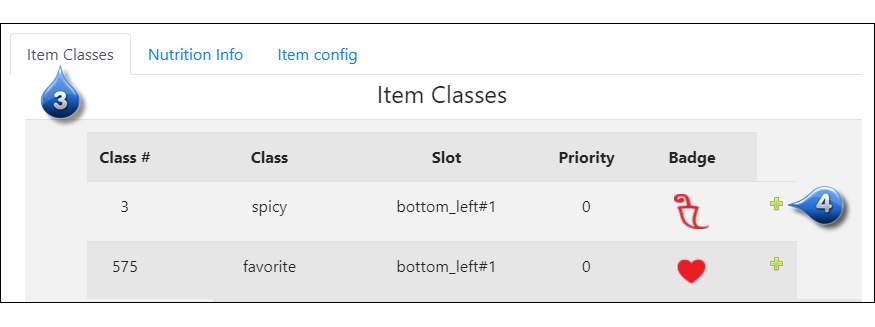
Note
Badge/class icons must be uploaded by NovaDine’s development team prior to being able to assign them. If you would like to assign badges/classes to your items, please speak with your NovaDine representative.
Delete Item Classes/Badges
Drilldown to item level
Click on the item name
Select the sub-tab Item Classes
Click the
 to the right of the class/badge that you wish to delete from this item
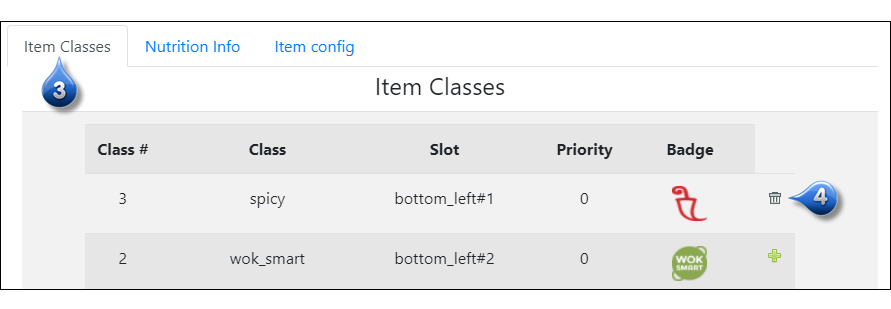
Note
A beside the class/badge means that particular badge is not assigned to the item and you would need to click the plus sign to add it. A beside the class/badge means that the badge is assigned and you would need to click the trash icon to delete it
Item Nutrition
To enter/edit item nutrition information:
Drilldown to item level
Click the item name
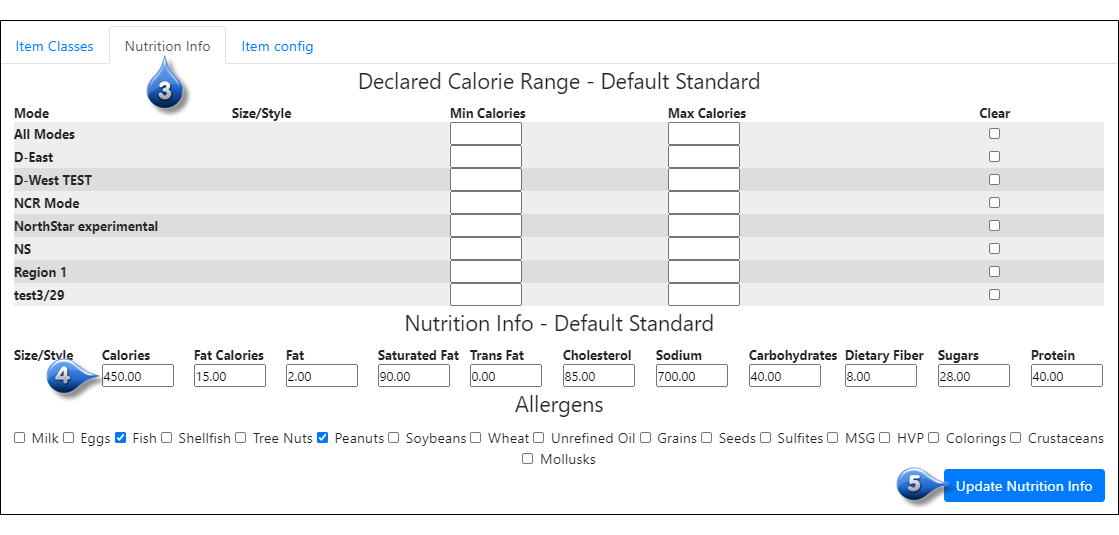
Select the sub-tab Nutrition Info
Enter the item’s nutrition information and allergens, as needed
Click Update Nutrition Info
Note
If an item does not have any nutritional information entered here, the button will not display on the front end for a customer
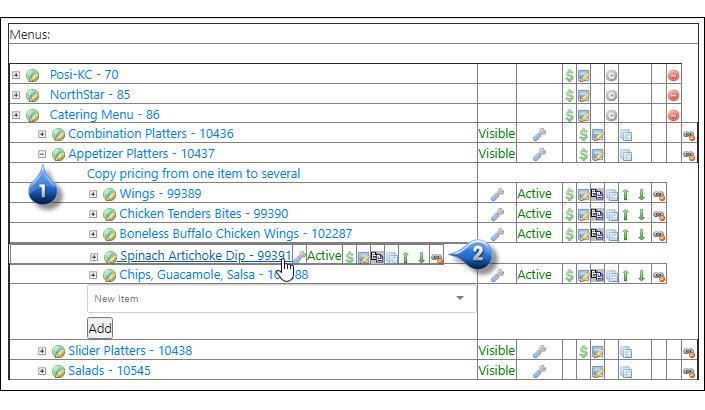
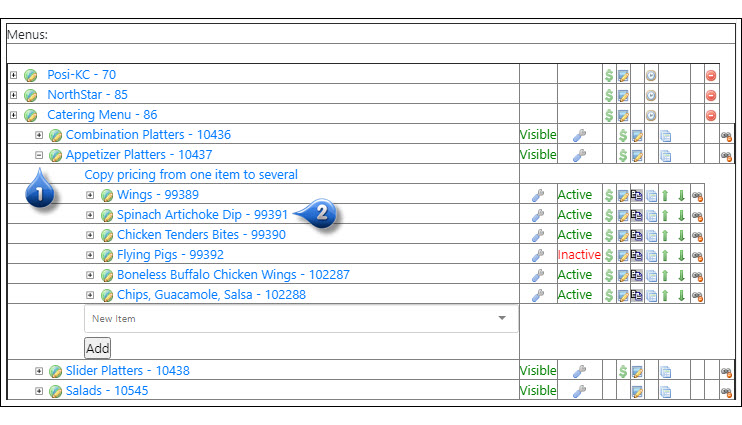
Add Item to Category
To assign an item to a category:
Drilldown to item level
In the Add Item box, search for the preferred item by Item name, NovaDine item ID, or External ID and select it from the dropdown
Click on the item to add it to the category

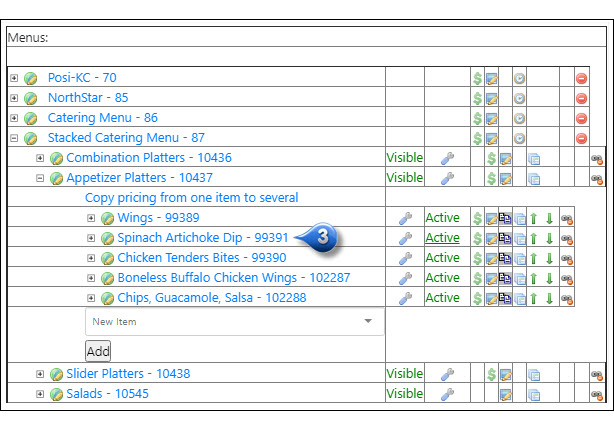
Change Item Display Order
To change the display order of items:
Drilldown to item level
Click and hold item that you wish to move
Drag and drop the item to the desired location
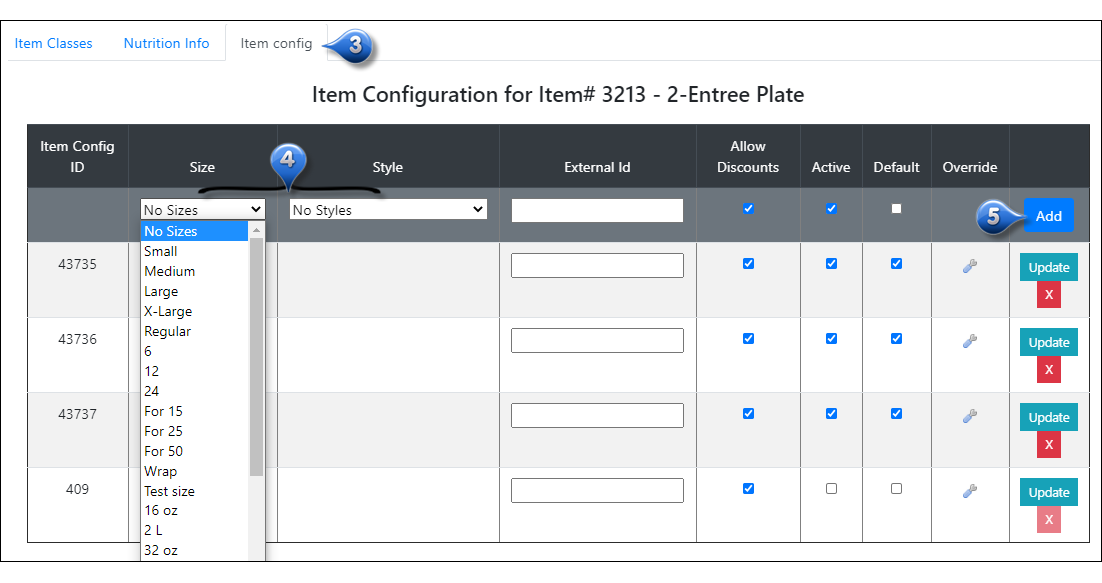
Item Sizes/Styles
To assign sizes and/or styles to particular items:
Drilldown to item level
Click on the item name
Select the Item Config sub-tab
Select the desired Size/Style from the corresponding dropdowns
Select Add to save the selected Size/Style as an item configuration
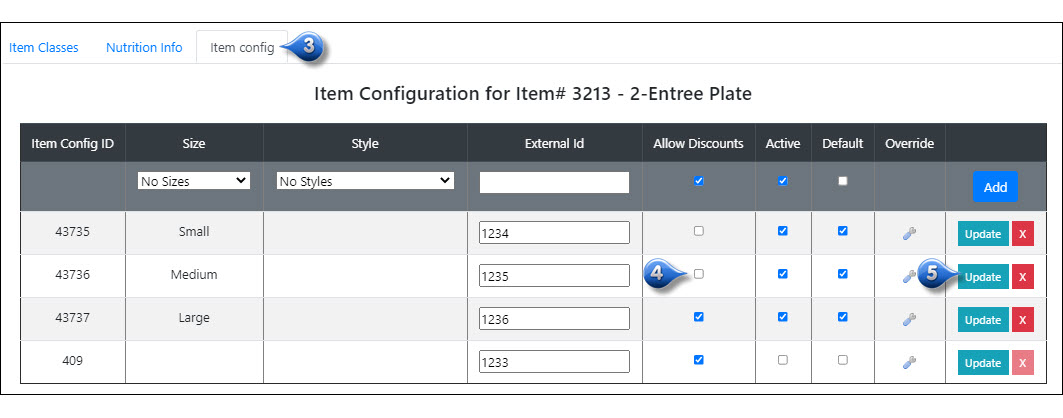
Item Configurations/POS IDs
Drilldown to item level
Click on the item name
Select the Item Config sub-tab to view the sizes and styles available for the selected item
Enter or edit the External/POS ID of the item/size/style combination. This must match the External ID of the item in the POS.
Activate or deactivate item configurations, as needed. Simply uncheck the box and select Update to de-activate, or check the box and select Update to activate.
To remove an item, select the
 next to the corresponding item configuration
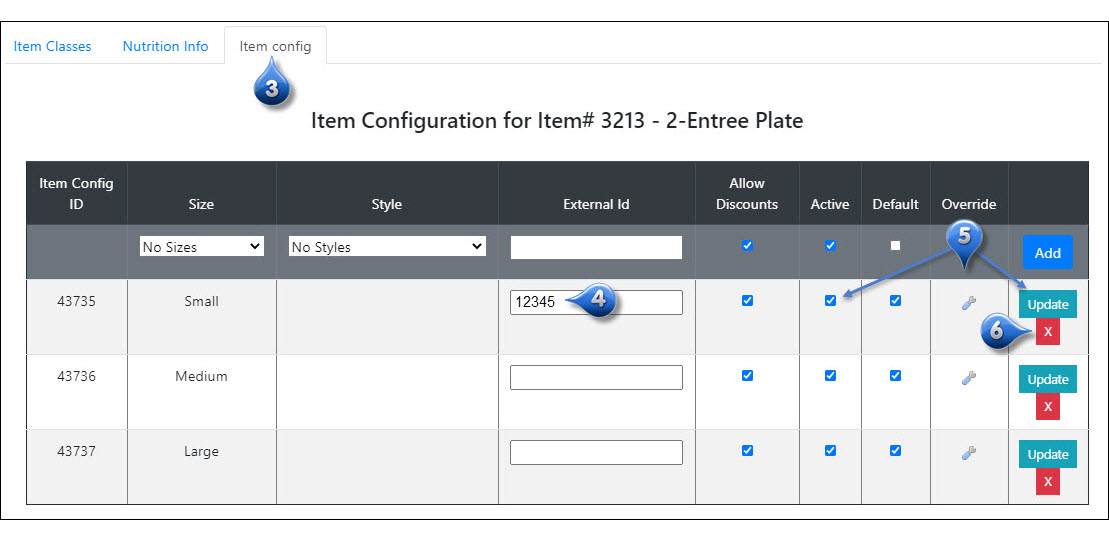
Exclude Specific Items from being Discounted with use of Coupons
There could be certain items, like combos, that you wish to exclude from all discounts/coupons. This is done through the item’s configuration.
Drilldown to item level
Click on the item name
Select the Item Config sub-tab - this is where you can see the sizes and styles in which this item is available and exclude from discounts, if applicable
To exclude an item from being discounted with the use of coupons, deselect the checkbox under Allow Discounts to the right of the corresponding item
Click Update
Item Overrides
Drilldown to item level
Click the
 next to the item that you wish to override
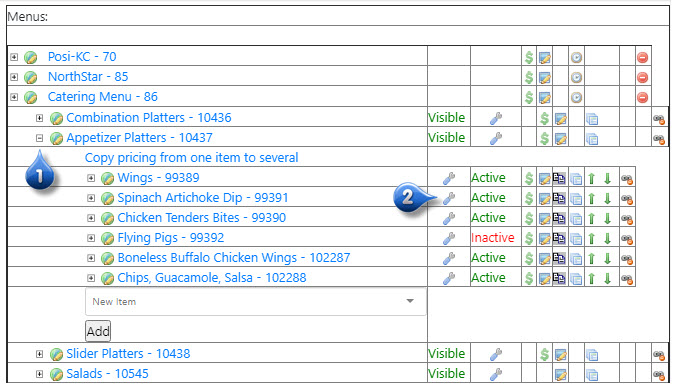
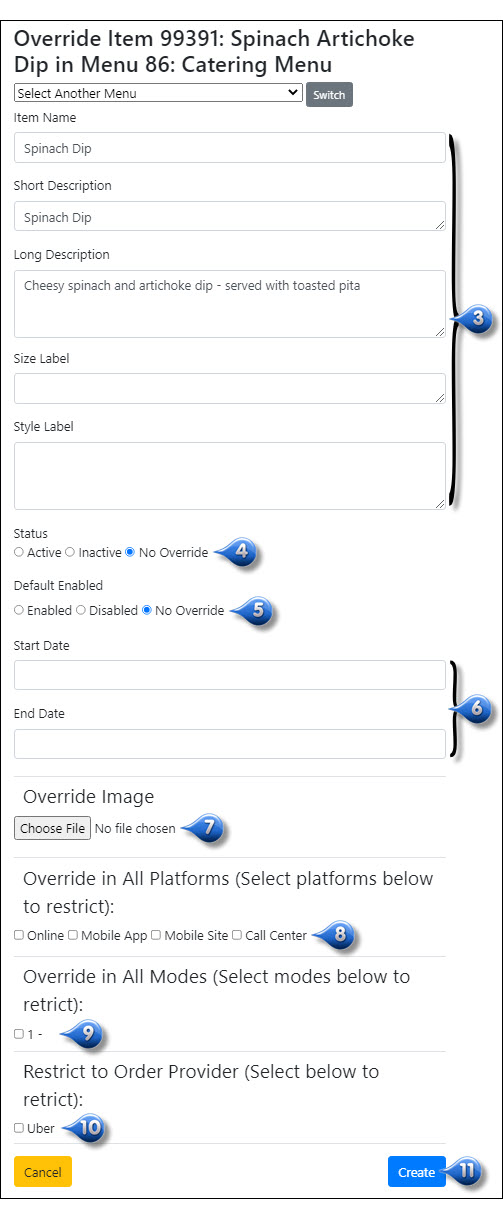
Enter override information
- Item Name: this is the new/alternate name of the item (e.g., Item is named ‘Brownie Sundae’ on Master Menu, but should be called ‘Brownie Sundae to-go’ on Postmates Menu). You can leave this blank if you are overriding the item to be hidden from an order provider
- Short Description: a brief description of the item (e.g., The ‘Brownie Sundae to-go’ might have an udpated description of ‘Brownie with ice cream on the side’ on Postmates Menu). You can leave this blank if you are overriding the item to be hidden from an order provider
- Long Description: a more detailed description of the item (e.g., The ‘Brownie Sundae to-go’ might have an udpated description of ‘Brownie with ice cream and hot fudge served in a separate container’ on Postmates Menu). You can leave this blank if you are overriding the item to be hidden from an order provider
- Size Label: an alternate name for the item’s ‘size’ (e.g., you may have an item that, instead of asking the customer to choose a ‘size’, you want to ask them to choose a ‘number of scoops’ that they want for thier sundae) If it’s not set, the default is ‘Size’
- Style Label: an alternate name for the item’s ‘style’ (e.g., you may offer a vegetable pizza where you want the customer to be able to choose what type of crust they want for their pizza. Instead of the ‘style’ label, you might want it to display ‘type of veggie crust’ for that one item) If it’s not set, the default is ‘Style’
- Select Status: if the item override should be Active, Inactive, or No Override
- Inactive: the item will not be available for store’s to use
- Active: the item will be available for store’s to use
- No Override: does not override this setting
- Select Default Enabled: if the item override should be Enabled, Disabled, or No Override by default
- Disabled: each individual location will have to go in and enable the item for their store use
- Enabled: each location will have item automatically enabled - they would have to go in and disable the item
- No Override: does not override this setting
- Enter a Start and/or End Date for the item, if applicable
- Select and upload image file to override the main image on either desktop or mobile
- Check the boxes next to each Platform in which this item override should appear (ex: check Call Center to only apply the override to the Call Center Platform)
- Check the boxes next to each Mode in which this item override should appear (leave all checkboxes blank to override item in all modes)
- Check the boxes next to the Order Provider that this override should apply to (e.g., check the box for GrubHub if you only want to apply the override to this particular item in the GrubHub menu)
- Click Save
Accessing Item Configuration Overrides
Drilldown to item level
Click on the item name
Select the Item Config sub-tab
Select the
icon next to the item configuration you wish to override
You can choose to override the item configuration for Prep Time, Additional Prep Time Minutes, Image, or Service Type Exclusions
Make any overrides needed and click Submit
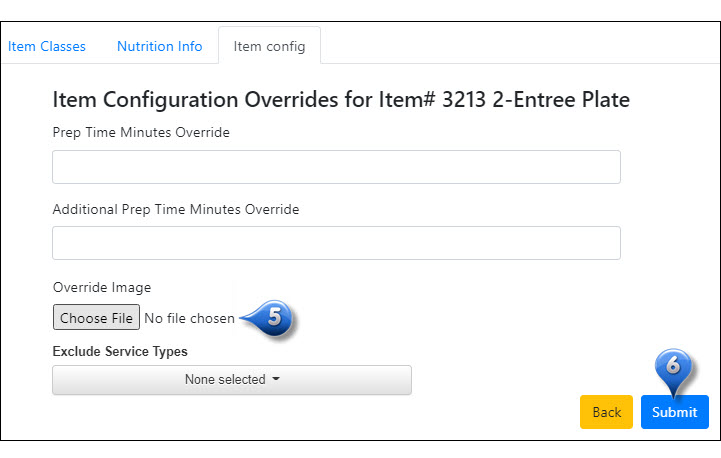
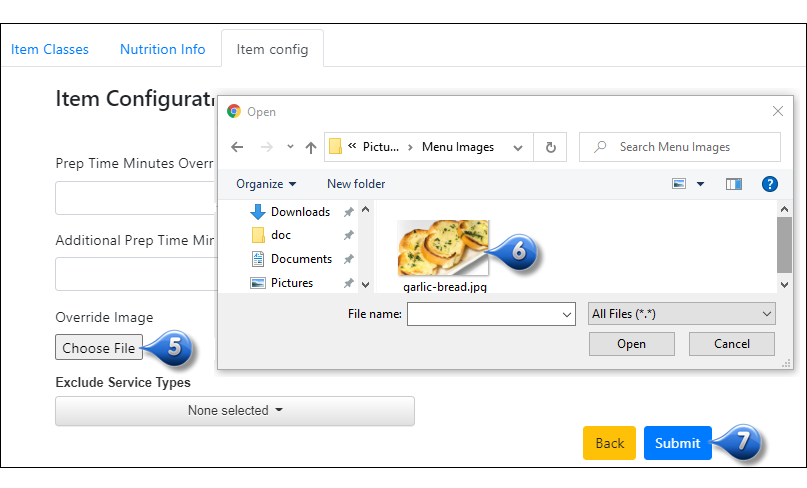
Override Images for Item Configurations
Drilldown to item level
Click on the item name
Select the Item Config sub-tab
Select the
icon next to the item configuration you wish to override
Select Choose File
Select the image you wish to upload
Select Submit
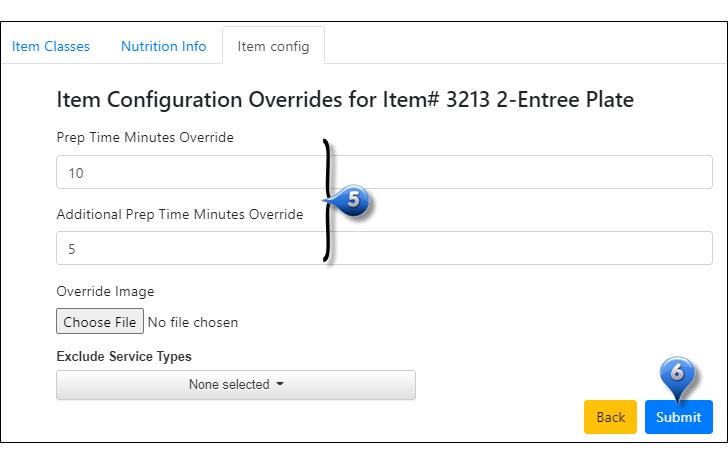
Override Prep Time for Item Configurations
Drilldown to item level
Click on the item name
Select the Item Config sub-tab
Select the
icon next to the item configuration you wish to override
Specify a number of minutes for Prep Time Minutes Override or Additional Prep Time Minutes Override, as needed.
Select Submit
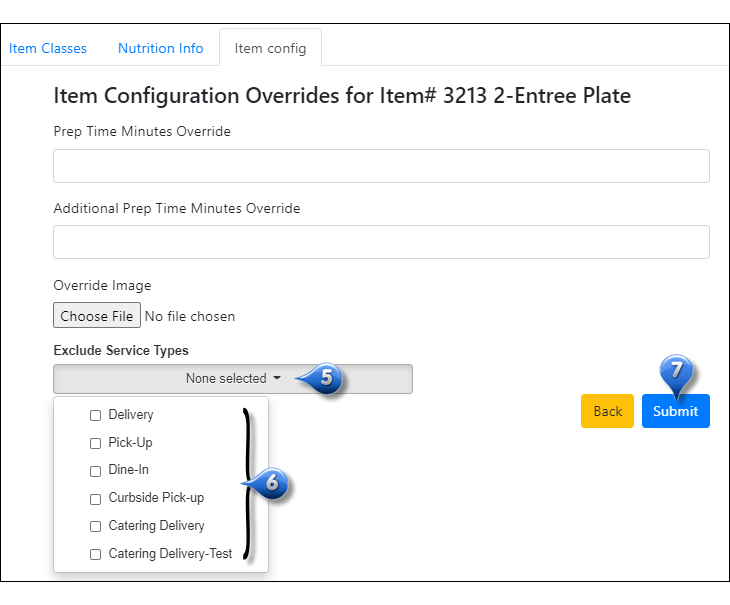
Override Service Type Exclusions for Item Configurations
Drilldown to item level
Click on the item name
Select the Item Config sub-tab
Select the
icon next to the item configuration you wish to override
Select the drop-down for Exclude Service Types
Select any service types that this item configuration should not be available for.
Select Submit
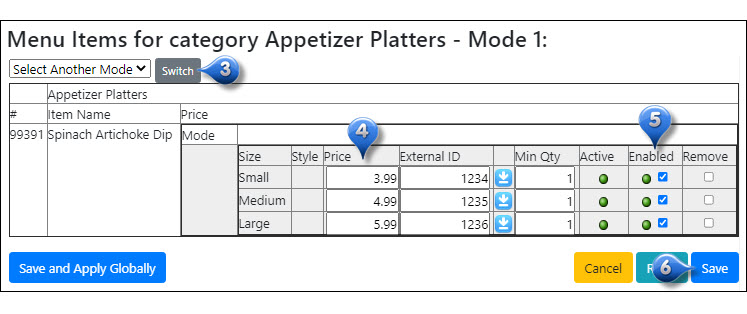
Item Pricing/Availability
To update item pricing and item availability:
Drilldown to item level
Click the
 to the right of the item that you wish to update
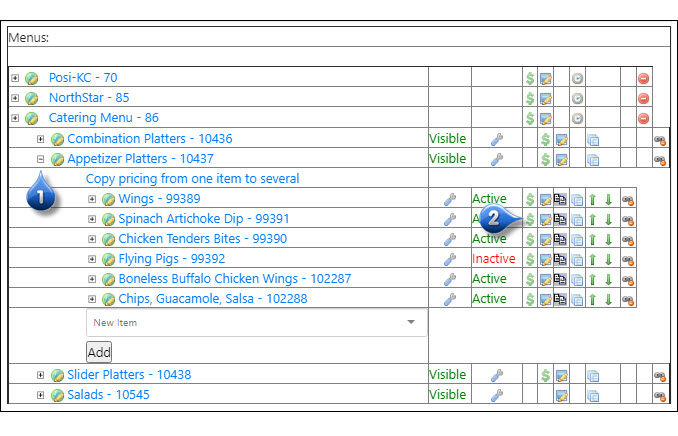
Select a specific mode from the dropdown and clicking Switch or choose All Modes to edit item information for all modes on one page
Update pricing for the item in the various modes
Edit item availability by checking the box next the
 button to disable the item (turning it red/disabled after saving), or clicking the
  button to enable the item (turning it green/enabled after saving)
Click Save
Activate/Deactivate an Item
To set an item status to Active or Inactive:
Drilldown to item level
Click the item name
Enable the radio button next to Active or Inactive
Click Save
Warning
Marking an item inactive will remove the item from all categories that it is assigned to. Changes made at the item level trump all other settings