Order Handling
Contents: This guide will show you how orders are handled via the Agent and/or your POS
Iris Order Handling Overview
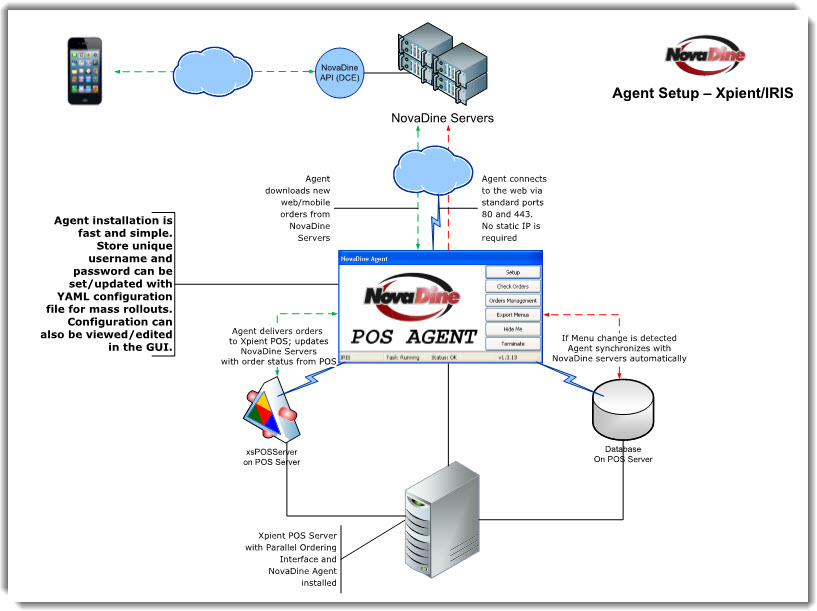
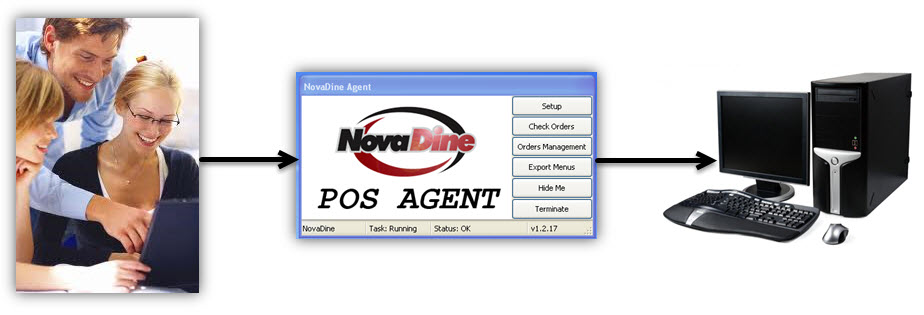
The customer will place an online order using the restaurant’s online ordering website. The NovaDine Agent will then automatically send the online order to the designated POS station, as shown below:
Guest Ordering Process
Customer starts an order by selecting a service type and order time
- Service types are set up by location and include prep and lead times
- The combined lead and prep time set for that service type determines the earliest available ready time for the customer to choose from
Customer orders items and selects checkout
- At checkout, the prep time will be checked again based on the size of the order and how long it takes the customer to reach checkout
- If the order ready time has been altered, the customer will have to accept the new ready time before continuing
Agent to POS
The NovaDine Agent checks for orders every 60 seconds using a unique username and pulls them down:
Once the Agent has an order, it will pass it to the IRIS Web Service to send to the designated POS station when the prep time has been met
Note
Prep time is set by service type, item total, or order value total
Viewing Online Orders
View Online Orders on IRIS
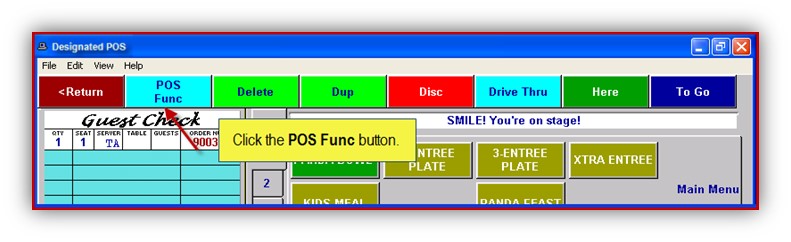
Click the POS Func button
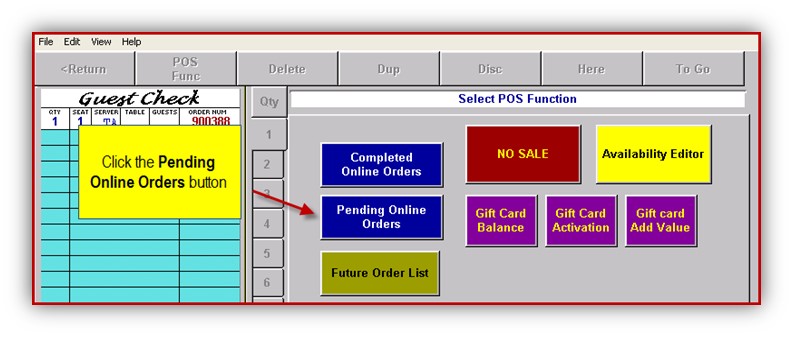
Click the Pending Online Orders button
View payment status
If you do not collect payments online or do not use the Xpient payment service, all incoming orders will be yellow until they are tendered in the store
If you do collect payment via your payment service but the card was declined or there was a mismatch with the credit card information, the order will be YELLOW to indicate that it is still UNPAID

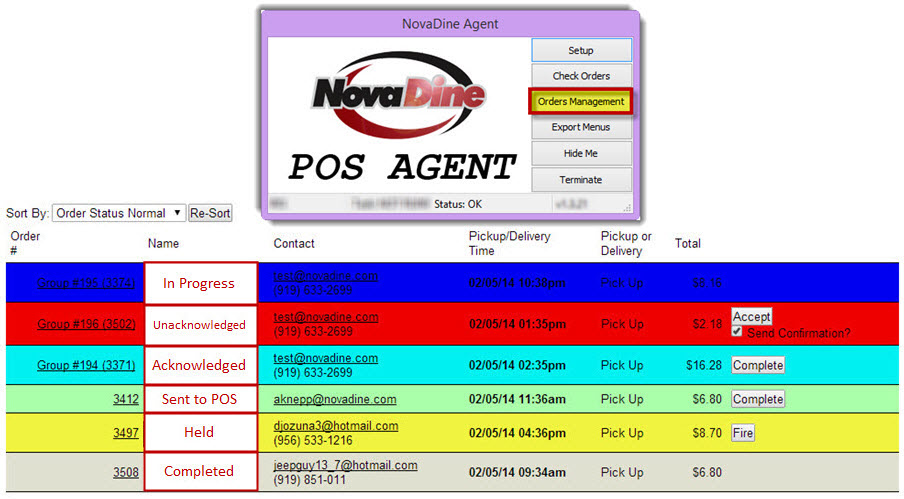
View Online Orders on the Agent
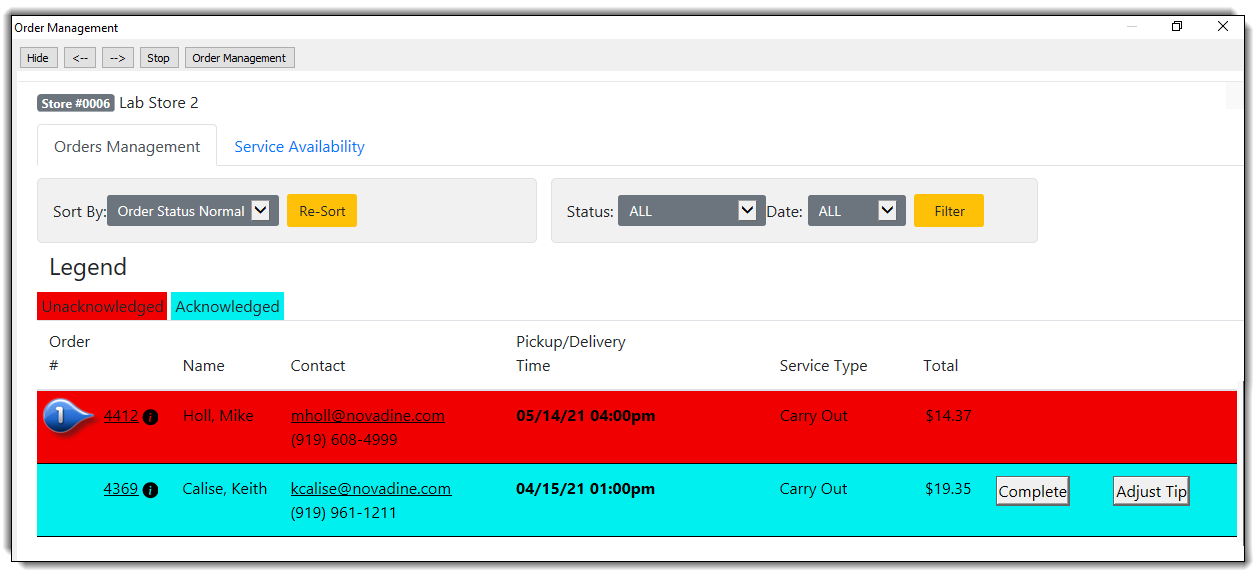
Orders are viewed on the Order Management Screen (OMS) of the Agent. Order status is shown by what color the order is displayed in as detailed below
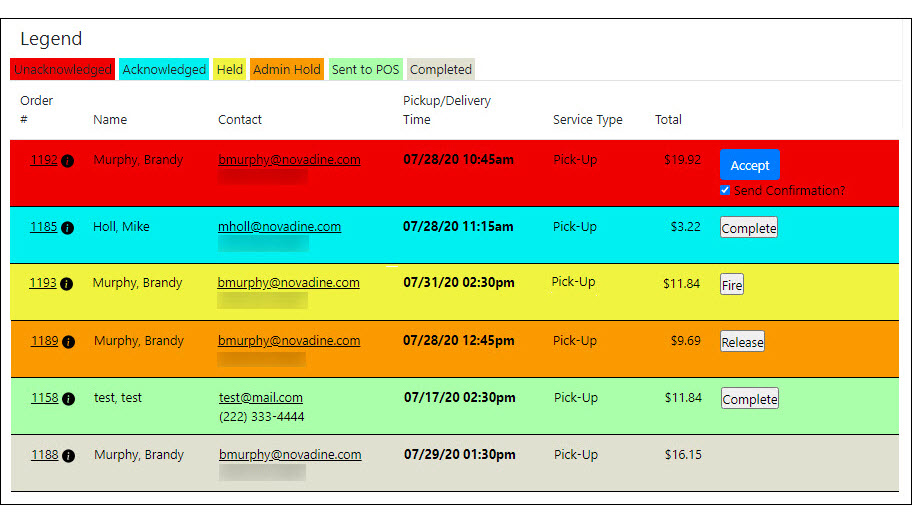
- Yellow: Held until prep time (future order)
- Green: Sent to POS
- Red: Paid, waiting for acknowledgement
- Teal: Paid, waiting to be filled
- Dark Blue: Paid, waiting for finalization
- Tan: Paid and filled (complete)
Warning
It is important that you do NOT accept or complete any online orders directly on the NovaDine Agent. The POS will accept and complete the order automatically. If you manually accept or complete an order, the order will NOT send to the POS. The only time you should ever accept or complete an order is if you do not want it to go to the POS for any reason or if instructed to do by a support representative.
Warning
It can take up to a full minute after clicking ‘Fire’ before the order actually goes to the POS. Users will need to click ‘Fire’ and then let it be. If they click ‘Complete’ right afterwards, that will stop the order from going to POS. When they click ‘Fire’, the order’s status is changed from ‘Held’ to ‘Ready to Send’. The Agent picks up the order on the next check in, which can take up to a minute from the time they click ‘Fire’.
Future Orders
The Agent includes the option to hold future orders which is recommended for reconciliation purposes:
- If future orders are for the same day, you have the option to hold the order or send to the POS immediately when the order is received
- Earliest send time is the next business day according to the “end of day” for reporting (This setting is found under the “Order Processing” tab in management)
If a customer places a future order and wishes to make a change, it is still possible to make changes to the order:
- If the order has already fired to the POS, the change will need to be made through the POS
- If the order is still being held by the Agent, the customer can update their order online
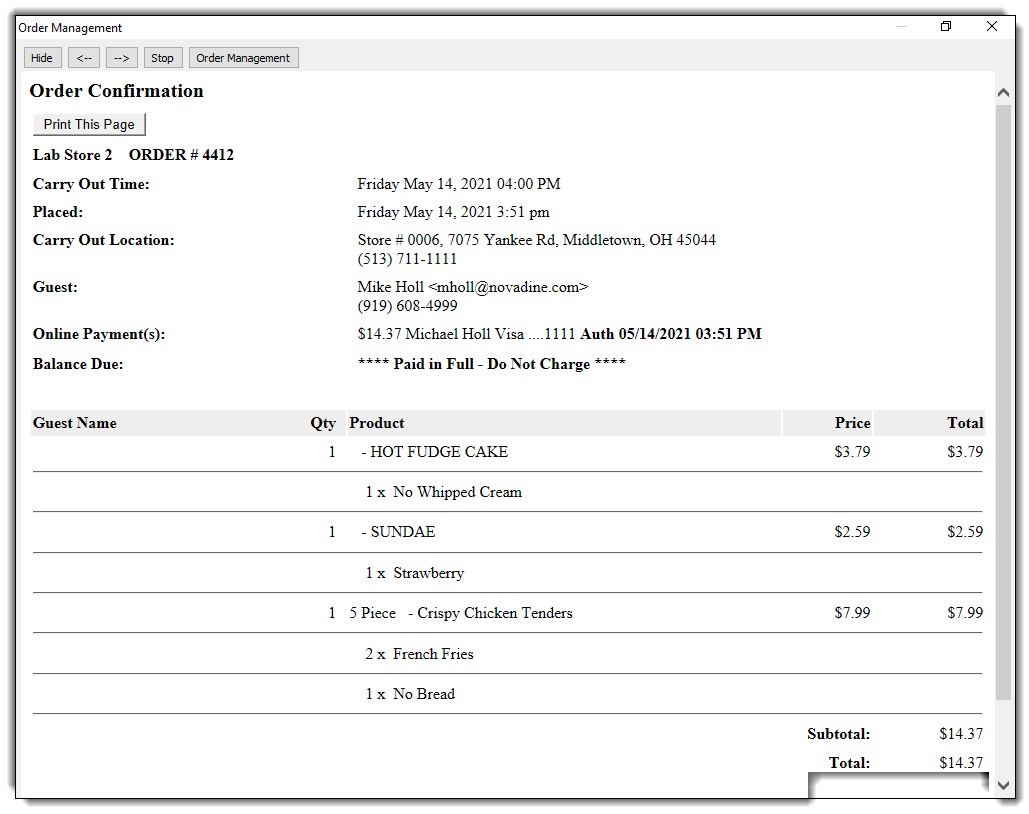
View Receipt and Order Details
You can easily view order details, customer details, payment information or print a receipt from the Agent
From the Order Management Screen in the Agent, click on the order number
Receipt populates showing the order details, customer details and payment information. You can print a copy of the receipt from this page
Order Escalation
As a POS location, your orders will be sent from the NovaDine Agent directly to the POS. Once it hits the POS, it will automatically be accepted by the NovaDine Agent
There are certain circumstances which may prevent the order from going to the POS. Some of the most common ones are listed below:
- The NovaDine Agent is not responding, is IDLE, or has stopped checking in
- The xsPOSServer is down
- Error from IRIS submitting order: Item not found
Note
A technician will make 3 attempts to contact your location to ensure that you receive and process the order. If NovaDine is unable to make contact, the order will be kept in an investigative state. NovaDine will follow up with the Technical Contact for your restaurant chain to alert them of the order and of a possible issue with the NovaDine Agent at that location
To help ensure orders are accepted by the location, our system offers several additional notification features:
Preventing Order Escalations
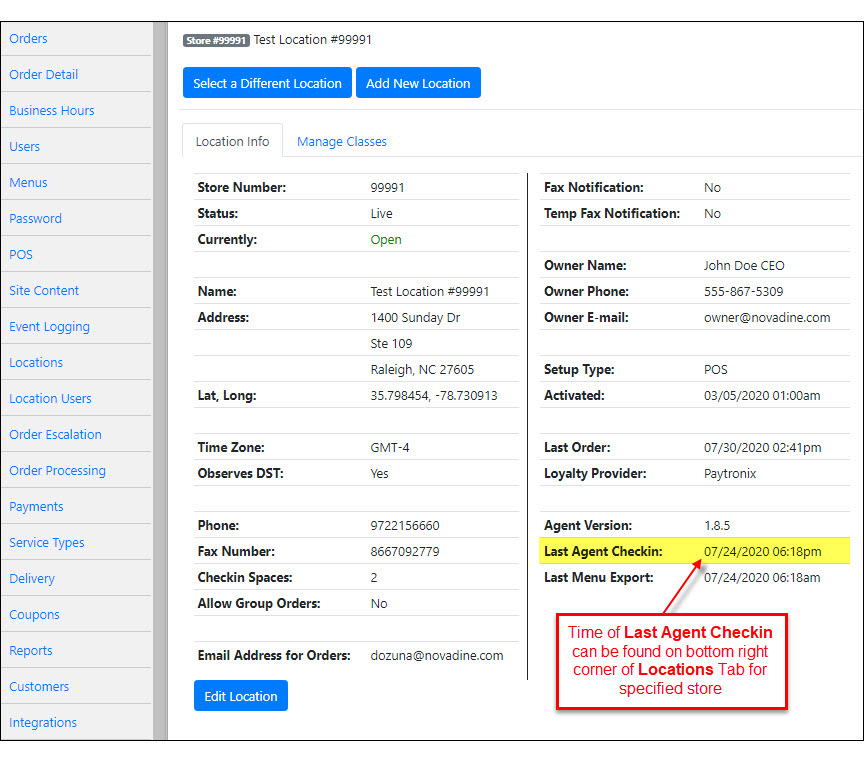
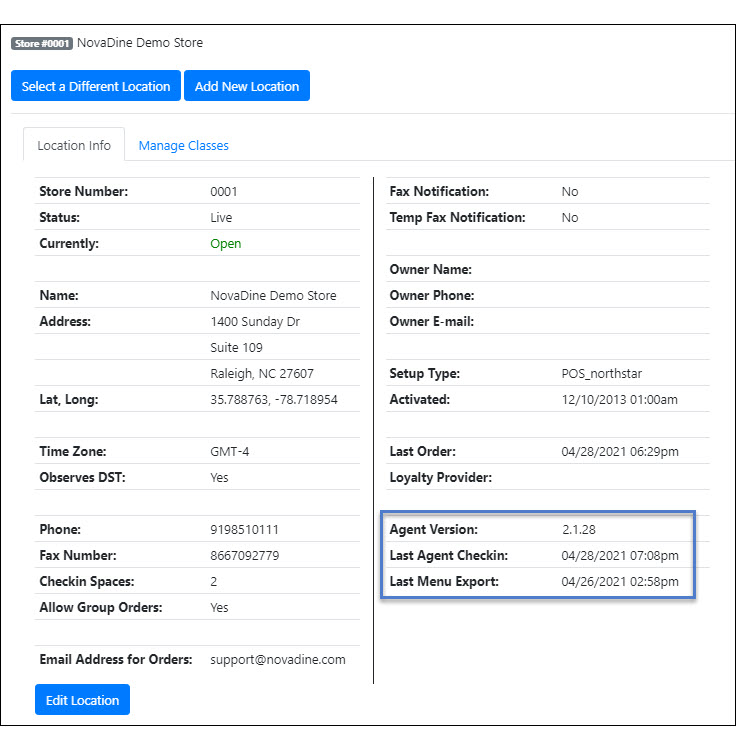
It is important to be sure that the NovaDine Agent and that the agent is checking in. The agent will check in every minute and the check-ins will update in real time on the website every minute. If the agent does not have a current check-in you will need to restart the agent to ensure proper functionality. The agent version and last agent check-in can be found under the Locations tab on the website.
Terminating the Agent
To Terminate the agent, follow the instructions below:
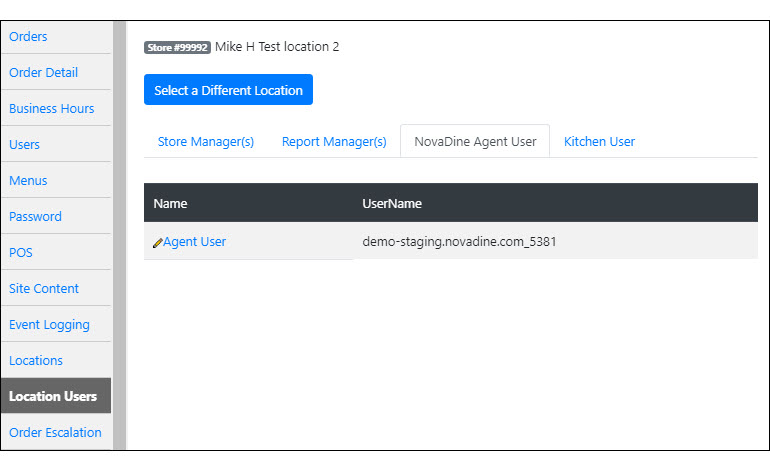
Log into backend management of your online ordering site to retrieve the agent username and password. This can be found under the NovaDine Agent User sub-tab of the Location Users tab by clicking on the pencil icon next to Agent User
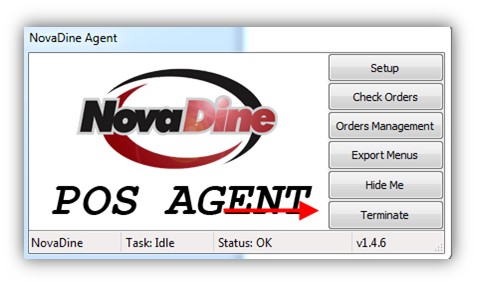
Click Terminate on the agent
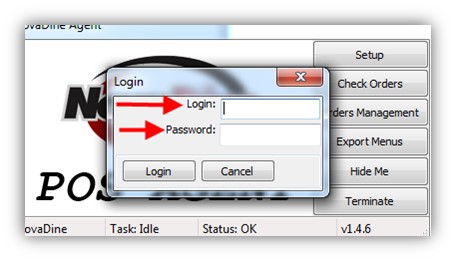
Enter in the username and password found in step 1
Select Login to terminate
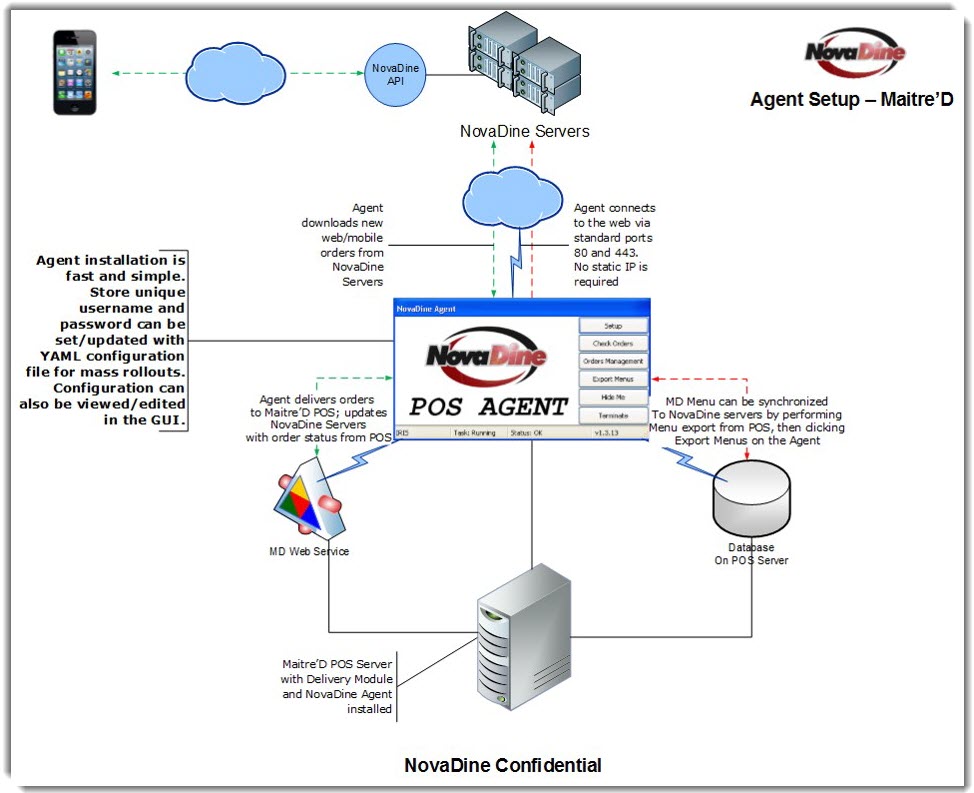
Maitre’D Order Handling Overview
The customer will place an online order using the restaurant’s online ordering website. The NovaDine Agent will then automatically send the online Order to the designated POS station as detailed below:
Guest Ordering Process
Customer starts an order by selecting a service type and order time
- Service types are set up by location and include prep and lead times
- The combined lead and prep time set for that service type determines the earliest available ready time for the customer to choose from
Customer orders items and selects checkout
- At checkout, the prep time will be checked again based on the size of the order and how long it takes the customer to reach checkout
- If the order ready time has been altered, the customer will have to accept the new ready time before continuing
Agent to POS
The NovaDine Agent checks for orders every 60 seconds using a unique username and pulls them down:
Once the Agent has an order, it will pass it to the Maitre’D Web Service to send to the designated POS station when the prep time has been met
Note
Prep time is set by service type, item total, or order value total
Viewing Online Orders on Maitre’D
To view online orders in Maitre’D:
- Enter employee code and password, if required
- Select appropriate Function key (Pick-up or Delivery)
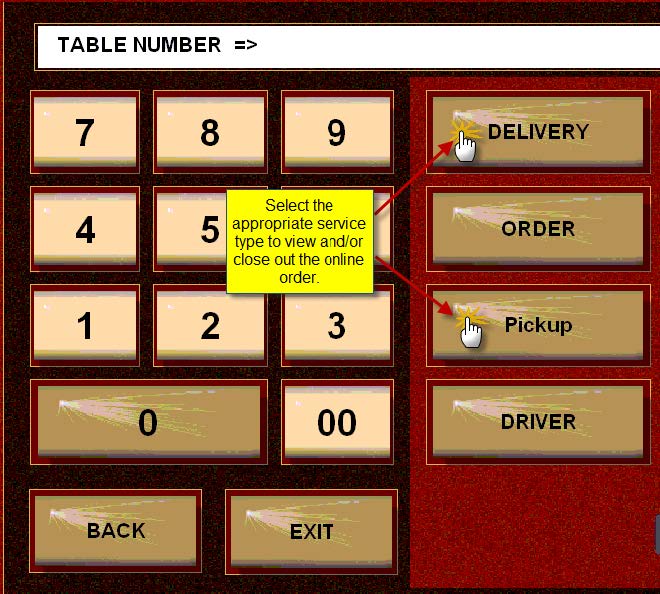
- Touch “MORE” until the order is found, then click on the order to open
- Touch “EXIT” to return to the main Maitre’D screen
Viewing Online Orders on the Agent
Orders are viewed on the Order Management Screen (OMS) of the Agent. Order status is shown by what color the order is displayed in as detailed below
- Yellow: Held until prep time (future order)
- Green: Sent to POS
- Red: Paid, waiting for acknowledgement
- Teal: Paid, waiting to be filled
- Dark Blue: Paid, waiting for finalization
- Tan: Paid and filled (complete)
Warning
It is important that you do NOT accept or complete any online orders directly on the NovaDine Agent. The POS will accept and complete the order automatically. If you manually accept or complete an order, the order will NOT send to the POS. The only time you should ever accept or complete an order is if you do not want it to go to the POS for any reason or if instructed to do by a support representative.
Warning
It can take up to a full minute after clicking ‘Fire’ before the order actually goes to the POS. Users will need to click ‘Fire’ and then let it be. If they click ‘Complete’, the order will not be sent to POS. When they click ‘Fire’, the order’s status is changed from ‘Held’ to ‘Ready to Send’. The Agent picks up the order on the next check in, which can take up to a minute from the time they click ‘Fire’.
Future Orders
The Agent includes the option to hold future orders which is recommended for reconciliation purposes:
- If future orders are for the same day, you have the option to hold the order or send to the POS immediately when the order is received
- Earliest send time is the next business day according to the “end of day” for reporting (This setting is found under the “Order Processing” tab in management)
If a customer places a future order and wishes to make a change, it is still possible to make changes to the order:
- If the order has already fired to the POS, the change will need to be made through the POS
- If the order is still being held by the Agent, the customer can update their order online
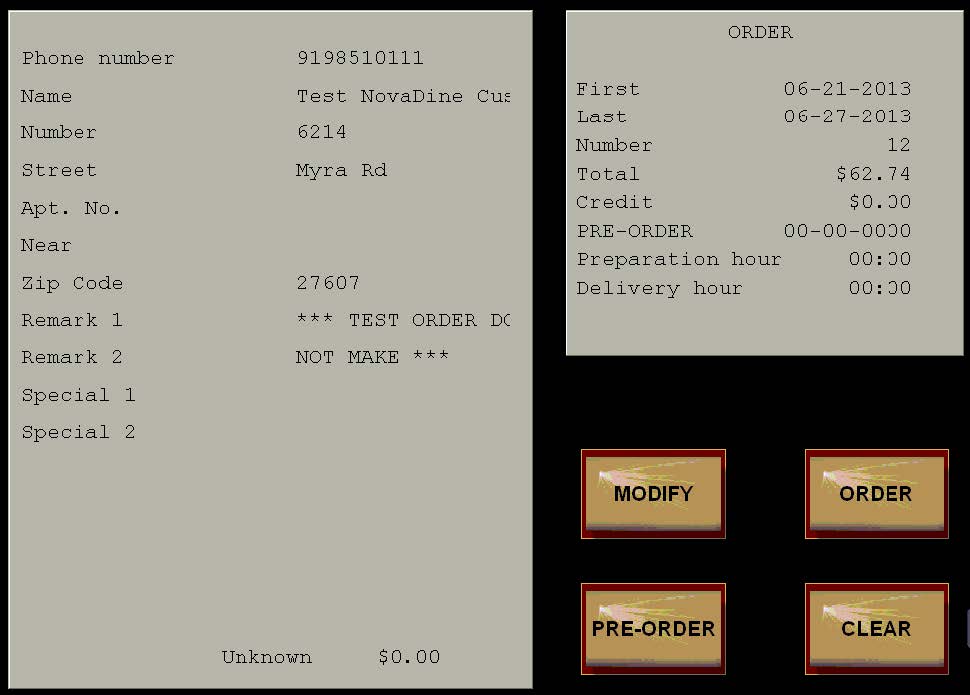
View Receipt and Order Details
You can easily view order details, customer details, payment information or print a receipt from the Agent
From the Order Management Screen in the Agent, click on the order number
Receipt populates showing the order details, customer details and payment information. You can print a copy of the receipt from this page
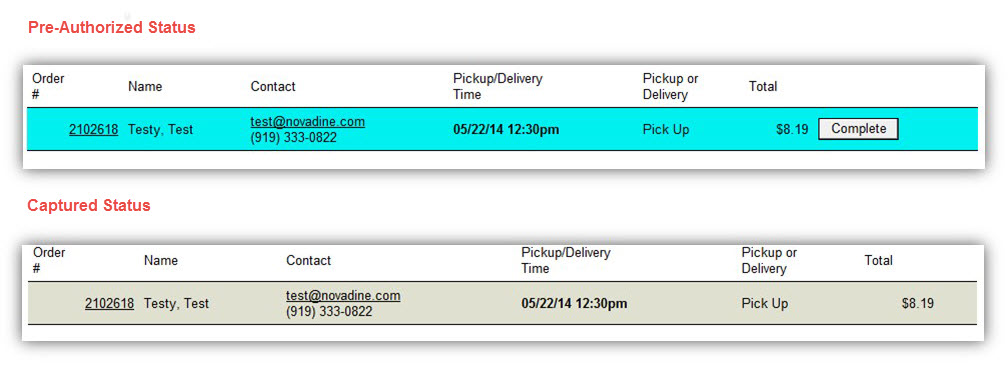
Payments
- When a customer orders online, they will typically have the option to pay with a credit card or cash upon pick up/delivery (based on location settings)
- When the customer places their order using a credit card, the card is pre-authorized until the order is complete
- Upon completion of the order in the POS, the credit card payment is captured
Updating Items Pricing/Availability
Maitre’D does not auto-export menus. This will have to be done manually when changes are made
- This includes pricing, adding new items, etc
Updates ARE performed automatically for item availability and does not require a manual export
Order Escalation
As a POS location, your orders will be sent from the NovaDine Agent directly to the POS. Once it hits the POS, it will automatically be accepted by the NovaDine Agent
Note
A technician will make 3 attempts to contact your location to ensure that you receive and process the order. If NovaDine is unable to make contact, the order will be kept in an investigative state. NovaDine will follow up with the Technical Contact for your restaurant chain to alert them of the order and of a possible issue with the NovaDine Agent at that location
To help ensure orders are accepted by the location, our system offers several additional notification features:
Preventing Order Escalations
It is important to be sure that the NovaDine Agent and that the agent is checking in. The agent will check in every minute and the check-ins will update in real time on the website every minute. If the agent does not have a current check-in you will need to restart the agent to ensure proper functionality. The agent version and last agent check-in can be found under the Locations tab on the website.
Note
The Agent section of the Locations Tab shows data collected from the NovaDine Agent. The Agent Version this location is running will be shown here, along with the Last Agent Checkin, which is in real time. Also displayed is the date of the Last Menu Export, which is updated automatically when an export is done. You can utilize this to know whether or not the most up to date menu has been exported. Please note that a menu should export every morning at a minimum. If it hasn’t, there is an issue that should be escalated.
Terminating the Agent
To Terminate the agent, follow the instructions below:
Log into the online ordering site to retrieve the agent username and password. This can be found under the Location Users tab by clicking on the pencil next to NovaDine Agent
Click “Terminate” on the agent
Enter in the username and password
Select “Login” to terminate
Non-POS Order Handling Overview
The customer will place an online order using the restaurant’s online ordering website. The NovaDine Agent receives the order and will automatically send it to the designated PC at the location
Note
An online order should be treated like a regular order taken in store
Computer Setup Requirements
Please adhere to the following requirements:
- High speed internet: High speed internet is necessary for online ordering so that orders are delivered to your store quickly
- A monitor and PC: The NovaDine software will be uploaded onto an computer in the front of the restaurant so that orders are downloaded and your employees are notified
- Printer, mouse, and speakers: These items are required so that you can interact with the NovaDine Agent software. The speakers need to be set to the highest volume so that your employees can hear the audio alert when a new order arrives on the Agent. A printer with sufficient ink and paper is also required, as new orders are automatically printed out upon receipt.
- Windows XP or higher: Our software operates best on Windows XP and higher versions of Windows operating systems
- Fax machine: Used as a backup method of receiving orders in the event your internet or computer is not working properly. You must have paper, ink, and toner for this as well
Guest Ordering Process
Customer starts an order by selecting a service type and order time
- Service types are set up by location and include prep and lead times
- The combined lead and prep time set for that service type determines the earliest available ready time for the customer to choose from
Customer orders items and selects checkout
- At checkout, the prep time will be checked again based on the size of the order and how long it takes the customer to reach checkout
- If the order ready time has been altered, the customer will have to accept the new ready time before continuing
NovaDine Agent to Computer
The NovaDine Agent is the software used to manage online orders received. This will be installed by a NovaDine Technician via remote access prior to activation
The NovaDine Agent checks for orders every 60 seconds using a unique username and pulls them down
Once the Agent has an order it will send it to the designated PC at the location when the prep time has been met
- Prep time is set by service type, item total, or order value total
Receiving Orders
When the online order is handed off to the ND Agent, an alert will pop up indicating there is a new order along with the chime of a cymbal

The Order Management screen will open up and the order will appear RED. A copy of the receipt will automatically print to the designated printer and you will hear a sound resembling a telephone ring
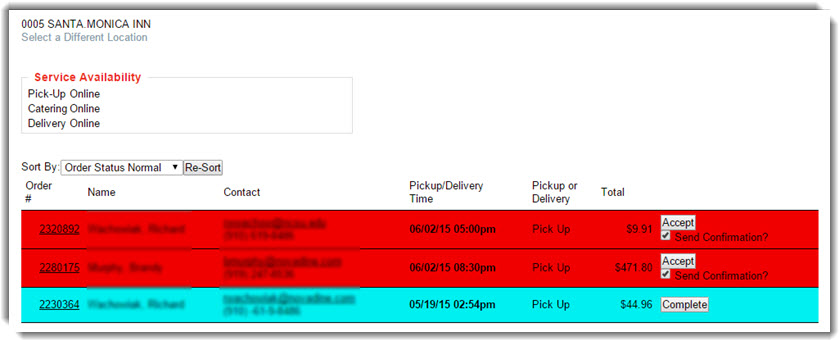
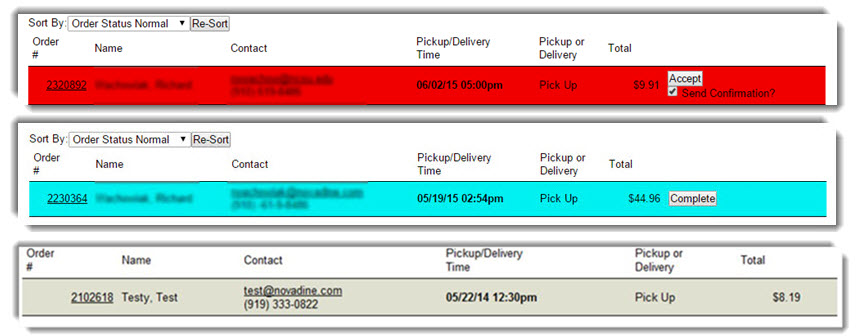
Accepting and Completing Orders
- Click the “Accept” button to acknowledge the order. You can elect to send the customer a confirmation email stating that the location has received their online order by checking the box “Send confirmation” prior to accepting the order
- After accepting the order the status color will change to TEAL, this indicates the order is currently in progress
- Click “Complete” when the order has been picked up. This final process will also capture the credit card pre-authorization
- After completing the order, the status color will change to GRAY
The various stages are shown below:
Future Orders
The Agent includes the option to hold future orders which is recommended for reconciliation purposes
- If future orders are for the same day, you have the option to hold the order or send to the POS immediately when the order is received.
- Earliest send time is the next business day according to the “end of day” for reporting (This setting is found under the “Order Processing” tab in management)
If a customer places a future order and wishes to make a change, it is still possible to make changes to the order
- If the order has already fired to the POS, the change will need to be made through the POS
- If the order is still being held by the Agent, the customer can update their order online
Viewing Online Orders
View Online Orders in the Agent
Orders are viewed on the Order Management Screen (OMS) of the Agent. Order status is shown by what color the order is displayed in as detailed below:
View Receipt and Order Details
You can easily view order details, customer details, payment information or print a receipt from the Agent
From the Order Management Screen in the Agent, click on the order number
Receipt populates showing the order details, customer details and payment information. You can print a copy of the receipt from this page
Credit Card Processing
When a customer orders online, they will typically have the option to pay with a credit card or cash upon pick up/delivery (based on location settings)
When the customer places their order using a credit card, the card is pre-authorized until the order is complete
Upon completion of the order in the POS, the credit card payment is captured
Place a Test Order
When you want to run transactions in test mode:
- Login to your site as the below user:
- Username: test@novadine.com
- Password: test
Select the location for the test order
Add items to your cart and proceed to checkout as a customer would
When you get to the checkout screen, you will need to use a test credit card number, which your online merchant provider should supply. No matter what the number, always enter CVV code of 123
Note
When logged in as the test user, our system will automatically run the transactions in test mode. It will also automatically insert a comment on the order instructing the location not to make the food.
Order Escalation
Order Escalation Procedure
- After a customer places an order it will be sent to your store via the NovaDine Agent installed on your designated PC. You will need to accept the order on the agent
- If an order is not accepted within 4 minutes on the NovaDine Agent, the order will be escalated by support personnel and automatically faxed. Once escalated, support personnel will call the location to make sure your store receives the order and try determine the issue with the NovaDine Agent
Note
A technician will make 3 attempts to contact the location to ensure that they receive and process the order. If NovaDine is unable to make contact, we will mark the order status to “investigation” which prevents the customer from being charged. The online service will be disabled for the rest of the day and will reactivate the following morning. NovaDine will make every attempt to follow up with the location the next day.The order can be charged once we have confirmed the order was fulfilled.
To help ensure orders are accepted by the location, our system offers several additional notification features:
| Note: | Important things to remember to avoid escalations:
|
|---|