Master Menu
Contents: This guide will show you how to access the Master Menu, where you have the ability to manage modes, menu items, options, prices and item descriptions.
Menu Overview
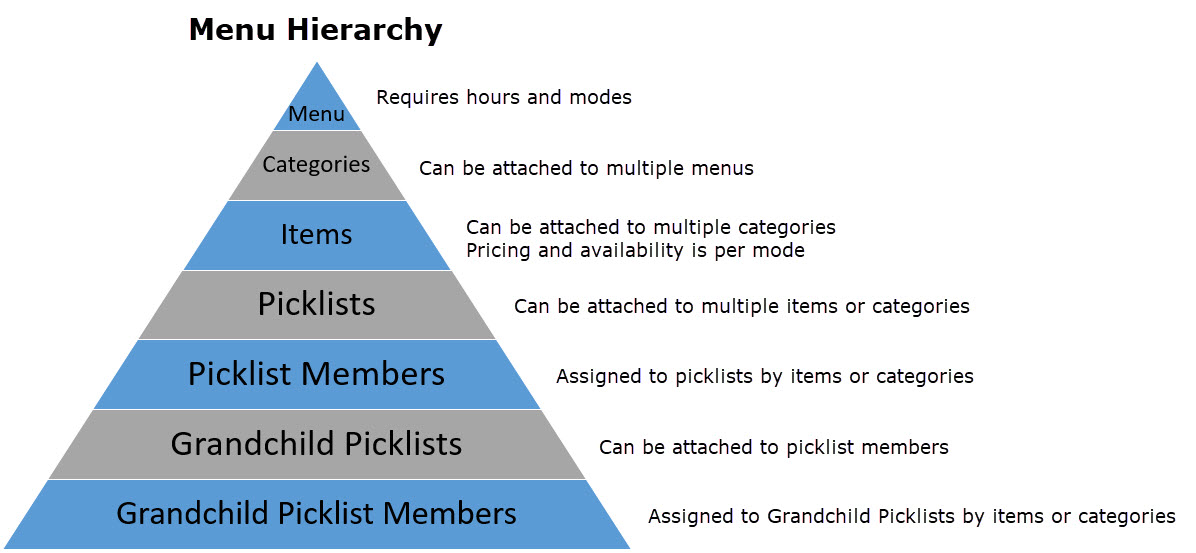
A vital part of the online ordering experience is the menu. All menu items, options, prices, and item descriptions should be up to date and customer friendly. Each menu consists of seven parts:
- Categories
- Subcategories
- Items
- Picklists
- Picklist Members
- Grandchild Picklists
- Grandchild Picklist Members
This documentation will guide you through the process of creating and editing all aspects of your menu
Note
Backend Management is not supported in Internet Explorer. Chrome or FireFox must be used
Accessing Global Menus
To access the menu for a specific location:
Click the
 icon in the top right corner of your site
Login with your management account credentials
Click the
 icon in the top right corner that displays after successful login, which will open your Backend Management site in a new tab
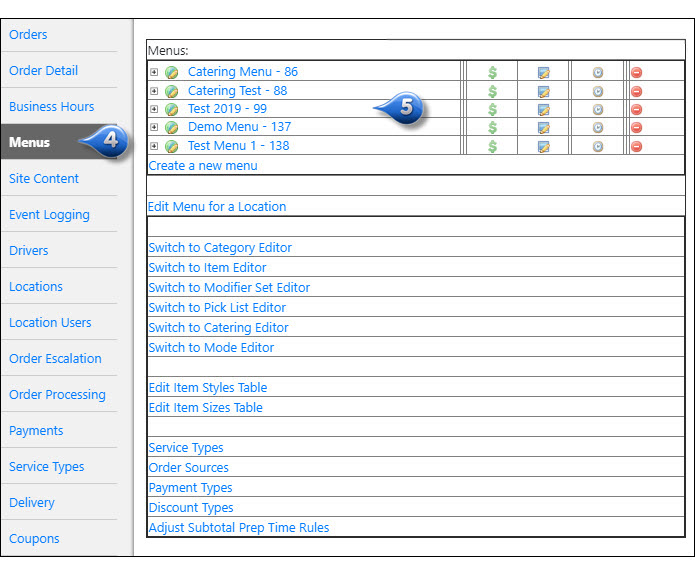
On the newly opened Management Tab, click on the Menus Tab
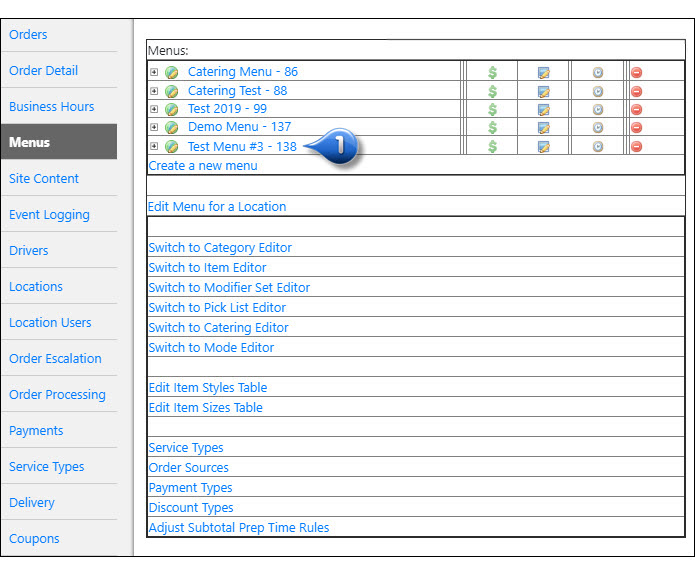
This is the Dashboard for your menu management
Menus
Create a Menu
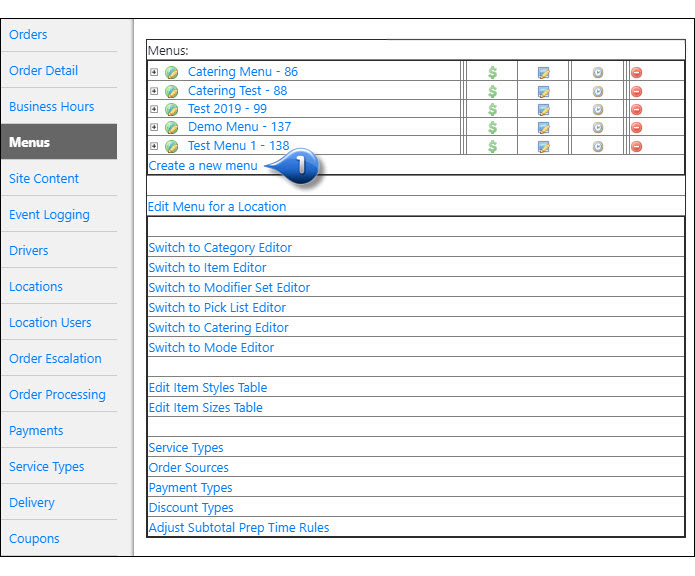
To create a new menu:
From the Menus Tab, click the Create a new menu link
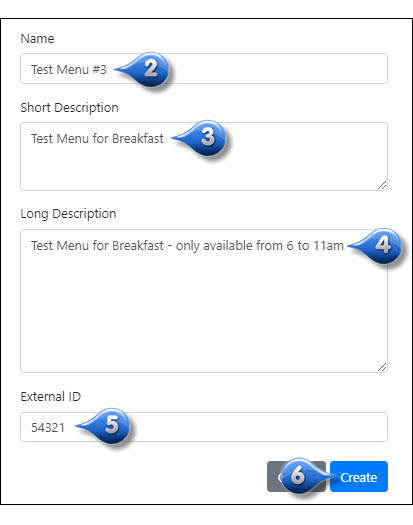
Enter a Name for the new menu
Enter a Short Description for the menu (Optional)
Enter a Long Description for the menu (Optional)
Enter the External ID of the menu from the POS, if required (For POS Integrated locations only)
Click Create
Note
See Categories/Subcategories and Items for instructions to add categories and items to the new menu
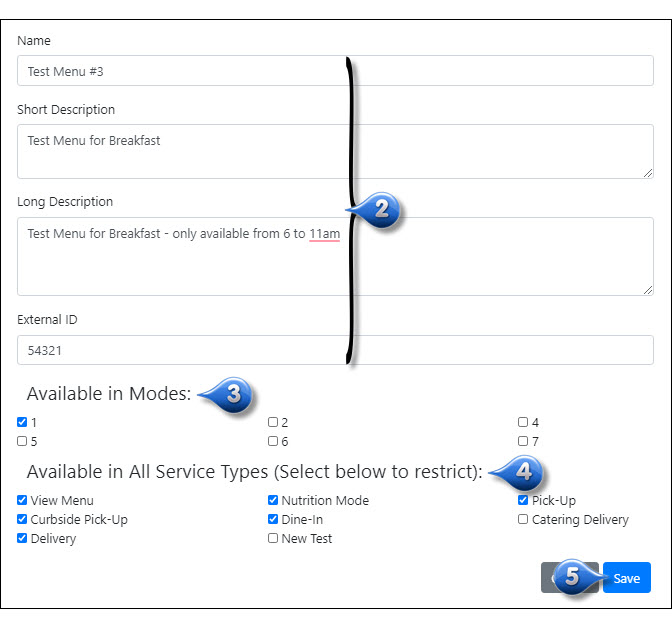
Edit Menu Description and Availability
To edit the Menu Description and Availability of an existing menu:
From the Menus Tab, click on the name of the menu that you wish to edit
Edit name, descriptions, and External ID, as needed
Check the boxes next to the modes in which this Menu should be available
Check the boxes next to the Service Types in which this Menu should be available (default is Available in All Service Types - all boxes unchecked)
Click Save
Edit Global Menu Hours
To update the hours for a global menu:
From the Menus Tab, click the
 to the right of the menu name that you wish to edit hours for
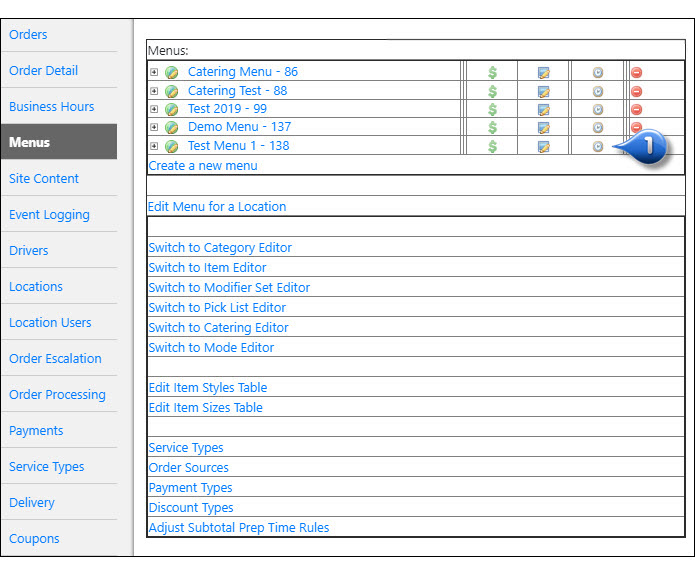
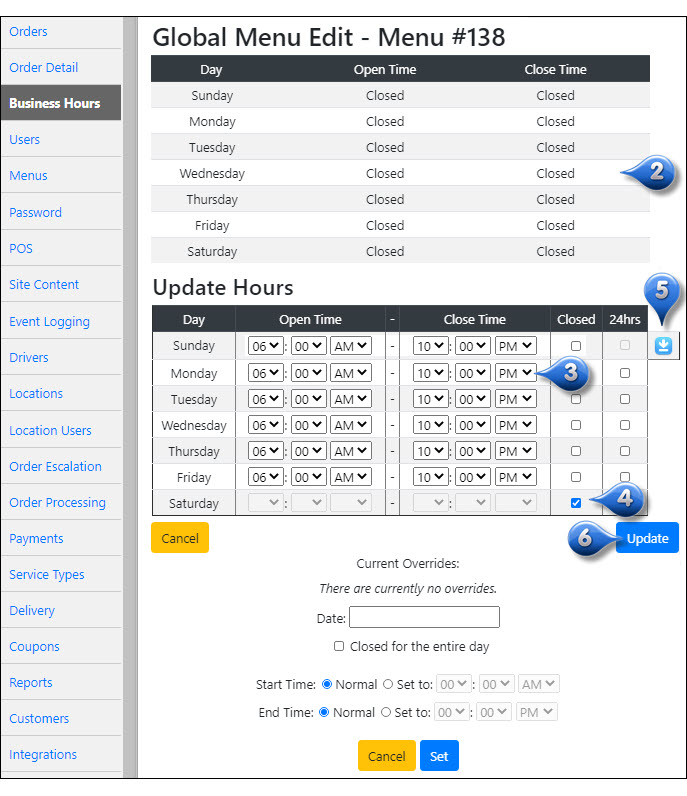
You will see the current menu hours listed in the top section
Update the menu hours for each day of the week by choosing the open and close time from the appropriate drop downs
If the menu will be unavailable on certain days, check the Closed box next to appropriate day
If the menu will have the same hours for each day, simply enter the hours in the first row and click the blue down arrow to copy the hours to the below days
Click Update to save your changes
Edit Menu Hours for a Specific Date
To update hours a specific date, a holiday, for example, please follow the below steps:
From the Menus Tab, click the
to the right of the menu name that you wish to edit hours for
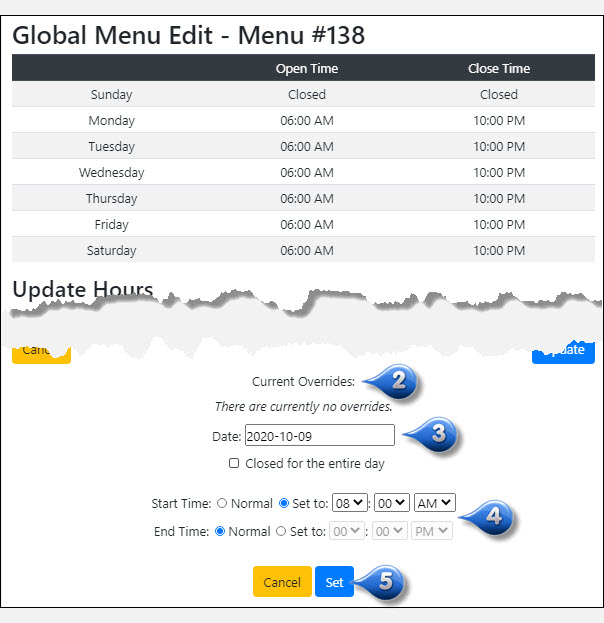
Under the Current Overrides section, you have the option to temporarily change your menu’s opening and/or closing hours for a specific date
Choose the date from the Calendar dropdown in the Date field
Choose the radio button next to Start Time and choose Set to to change your opening time and/or End Time to change your menu hours
Click Set
If you wish to edit hours for more than one day, repeat the above process for each day that the menu hours will differ
Close Menu for a Specific Date
To close a menu for a specific day:
From the Menus Tab, click the
to the right of the menu name that you wish to edit hours for
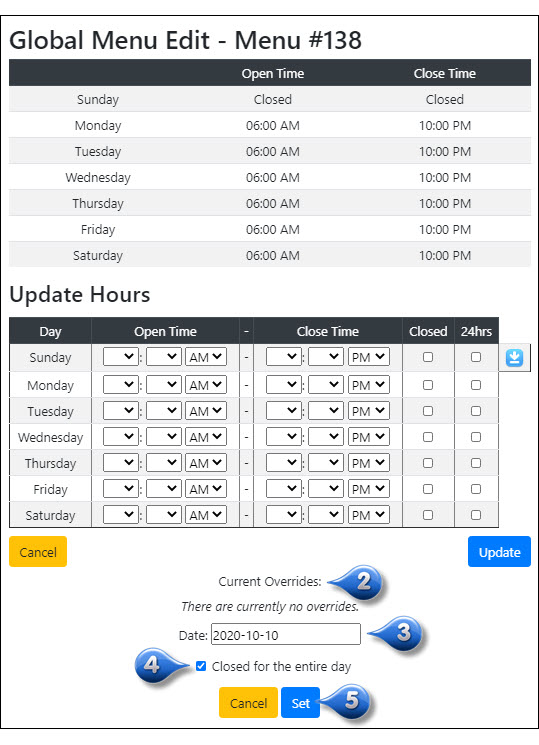
Under the Current Overrides section, you have the option to close your menu for a specific date
Choose the date from the Calendar dropdown in the Date field for which your stores will be closed
Check the Closed for the entire day box
Click Set
Repeat the above steps for each date that your menu will be closed
Modes
Modes are used to create unique versions of a menu that allow you to assign different pricing, overrides, external IDs, and availability to items at a specific number of stores
Create a Mode
To create a new Mode:
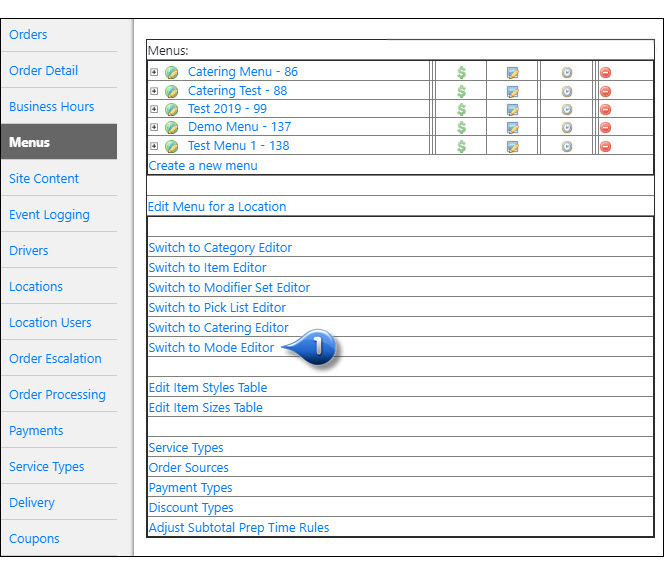
From the Menus Tab, click Switch to Mode Editor
Click Create a New Mode
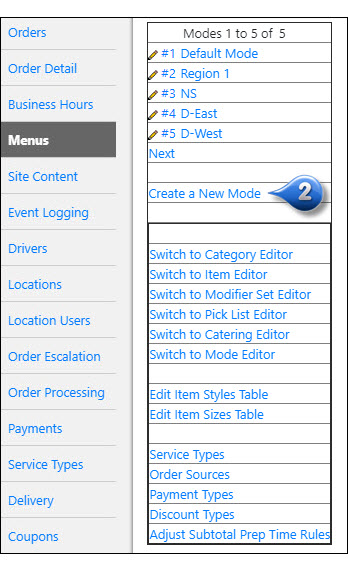
Enter an ID # to identify the mode (leave blank to Auto Number)
Enter a Name for the Mode
Enter a Nutrition Mode, if applicable
Click Create

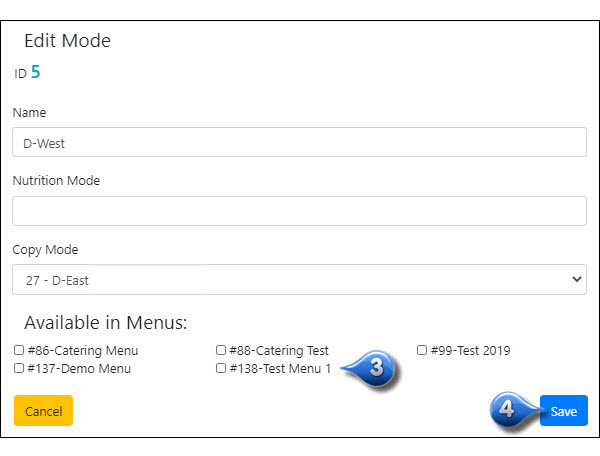
Assign a Mode to a Menu
To assign a Mode to a specific Menu:
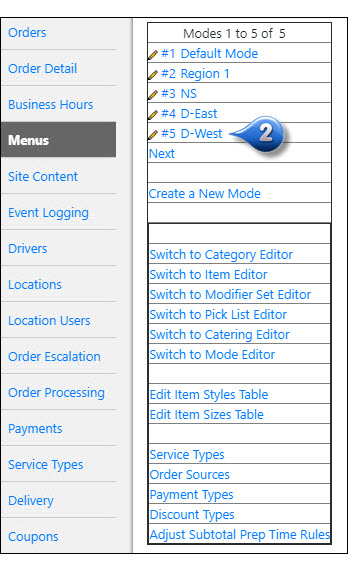
From the Menus Tab, click Switch to Mode Editor
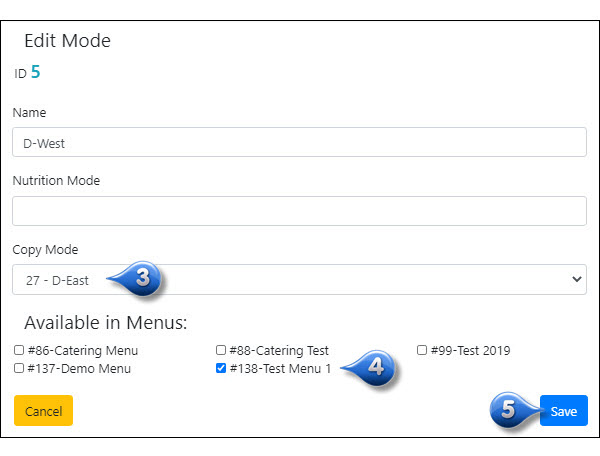
Click on the name of the specific Mode that you wish to add to a Menu
Select a Mode from the dropdown to copy, if you wish to copy an existing mode
Enable the checkbox to the left of the Menu(s) in which you would like to add this Mode
Click Save
Manage Modes
Use the  to accomplish the following tasks:
- Enable or disable mode items
- Update pricing by mode
- Remove items from mode
- Enter or edit External IDs (POS locations only)
Note: It is possible to update different modes from the page, without having to return to the main menu page. From the dropdown at the top of the window, select the mode you wish to edit next and click “Switch”. Select All Modes from the dropdown to show and make changes to all modes on one page
Enable or Disable Mode Items
To enable or disable items by mode:
From the Menus Tab, click the
next to menu name that contains the items that you wish to enable/disable. You can also drill down to the category or item level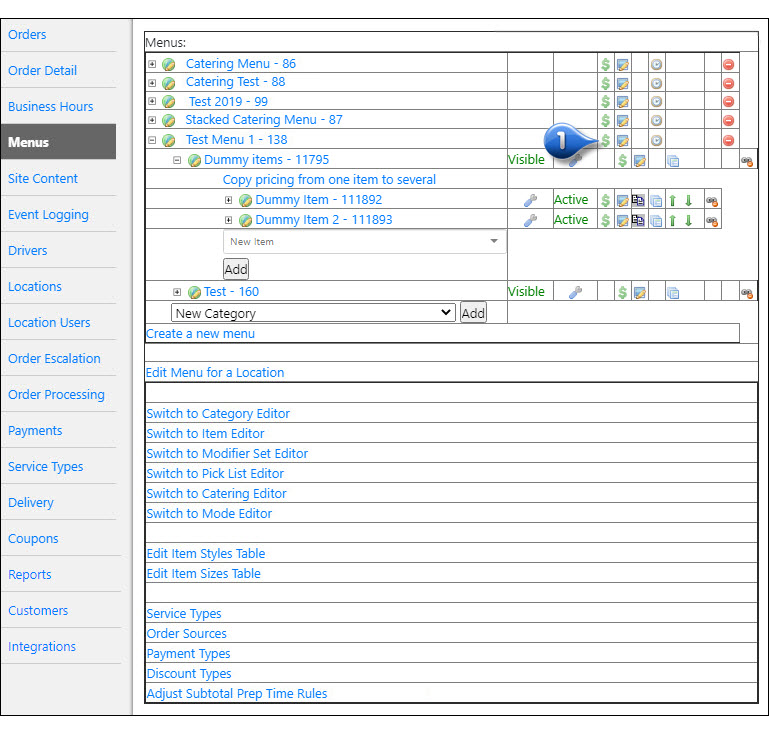
You are able to filter by modes by selecting from the dropdown, and clicking Switch
Click the
 to right of item or to the left of the category name to enable/disable multiple items in a mode category
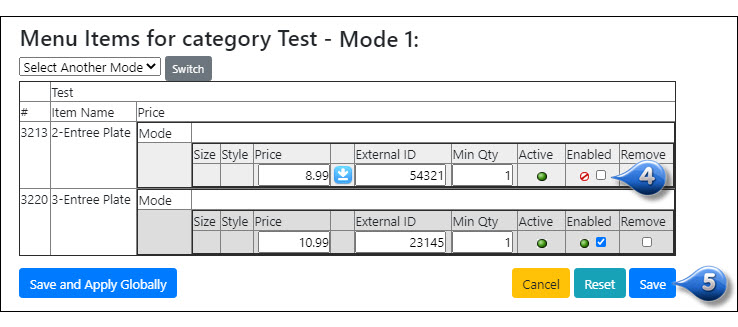
To enable items, click checkbox beside
 . To disable items, click checkbox beside
Click Save
Update Pricing by Mode
To update pricing by mode:
From the Menus Tab, click the
next to menu name that contains the items that you wish to update pricing for. You can also drill down to the category or item level
You are able to filter by modes by selecting from the dropdown, and clicking Switch
Click the
to right of item or to the left of the category name to update pricing for multiple items in a mode category
Enter/edit the item pricing
Click Save to save in the selected mode or Save and apply globally to apply pricing to all modes
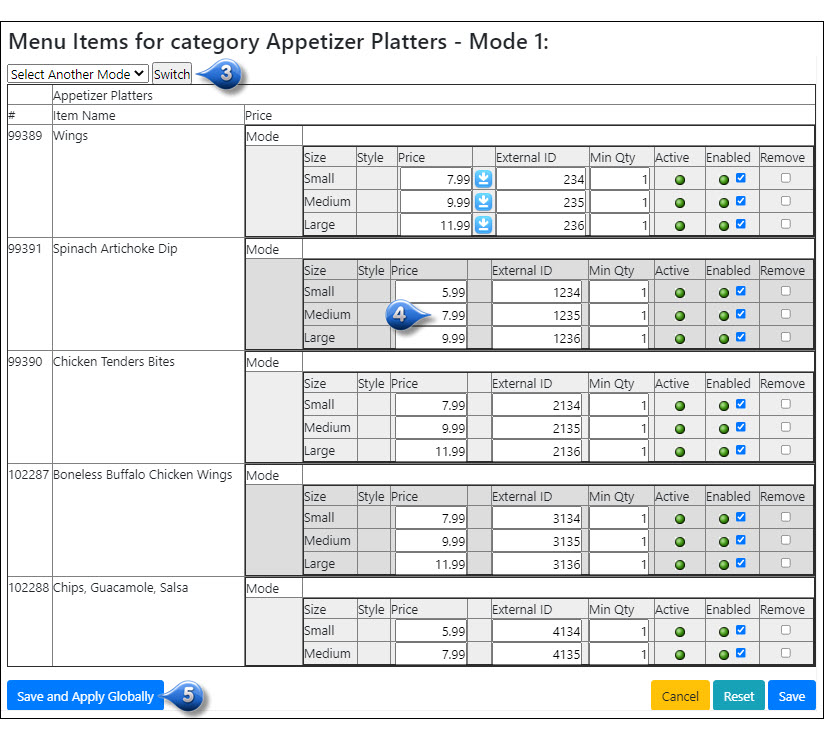
Note
You can use the blue arrow to automatically fill that item’s pricing, external ID, availability, and minimum quantity into the same sized item in all modes
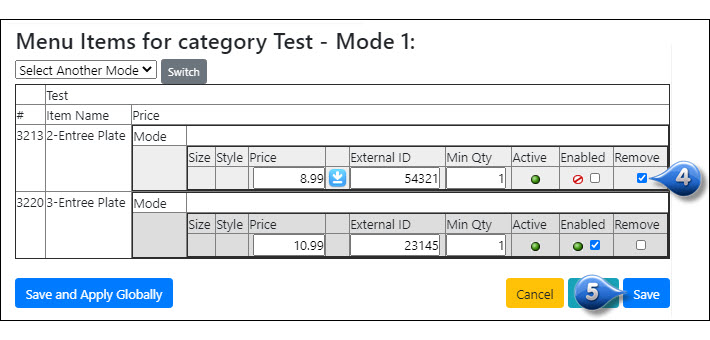
Remove Items from Mode
To remove items from a mode:
From the Menus Tab, click the
next to menu name that contains the items that you wish to remove from a mode. You can also drill down to the category or item level
You are able to filter by modes by selecting from the dropdown, and clicking Switch
Click the
to right of item or to the left of the category name
Click checkbox in Remove Column to the right of the item that you wish to remove from that mode
Click Save
Enter or edit External IDs (POS locations only)
To add/edit an External ID by mode:
From the Menus Tab, click the
next to menu name that contains the items that you wish to add/edit an External ID for. You can also drill down to the category or item level
You are able to filter by modes by selecting from the dropdown, and clicking Switch
Click the
to right of item or to the left of the category name
Enter the POS ID in the item’s External ID field
Click Save

Remove Mode from a Menu
To remove a Mode from a specific Menu:
From the Menus Tab, click Switch to Mode Editor
Click on the name of the specific Mode that you wish to remove from a Menu
Deselect/uncheck the checkbox to the left of the Menu in which you would like to remove this Mode
Click Save
Categories/Subcategories
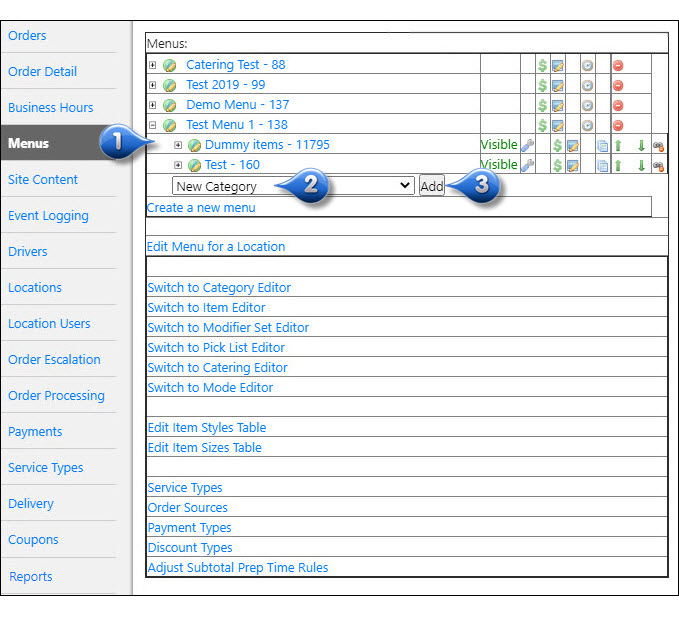
Create a New Category
To create a new category:
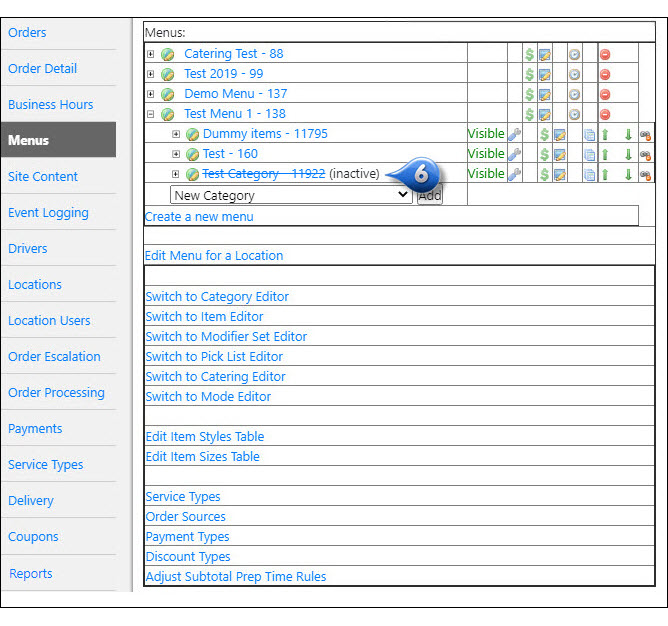
From the Menus Tab, drilldown to the category level on the menu that you wish to add the new category to
Select New Category
Click Add
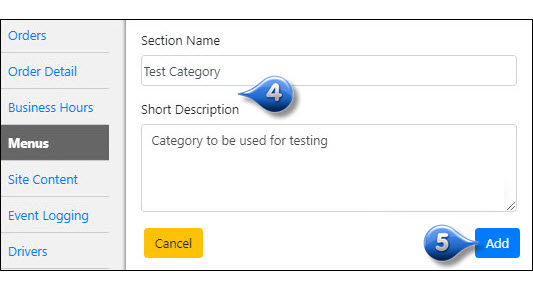
Enter a Name and Description for the new category
Click Add
Create a Subcategory
To create a subcategory:
From the Menus Tab, drilldown to the category level on the menu that you wish to add the new subcategory to
Select New Category
Click Add
Enter a Name and Description for the new subcategory
Click Add
Back on the Menus Tab, click on the name of the category that you just created
To make it a subcategory, select a Parent Category from the dropdown and make any other changes needed
Click Save
Edit an Existing Category
To edit an existing category:
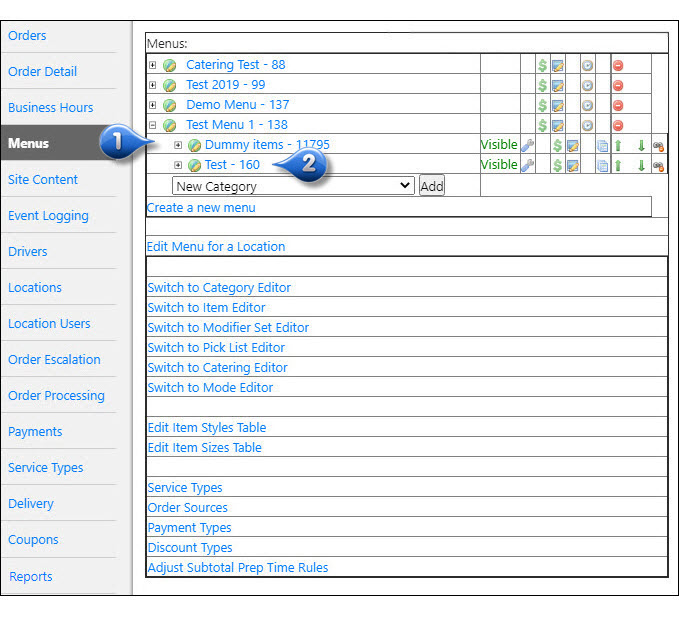
From the Menus Tab, drilldown to the category level on the menu that contains the category that you wish to edit
Click on the category name that you wish to edit
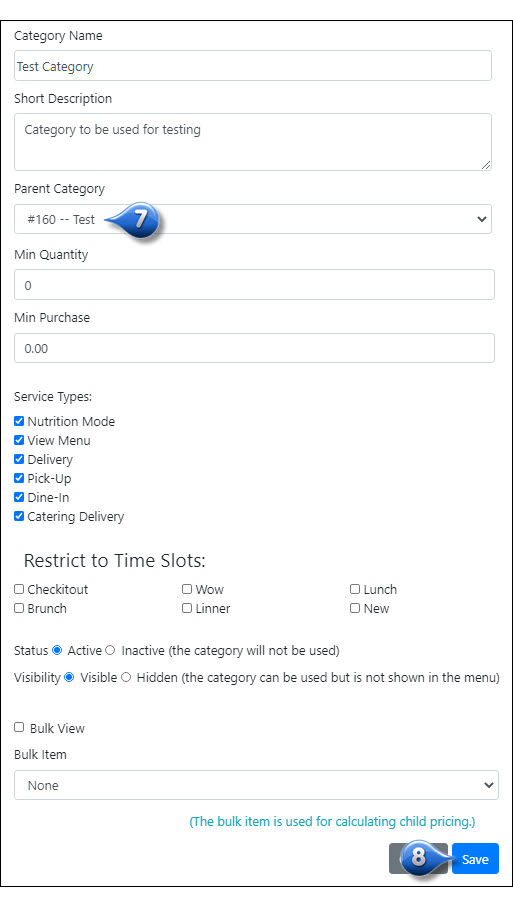
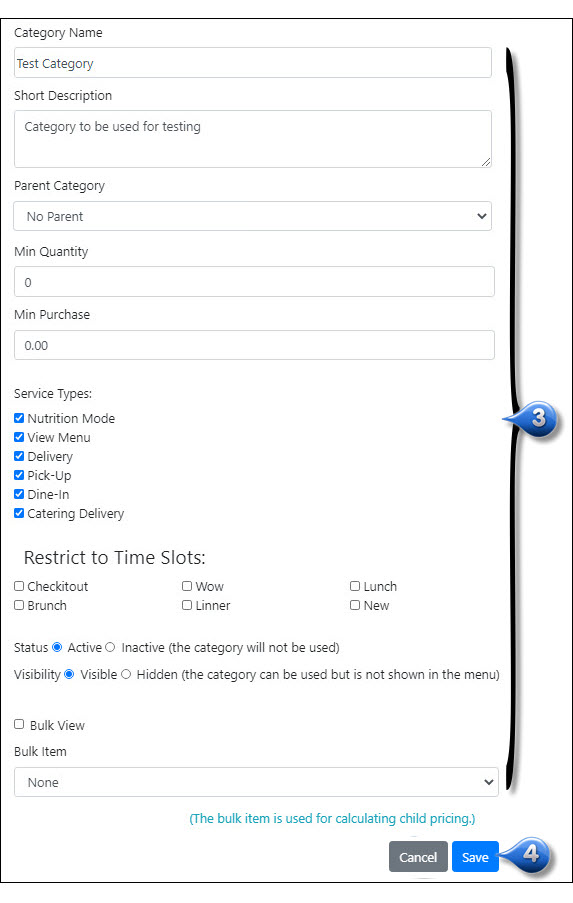
Enter/edit the category information, as needed
- Category Name: name of the category
- Short Description: a brief description of the category
- Parent Category: if this is a child category, choose the Parent Category from the dropdown or select No Parent
- Min Quantity: minimum quantity of the category
- Min Purchase: minimum purchase amount required for the category
- Service Types: check the box next to each service type in which this category should be available
- Restrict to Time Slots: if your chain has time slots enabled, select the time slots that the category should be available in
- Status: select if this new category should be Active or Inactive. Inactive means the category will not be used
- Visibility: select if this new category should be Visible or Hidden. Hidden means that the category can be used but is not shown in the menu
- Bulk View: enable checkbox if bulk view (quantity box) should be available for this category
- Bulk Item: select the appropriate bulk item from the dropdown
Click Save
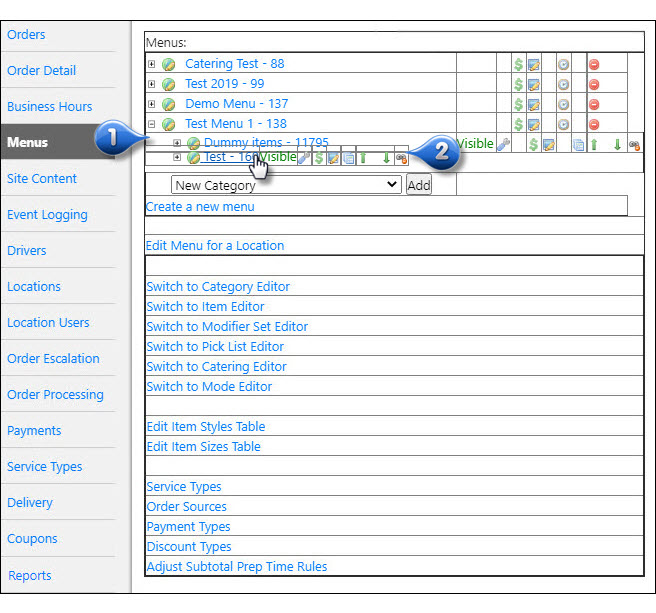
Delete a Category from a Menu
Drilldown to category or subcategory level
Click the
 to the far right to remove the category from the menu
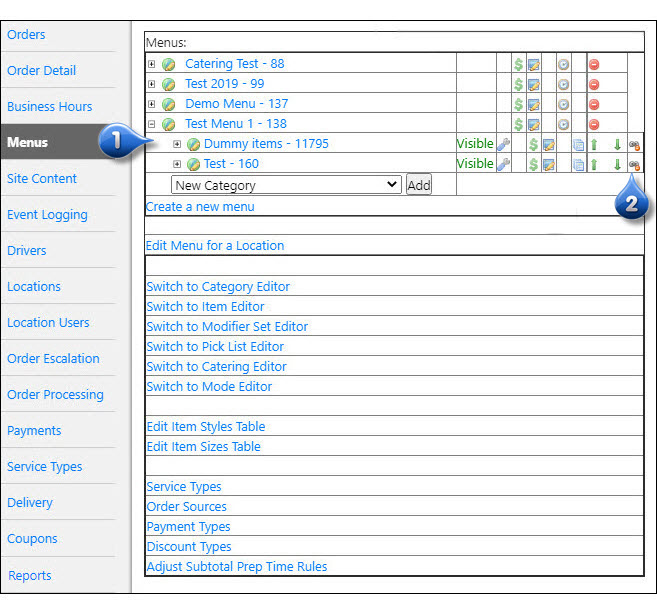
To Change the Category Display Order
Drilldown to category or subcategory level
Drag and drop the category to the desired location
Add Category Image
To add an image to a category:
Drilldown to category level
Click
 to the right of the category
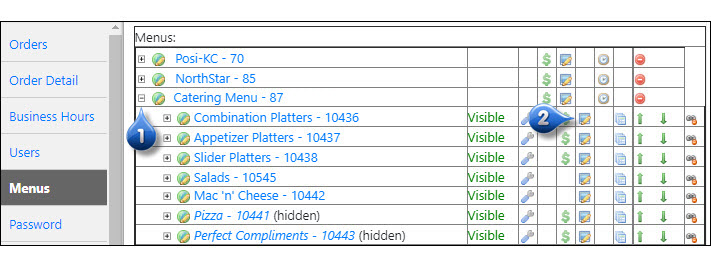
Click Choose File
Select the image file that you want to upload for the category
Click Upload
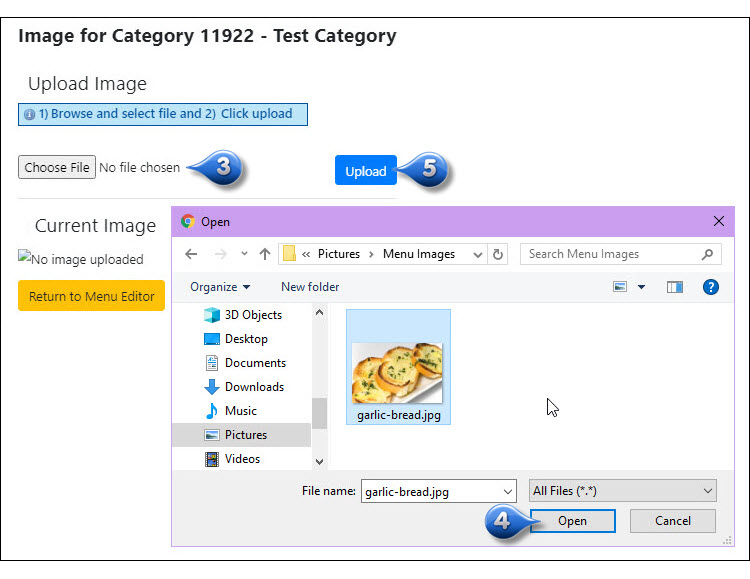
Note
Menu images need to be 400x300px in png format
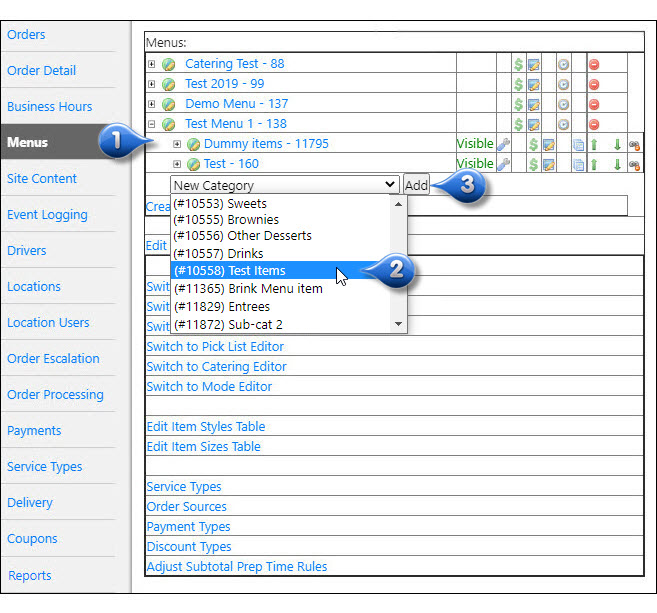
Add an Existing Category to Menu
To add an existing category to a Menu:
Drilldown to category level
Select an existing category from the dropdown
Click Add
Category Overrides
To override a category:
Drilldown to category level
Click the
 next to the category that you wish to override
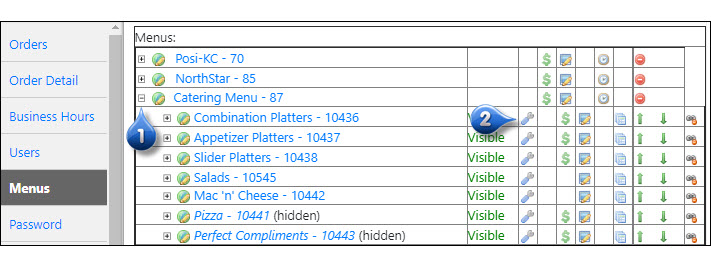
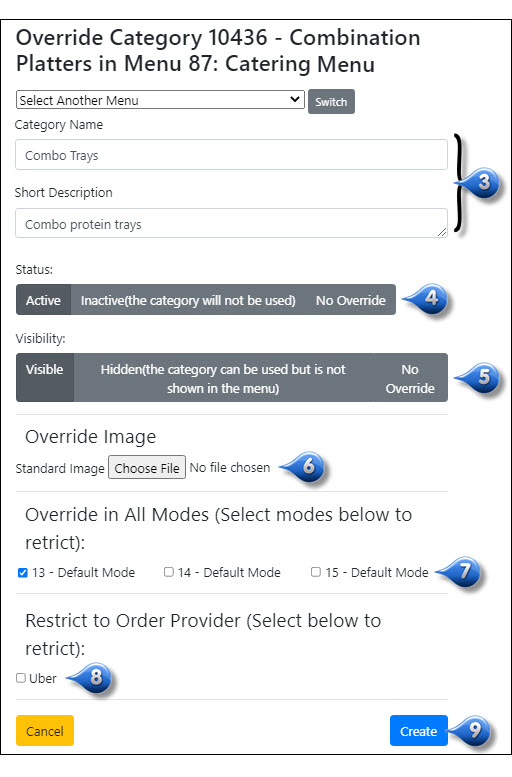
Enter override information
- Category Name: this is the new/alternate name of the category (e.g., Category is named Platters on Master Menu, but should be called Plates in southern states)
- Short Description: a brief description of the category
Under Status, select if this new category should be Active, Inactive, or No Override. Inactive means the category will not be used
Under Visibility, select if this new category should be Visible, Hidden, or No Override. Hidden means that the category can be used but is not shown in the menu
Under Override Image, you can override the standard image that appears
Check the boxes next to each mode in which the override should appear
Check the boxes next to specific Order Providers if the override should only apply to certain providers
Click Create
Items
For documentation regarding management of items, please see item
Manage Menu Pricing
Master Menu Pricing
Click the
next to menu name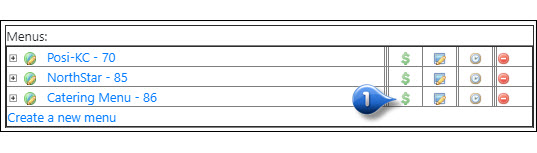
Click the
to right of item you wish to edit pricing for or click on the category name to bring up all items in that category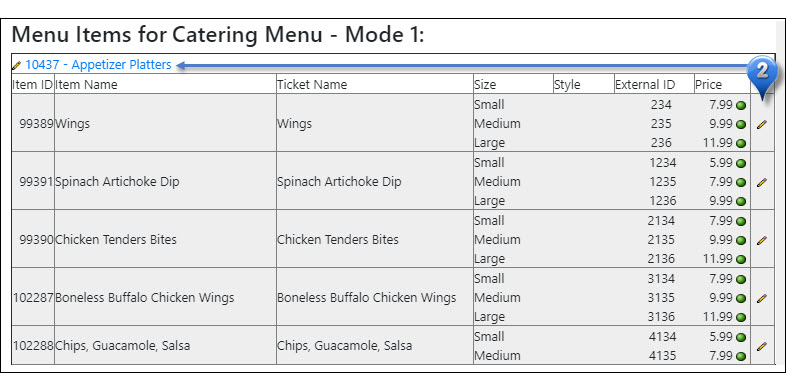
Enter/edit item pricing - use the blue arrow to automatically fill that item’s pricing, external ID, availability, and minimum quantity to the same sized item in all modes
Click Save to save in the selected mode or Save and apply globally to apply pricing to all modes
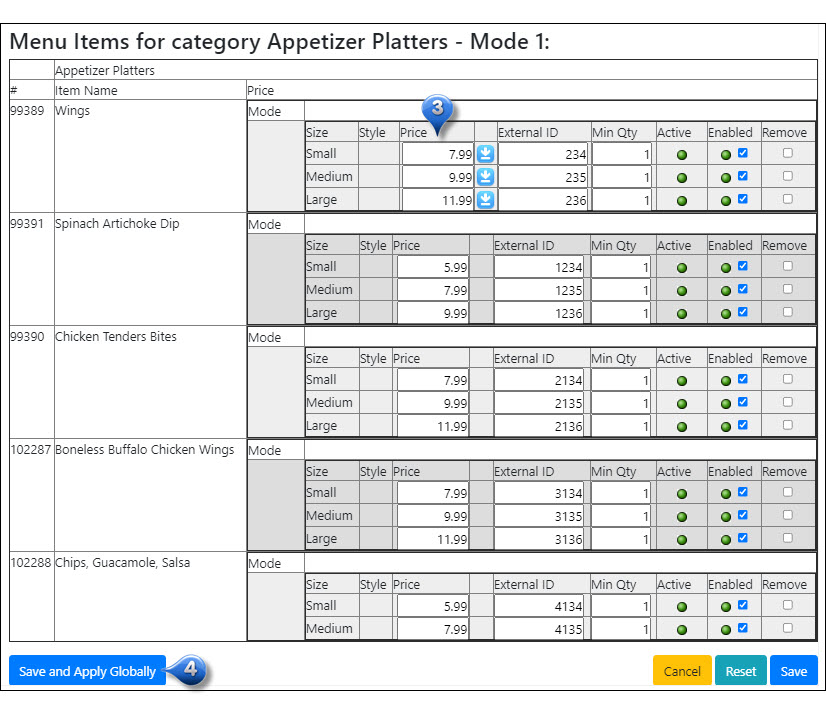
Note
You can use the blue arrow to automatically fill that item’s pricing, external ID, availability, and minimum quantity to the same sized item in all modes
Mode Pricing
Click the
next to menu name
Click the
to right of item you wish to edit pricing for or click on the category name to bring up all items in that category
Select All Modes from dropdown or select a specific mode to edit and click Switch
Enter/edit the item pricing
Click Save to save in the selected mode or Save and apply globally to apply pricing to all modes
Note
You can use the blue arrow to automatically fill that item’s pricing, external ID, availability, and minimum quantity to the same sized item in all modes
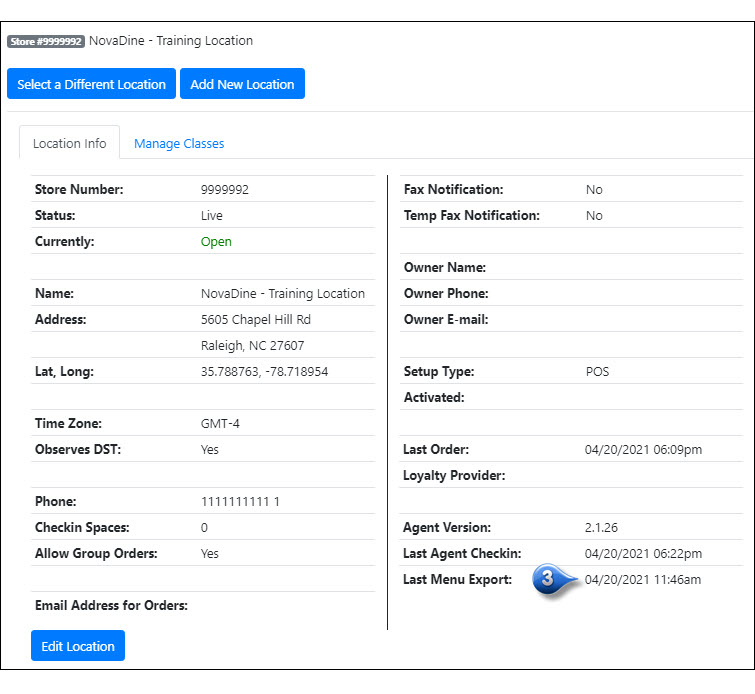
POS Menu Exports
As a POS location, your menu will export through the NovaDine Agent to the website. Verify the date of the last export before editing your menu to ensure the most up to date information has been exported.
Click the Locations Tab (the default tab upon login)
Enter your store number or any store information (city, state, zip) into the Store Search field and select from the dropdown
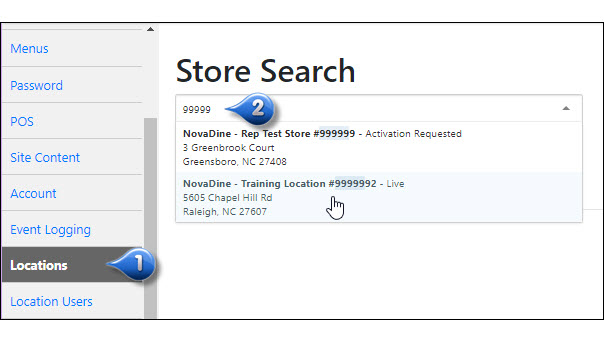
Verify Last Menu Export date to ensure it is current (usually early morning of current day)
Child Pricing
Child pricing is imported from your POS system. Once the store imports the menu, the pricing will be correct. If you want to test, set up all of the items, then export your lab’s menu and test using that test location.
Picklists
For documentation regarding management of picklists, please see Picklist Management